Modern websites don’t stop at one language, and neither should yours. Duplicated pages, messy routing, and hardcoded translations scattered across the codebase might sound complex. But with a headless CMS like Prismic and a framework like Next.js, you can centralize everything.
So how do you build a multilingual site without turning your project into a maintenance nightmare? We’ll walk through a practical approach to adding i18n support using Prismic. By the end, you’ll have a fully working multi-language website with clean routing, dynamic content, and a seamless language switcher.
Overview of the multi-language toolkit
Before jumping into implementation, here are the core pieces that make this setup work:
- Prismic CMS: manages your content and translations in one place.
- Next.js: handles routing, rendering, and performance.
- i18n configuration: defines supported locales and fallback logic.
- Middleware (proxy): detects the user’s language and automatically redirects.
- Language Switcher: lets users move between localized versions.
Together, these tools create a system where content, routing, and user experience stay perfectly in sync.
If you’re new to Prismic or evaluating headless CMS options, our guide on connecting Prismic CMS to popular frameworks covers the integration fundamentals across React, Vue, Next.js, and Nuxt.
Step 1 — create a Prismic repository
Everything starts with your content layer. First, go to prismic.io and sign in or create an account. Then, from the dashboard, click “Create repository” and select your framework. Next.js is used in this guide, but the approach applies broadly.
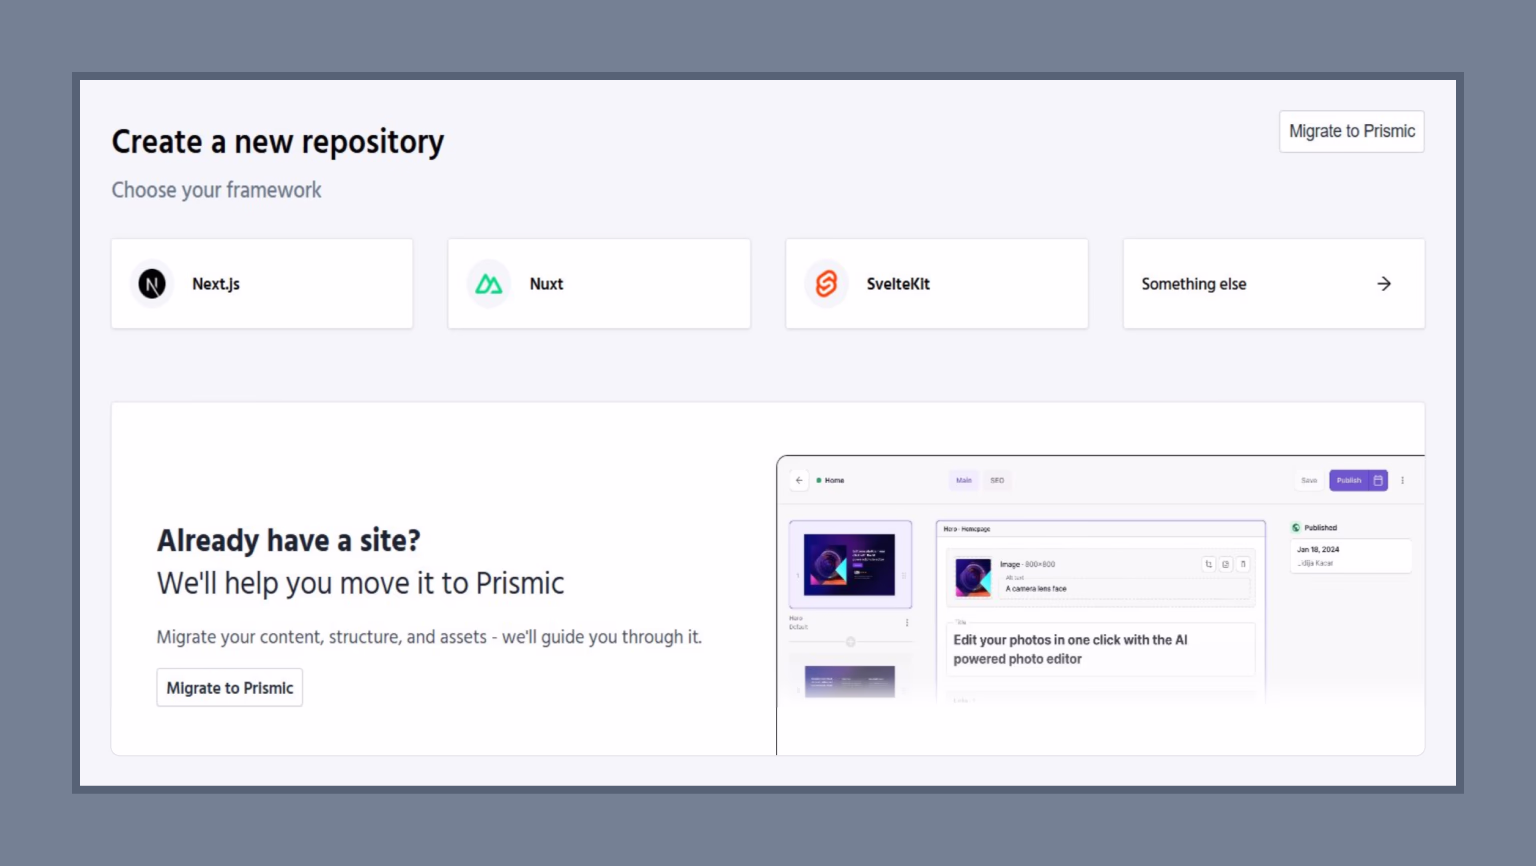
On the next screen, you’ll be asked how you want to start your project. For this guide, click on “Minimal starter.” This gives you a clean foundation — no unnecessary abstractions, just the essentials that you’ll build i18n on top of.

Next, fill in your repository name. This will become your Prismic API endpoint (e.g., my-site.prismic.io). You’ll also see the available plans — the Free plan is sufficient for this tutorial. After naming your repository, Prismic will generate a setup command for initializing your project locally.
Pro tip: The Free plan on Prismic supports up to 2 locales. If you need more languages, consider upgrading to the Starter plan ($15/month).

Step 2 — initialize the project
In order to set up the project, open your terminal, navigate to your projects folder, and run the command provided by Prismic. Here is the command:
npx @slicemachine/init@latest --repository your-repo-name --starter nextjs-starter-prismic-minimalYou might be wondering why you need this command. Well, it:
- Copies the minimal starter template into your current directory.
- Installs all required dependencies via npm.
- Connects the project to your Prismic repository.
- Opens a browser window to authenticate with Prismic.
At the bottom, you see the “Press any key to open the browser” message, which means the setup is paused until you authenticate with Prismic. Once you act on it, a browser window will open asking you to log in to Prismic. After logging in, you can close that tab.

Back in the terminal, you’ll see the initialization success message. When prompted to run Slice Machine, press Y. The tool is now active, as you can see below:
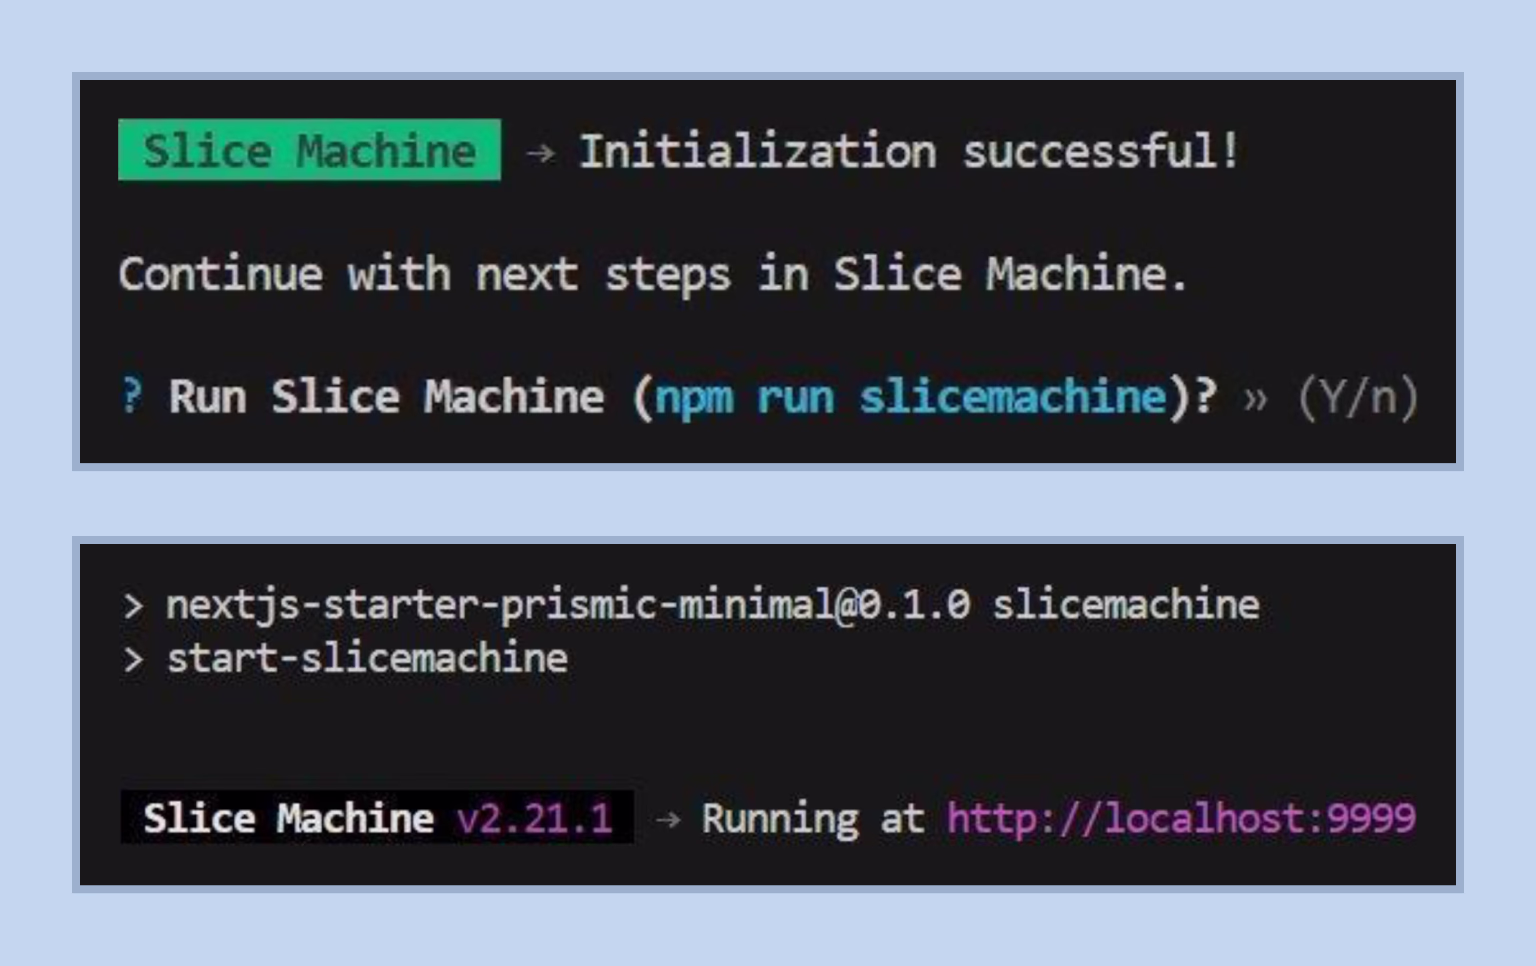
Think of Slice Machine as a local modeling tool that syncs your components and schemas with Prismic. It allows you to build website sections (called Slices) locally in your code editor and then “push” those structures to Prismic so content editors can use them.
Your next step after activating Slice Machine is opening http://localhost:9999 in your browser to see the Slice Machine UI. It shows your content types and slices. From that local URL, you can start creating your first Slices, defining their fields (like text, images, or links), and see them reflected in your Next.js project files.
Step 3 — configure locales in Prismic
At this point, your project is ready — but still single-language. Now we need to add the languages your website supports. For this, go to your Prismic dashboard and navigate to Settings > Translations & Locales.
Then, use the “Select a new locale” dropdown to add your second language and click “Add locale.” In this example, we’re adding Spanish (es-es), but you can add any locale supported by Prismic. This setup allows Prismic to store multiple versions of the same content — one per language.
Pro tip: You can also manage locales directly from the Prismic dashboard. The first locale you added becomes the master locale — the default language for your site.

Step 4 — set up i18n in your project
At this moment, you can add the i18n logic to your codebase. This involves three things: a config file for locales, a proxy (middleware) for automatic redirects, and updating our routes to include the locale in the URL. In the sections below, we explain each step in detail.
“With just one configuration file, all your locales are managed consistently — every language behaves predictably without touching the code.”
Install dependencies
First of all, you need two packages to handle locale detection from the browser’s Accept-Language header:
npm install negotiator @formatjs/intl-localematcher
npm install --save-dev @types/negotiator
The first command installs two packages into your project. <mark>negotiator</mark> helps detect a user’s preferred language, while <mark>@formatjs/intl-localematcher</mark> selects the best match from the locales your app supports.
The second command installs TypeScript type definitions for negotiator. These are used only during development and improve type safety without affecting your production build.
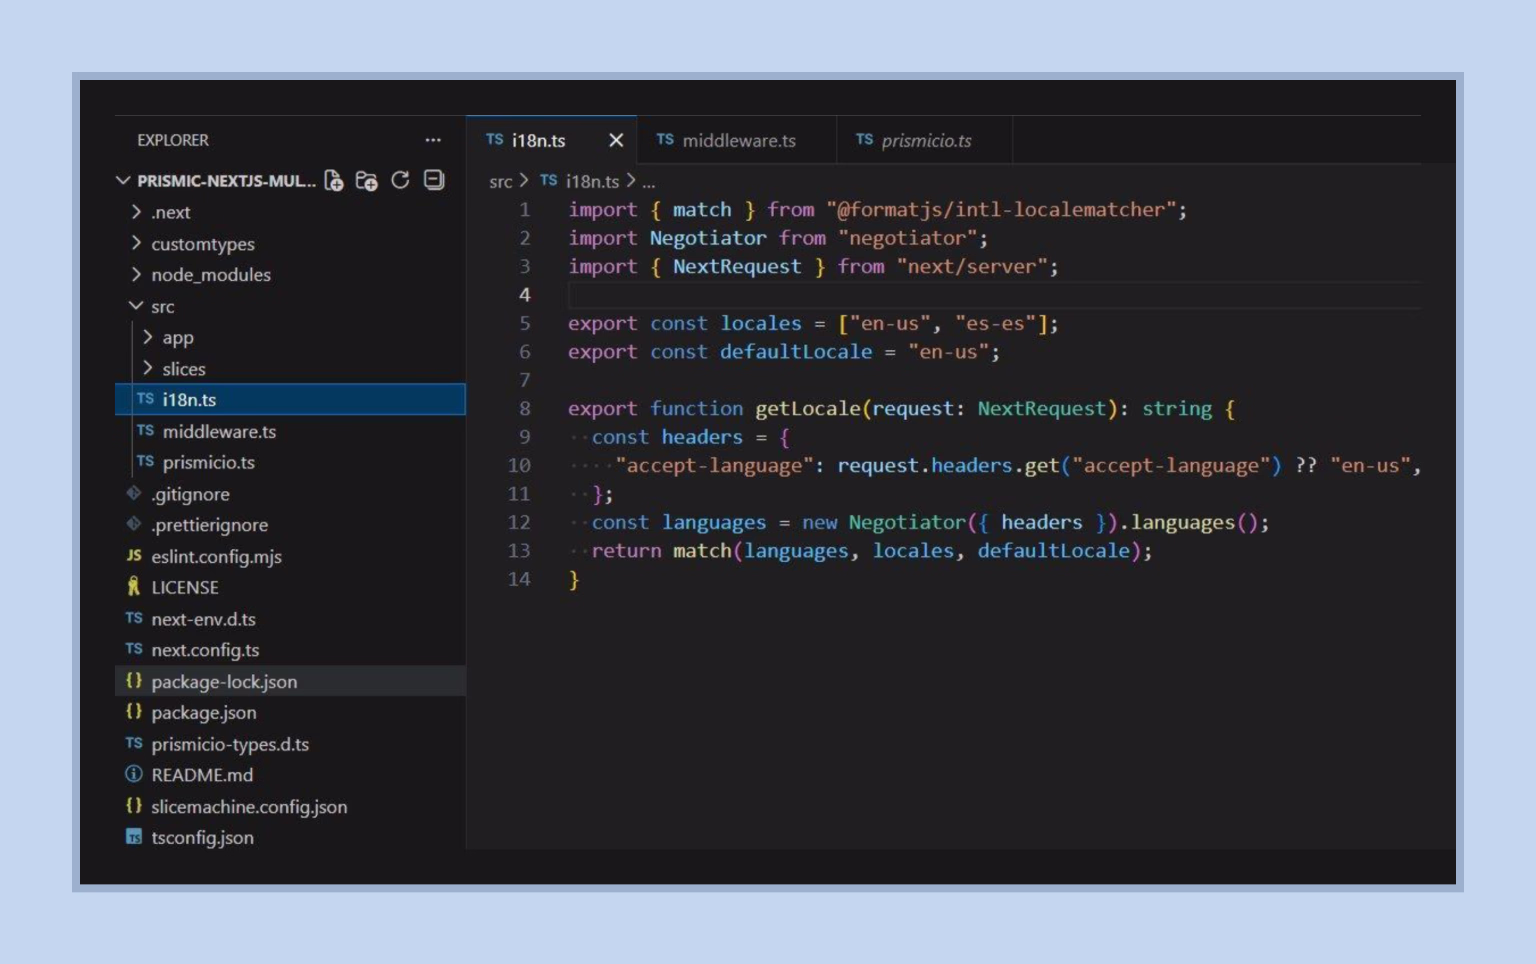
Create i18n.ts
The next thing you do is create a file called i18n.ts in your <mark>src/</mark> directory. This is the single source of truth for all locale configuration in your project. It defines:
- Supported languages;
- Default locale;
- Redirect logic;
- URL validation.
Here is what it looks like:
// src/i18n.ts
import { match } from "@formatjs/intl-localematcher";
import Negotiator from "negotiator";
import type { NextRequest } from "next/server";


// Supported locales. The first entry is used as the default locale.
export const locales = [
  { code: "en-us", name: "\u{1F1FA}\u{1F1F8} EN" },
  { code: "es-es", name: "\u{1F1EA}\u{1F1F8} ES" },
];


export const defaultLocale = locales[0].code;
export const localeCodes = locales.map((l) => l.code);


export function createLocaleRedirect(request: NextRequest): Response {
  const headers = { "accept-language": request.headers.get("accept-language") ?? defaultLocale };
  const languages = new Negotiator({ headers }).languages();
  const locale = match(languages, localeCodes, defaultLocale);
  request.nextUrl.pathname = `/${locale}${request.nextUrl.pathname}`;
  return Response.redirect(request.nextUrl);
}


export function pathnameHasLocale(request: NextRequest): boolean {
  const regexp = new RegExp(`^/(${localeCodes.join("|")})(/|$)`);
  return regexp.test(request.nextUrl.pathname);
}
Pro tip: Adding a new language later only requires updating this file (adding one line to the locales array in i18n.ts) — everything else adapts automatically.
In simple words, when someone opens your website, their browser secretly sends the “accept-language” header. This note might say something like “I prefer Spanish, but English is okay too.” Your code reads that note using the negotiator tool. That gives you a clean list of the user’s preferred languages, in order. After this, the matching tool compares the user’s preferences against the languages you support and selects the closest match.
Create proxy.ts
This step ensures users always land on the right version of your site without manual input. Once proxy.ts is created in your src/ directory, it runs on every request and redirects users to the correct locale URL if one isn’t already present in the path:
// src/proxy.ts
import type { NextRequest } from "next/server";
import { createLocaleRedirect, pathnameHasLocale } from "@/i18n";


export function proxy(request: NextRequest) {
  if (!pathnameHasLocale(request)) {
    return createLocaleRedirect(request);
  }
}


export const config = {
  // Apply to all routes except Next.js internals and static files
  matcher: ["/((?!_next|api|favicon.ico|slice-machine|.*\\..*).*)"],
};
Pro tip: In Next.js 15 and earlier, this file was called middleware.ts. In Next.js 16+, it’s been renamed to proxy.ts, and the exported function must also be named “proxy.”

Step 5 — update the routing structure
Now we make your application locale-aware. To achieve this, you need to add a <mark>[lang]</mark> dynamic segment to your routes so the locale becomes part of the URL. Move your existing page files into a new <mark>[lang]</mark> folder inside <mark>app/</mark>.
Before
In a Next.js App Router project, the <mark>app/</mark> folder holds all routes: <mark>page.tsx</mark> is the homepage (<mark>/</mark>), <mark>layout.tsx</mark> defines a shared layout with elements like headers and footers, and <mark>[uid]/page.tsx</mark> is a dynamic route where <mark>[uid]</mark> captures URL values. This structure sets up a homepage, a consistent layout, and dynamic pages based on the URL.
app/
  [uid]/page.tsx
  layout.tsx
  page.tsx
After
In this new structure, <mark>app/[lang]/page.tsx</mark> is a language-specific homepage (e.g., <mark>/en</mark>),<mark> [uid]/page.tsx</mark> is a dynamic subpage under that language (e.g., <mark>/en/123</mark>), and <mark>layout.tsx</mark> provides a shared layout for all pages in that language. The <mark>api/</mark> and <mark>slice-simulator/</mark> folders remain fixed for special routes or tools. This way, they create language-based routes with dynamic subpages and consistent layouts.
app/
  [lang]/
    [uid]/page.tsx
    layout.tsx
    page.tsx
  api/              <- do not move
  slice-simulator/  <- do not move
Adding <mark>[lang]</mark> to your routing structure improves SEO, keeps navigation predictable, and ensures each language gets its own URL.
![[lang] creates language-specific routes with dynamic pages/layout](https://cdn.prod.website-files.com/63fc977c14aaea404dce4439/69d901e7acc21d9244902928_%5Blang%5D%20creates%20language-specific%20routes%20with%20dynamic%20pageslayout.avif)
Locale-specific URLs matter for SEO because each language version living at its own URL (e.g., /en-us/about vs. /es-es/about) is the foundation for hreflang implementation, which tells Google which language version to show to which audience.
Step 6 — pass the locale to Prismic queries
Update each page file to extract the <mark>lang</mark> parameter from the URL and pass it to Prismic API requests.This step presupposes updating each page file to extract the lang parameter from the URL and pass it to Prismic API requests. This tells Prismic to return content in the correct language.
app/[lang]/page.tsx (homepage)
Let’s start with the homepage. So, the async <mark>Home</mark> component waits for a <mark>lang</mark> parameter from the URL, fetches the corresponding language-specific homepage content from a CMS, and renders it using <mark>SliceZone</mark> with the appropriate slices and components.
type Params = { params: Promise<{ lang: string }> };


export default async function Home({ params }: Params) {
  const { lang } = await params;
  const client = createClient();
  // Pass lang to fetch content in the correct locale
  const home = await client.getByUID("page", "home", { lang });
  return <SliceZone slices={home.data.slices} components={components} />;
}
This is what an updated <mark>page.tsx</mark> looks like:

app/[lang]/[uid]/page.tsx (dynamic pages)
The dynamic pages file also needs to be updated. Fetch all pages for all locales using lang: <mark>"*",</mark> then return <mark>page.lang</mark> directly from the Prismic document — no manual locale mapping needed:
export async function generateStaticParams() {
  const client = createClient();
  // Fetch pages for all locales
  const pages = await client.getAllByType("page", {
    lang: "*",
    filters: [filter.not("my.page.uid", "home")],
  });
  // lang comes directly from the Prismic document
  return pages.map((page) => ({
    lang: page.lang,
    uid: page.uid,
  }));
}Pro tip: With 5+ locales and hundreds of pages, <mark>lang: "*"</mark> can push deploy times to 10–20 minutes. For large content sets, switch to ISR (<mark>revalidate</mark>) or on-demand revalidation using Prismic webhooks.
app/[lang]/layout.tsx
The next thing you must do is update the layout to pass the current locale to the <mark>html</mark> tag — this is important for SEO and accessibility. Make sure PrismicPreview is inside <mark>body</mark>:
export default async function RootLayout({ children, params }: Props) {
  const { lang } = await params;
  return (
    <html lang={lang}>
      <body>
        <LanguageSwitcher lang={lang} />
        {children}
        <PrismicPreview repositoryName={repositoryName} />
      </body>
    </html>
  );
}
prismicio.ts (updating route resolvers)
This is an easy step to miss, but it is important for production. Prismic uses route resolvers to generate URLs for links inside your content when an editor adds a link to another page in the CMS. Without the <mark>/:lang</mark> prefix, those links will be generated without the locale, breaking internal navigation.
You should update the routes in prismicio.ts to include the locale segment:
const routes: Route[] = [
  { type: "page", uid: "home", path: "/:lang" },
  { type: "page", path: "/:lang/:uid" },
];
Pro tip: Without <mark>/:lang</mark> in route resolvers, links between pages generated by Prismic will be missing the locale prefix. Your site will still work for direct visits, but internal CMS links will point to the wrong URLs.
This is the point where real-world implementations most often diverge from tutorials. Custom slice types, shared Settings documents, or domain-based locale routing all require additional architecture decisions before you go further. If you’re adapting this for production, consider working with a team experienced in Prismic development services to identify gaps before they reach your users.
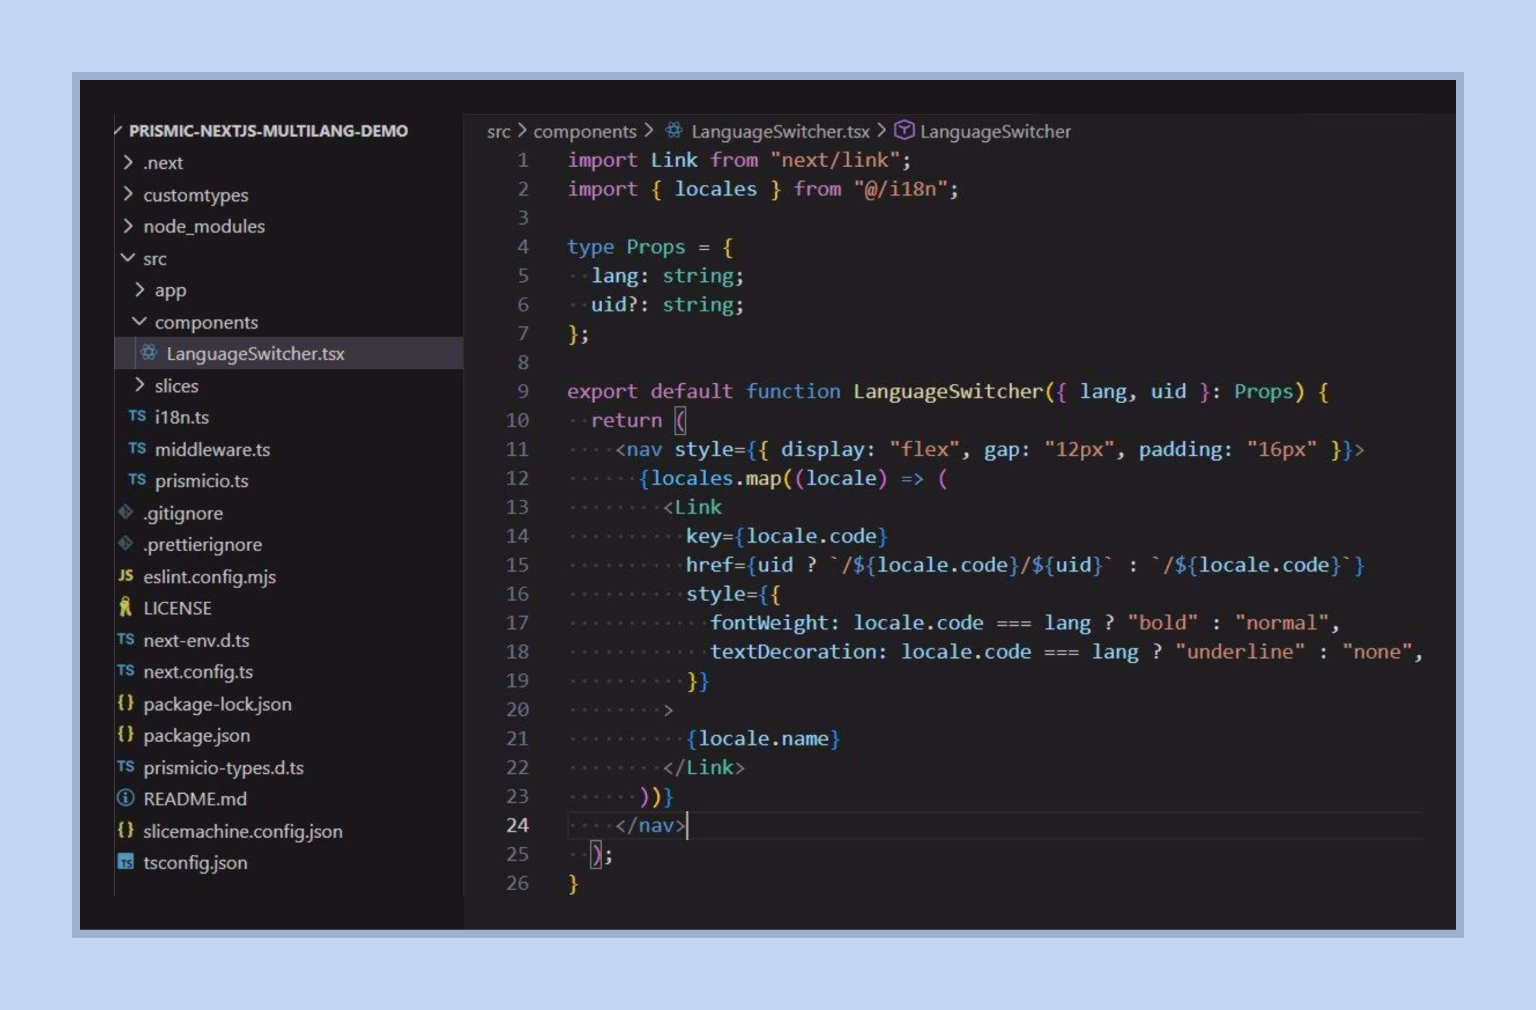
Step 7 — build the language switcher
The <mark>Language Switcher</mark> is a simple but powerful navigation component that renders a link for each supported locale. It uses the locales array from <mark>i18n.ts</mark> as its single source of data — so adding a new language only requires updating i18n.ts.
In technical terms, the <mark>LanguageSwitcher</mark> takes <mark>lang</mark> (current language code) and an optional <mark>uid</mark> (page identifier) as props, loops over available <mark>locales</mark>, and creates a <mark>Link</mark> for each (either <mark>/${locale.code}</mark> for the homepage or <mark>/${locale.code}/${uid}</mark> for dynamic pages).
// src/components/LanguageSwitcher.tsx
import Link from "next/link";
import { locales } from "@/i18n";


type Props = { lang: string; uid?: string };


export default function LanguageSwitcher({ lang, uid }: Props) {
  return (
    <nav style={{ display: "flex", gap: "12px", padding: "16px" }}>
      {locales.map((locale) => (
        <Link
          key={locale.code}
          href={uid ? `/${locale.code}/${uid}` : `/${locale.code}`}
          style={{
            fontWeight: locale.code === lang ? "bold" : "normal",
            textDecoration: locale.code === lang ? "underline" : "none",
          }}
        >
          {locale.name}
        </Link>
      ))}
    </nav>
  );
}
The switcher works purely through routing — clicking a language link navigates to the same page URL but with a different locale prefix. No JavaScript state management required, and each language gets its own unique URL, which is great for SEO.
Step 8 — add translated content in Prismic
With the code in place, the last step is to create translated versions of your content in Prismic. Navigate to your Prismic dashboard and open any page document. Select the document you want to translate (e.g., Homepage), then click “Copy to another locale” in the top toolbar. Below, you can check if you’re doing everything right.

At this moment, Prismic gives you two options:
- Copy all content. It creates a copy of the document in the target language with all the same content. You then manually translate the text fields. This is the best option when you want full control over the translation.
- Translate with AI. In this case, Prismic automatically translates the entire document using AI. You get 5 free translations on the Free plan. This option is perfect for quick prototyping or when you trust the AI translation quality for your use case.
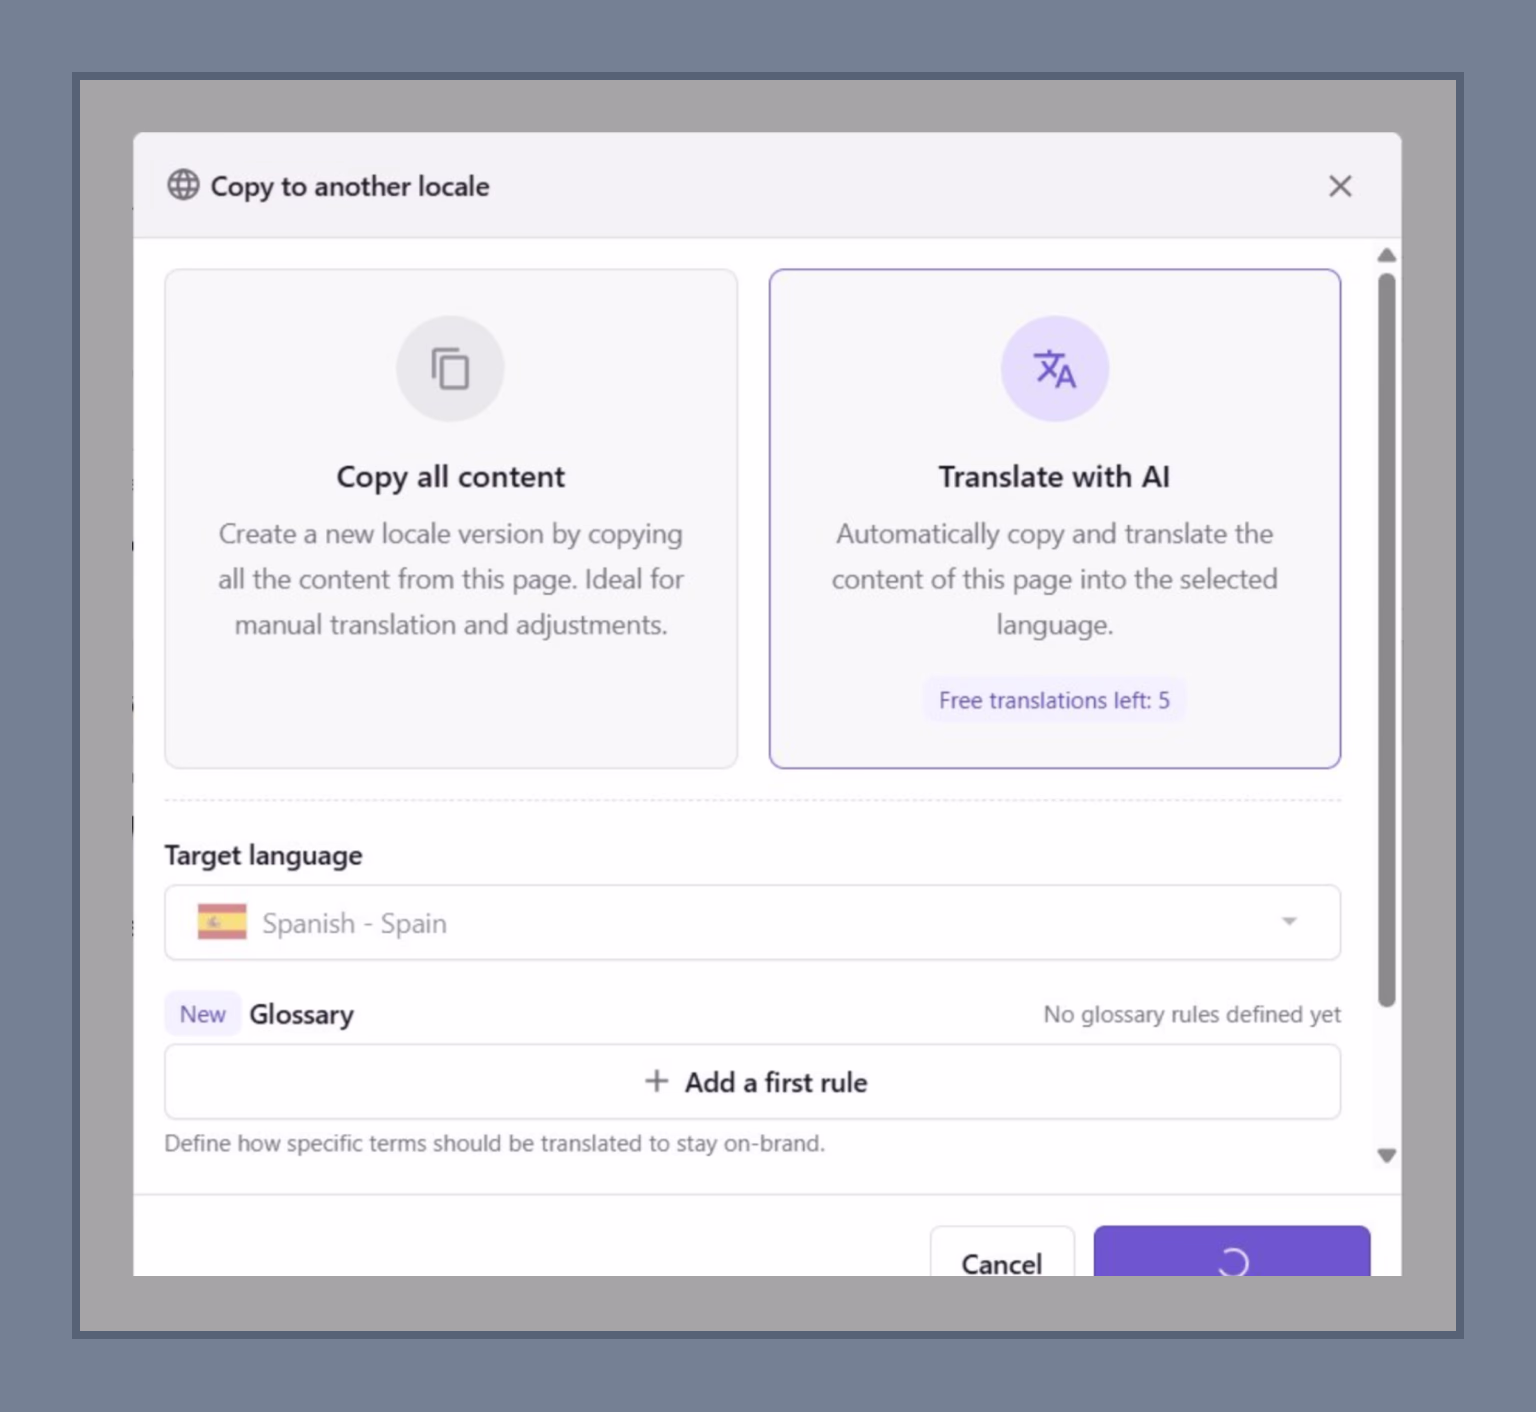
After translating, you’ll see the content in the target language ready to review and edit. It’s worth mentioning that Slices (components) themselves don’t need to be translated — they’re just React templates. Only the content fields inside documents (titles, text, images) need translated versions in Prismic. When the translation is ready, click Publish to make the translated content live.
Pro tip: Hardcoded UI text (like button labels or UI strings) won’t be translated by Prismic. Consider adding those strings as fields in a shared Settings document in Prismic, or use a separate i18n library for UI strings.
Step 9 — adding new pages
One of the biggest advantages of this setup is that adding new pages requires zero code changes. This is where the setup really pays off, since everything is handled through the Prismic dashboard. To add a new page, you need to:
Create the page in Prismic
First, you go to your Prismic dashboard and click “Create a new page.” Fill in the required fields:
- UID — the URL slug for this page (e.g., about will become /en-us/about);
- Title — the page title;
- Add Slice — add a RichText slice or any other slice and fill in the content;
- Click Publish.

Add the translated version
When the page is published in the master locale, click “Copy to another locale” and choose “Translate with AI” to instantly create the Spanish version (in our case) or your chosen locale. Review the translation and click “Publish” again.

Change no code — the page appears automatically
Since <mark>generateStaticParams</mark> uses <mark>lang: *</mark>, it automatically retrieves all published pages across every locale. This allows your content team to create and translate pages entirely from the Prismic dashboard without touching the codebase.
Editors focus on content, developers focus on code — the setup ensures everyone works in parallel without blocking each other.
Result — a multilingual site
After publishing the translated content, your multi-language website is fully working. The Language Switcher highlights the current locale in bold. Switching languages takes you to the same page in another locale, loading content from Prismic in that language.
You can visit the site to see it in action:

Checklist
Here’s what we configured to support multiple languages:
- Prismic repository with 2 locales (Settings > Translations & Locales).
- <mark>i18n.ts — central config for all locale settings
- <mark>proxy.ts</mark> — redirects requests to the correct locale URL.
- <mark>app/[lang]/</mark> — locale-based routing for all pages.
- <mark>{ lang }</mark> passed to every Prismic query for correct content.
- <mark>LanguageSwitcher</mark> — reads <mark>i18n.ts</mark>, handles routing, SEO-friendly.
- Translated content in Prismic via manual copy or AI.
Launch your multi-language site with ease
With this setup, your website can seamlessly support multiple languages. Centralized content in Prismic, locale-aware routing in Next.js, and a simple, SEO-friendly language switcher let your team add or translate pages without touching code. AI-powered translation speeds up prototyping, while manual control ensures accuracy. The result is a dynamic, fully localized site ready for any audience.
{{banner}}
FAQ
Why invest in branding services services services?
Does this setup work with server-side rendering (SSR)?
Yes. The [lang] routing structure and Prismic queries work with both static generation (SSG) and SSR. For SSR, simply remove generateStaticParams and use dynamic rendering — the params.lang extraction works identically. For sites with large numbers of pages or locales, SSR with caching or ISR is often a better fit than full static generation.
Can content editors add a new locale without a developer?
Partially. An editor can add a new locale in the Prismic dashboard and start creating translated documents. However, the new locale code also needs to be added to i18n.ts in the codebase for routing and middleware to recognize it.
Does this work with RTL languages like Arabic or Hebrew?
The routing and Prismic query structure work for any locale. The lang attribute on the <html> tag handles browser-level text direction automatically for RTL locales. For component-level RTL styling, you’ll need to add directional CSS or use CSS logical properties.
What’s the build time impact with 5+ locales?
With generateStaticParams and lang: "*", every page is pre-built for every locale at deploy time. With 2 locales and 50 pages, that’s 100 builds — fast. With 5 locales and 500 pages, that’s 2,500 builds, which can push deploy times significantly.
How do I handle Prismic links between pages in the CMS?
When a content editor creates a link to another Prismic page inside the CMS, Prismic uses these resolvers to generate the URL. As long as /:lang is included in your resolver paths, all internal CMS links will include the correct locale prefix automatically.