You’ve just been asked to spin up a Staging environment. Simple enough — until you open your Terraform repository and find a single main.tf file pushing 400 lines, with networking, databases, and application logic all tangled together. Duplicating it feels wrong. Refactoring it feels risky. So how do you move forward?

As your AWS stack grows — adding services like App Runner, RDS PostgreSQL, ElastiCache, and Secrets Manager — this structure quickly becomes unmanageable. What starts as a simple setup turns into a codebase that’s hard to read, difficult to maintain, and nearly impossible to reuse.
In this guide, we’ll walk through a practical approach to solving this problem using a modular Terraform architecture tailored to a real-world AWS stack.
Breaking down infrastructure with Terraform modules
To address scalability challenges, we need to move from a single, monolithic configuration to a modular architecture built with Terraform modules.
A module acts as a reusable container for a group of related resources. Instead of managing everything in one large configuration file, the infrastructure is split into isolated, logical components, each responsible for a specific part of the system:
- Networking handles the VPC, public/private subnets, Internet Gateway, and Security Groups.
- Database provisions the RDS PostgreSQL instance and securely manages credentials via AWS Secrets Manager.
- Cache sets up the ElastiCache Redis cluster.
- AppRunner configures the compute layer, managing container deployments, IAM roles, and VPC connectors.
These modules are then orchestrated from a single root main.tf file, which acts as a control layer — passing variables between modules and exposing outputs where needed. This follows the same principle of isolated responsibilities we explored in our breakdown of monolithic vs. microservices architecture.
Building the modules
In the sections below, we explain all four modules — detailing their functions, reasons for their structure, and key points to watch for in code.
Networking — the foundation
The networking module establishes the foundation for the entire infrastructure, including the VPC, subnets, and Internet Gateway. Security Groups are also defined here — rather than being split into separate files — keeping all network-level access control centralized and easier to manage.
The example below demonstrates how private subnets can be generated dynamically using Terraform’s count meta-argument. Instead of defining each subnet manually, a single resource block creates multiple isolated subnets across different availability zones, helping ensure high availability from the outset.
# modules/networking/main.tf (Snippet)


# Dynamically generate 2 private subnets for high availability
resource "aws_subnet" "private" {
  count             = 2
  vpc_id            = aws_vpc.main.id
  cidr_block        = cidrsubnet(var.vpc_cidr, 2, count.index + 1)
  availability_zone = data.aws_availability_zones.available.names[count.index % length(data.aws_availability_zones.available.names)]


  tags = merge(
    var.common_tags,
    {
      Name = "${var.resource_prefix}-private-subnet-${count.index + 1}"
      Type = "Private"
    }
  )
}


# (Note: VPC, Internet Gateway, and Security Groups are also configured here.
# See the GitHub repo for the full networking code).
Database — secrets first
Storing plaintext passwords in Terraform state files introduces a serious security risk. To avoid this, the database module integrates AWS Secrets Manager from the start, ensuring that credentials are securely handled as part of the provisioning process.
In this setup, the database password is stored in a managed secret, while Terraform references it during resource creation. The example below shows how these components work together:
# modules/database/main.tf (Snippet)


# Create the Secret in AWS Secrets Manager
resource "aws_secretsmanager_secret" "db_password" {
  name                    = "${var.resource_prefix}/db-password"
  recovery_window_in_days = var.environment == "prod" ? 30 : 0#0 = immediate deletion in non-prod
}


# Store the password value in the Secret
resource "aws_secretsmanager_secret_version" "db_password" {
  secret_id     = aws_secretsmanager_secret.db_password.id
  secret_string = var.db_password
}


# Provision the Database into the private subnets
resource "aws_db_instance" "postgres" {
  identifier           = "${var.resource_prefix}-db"
  engine               = "postgres"
  instance_class       = var.db_instance_class

  username             = var.db_username
  password             = var.db_password # Passed from variables, stored securely

  db_subnet_group_name = aws_db_subnet_group.main.name
  publicly_accessible  = false
  # ... (Backup and storage configurations omitted for brevity)
}
Cache — staying private
Redis is placed directly into the private subnets defined in the networking module — keeping it fast, secure, and inaccessible from the public internet. Notice how subnet_ids pulls the subnet array dynamically rather than relying on hardcoded values.
# modules/cache/main.tf (Snippet)


resource "aws_elasticache_subnet_group" "redis" {
  name       = "${var.resource_prefix}-redis-subnet-group"
  # Pulling in the array of private subnets dynamically
  subnet_ids = var.private_subnet_ids
}


resource "aws_elasticache_cluster" "redis" {
  cluster_id           = "${var.resource_prefix}-redis"
  engine               = "redis"
  node_type            = var.redis_node_type
  num_cache_nodes      = var.redis_num_cache_nodes
  subnet_group_name    = aws_elasticache_subnet_group.redis.name
  security_group_ids   = [var.redis_security_group_id]
}
AppRunner — connecting the dots
This is the module where all previous layers come together. The VPC connector provides App Runner with a private bridge to the database and cache — without it, those resources would remain inaccessible.
Equally important is the distinction between <mark>runtime_environment_variables</mark> and <mark>runtime_environment_secrets:</mark> standard variables are suitable for non-sensitive configuration, but the database password is retrieved directly from AWS Secrets Manager via IAM at runtime, meaning it never appears in plaintext anywhere in the deployment.
# modules/apprunner/main.tf (Snippet)


# 1. Create a bridge to our private subnets
resource "aws_apprunner_vpc_connector" "main" {
  vpc_connector_name = "${var.resource_prefix}-vpc-connector"
  subnets            = var.private_subnet_ids
  security_groups    = [var.apprunner_security_group_id]
}


# 2. Define the AppRunner Service
resource "aws_apprunner_service" "app" {
  service_name = "${var.resource_prefix}-service"


  source_configuration {
    image_repository {
      image_identifier      = var.app_image_uri
      image_repository_type = "ECR"


      image_configuration {
        # Standard Environment Variables
        runtime_environment_variables = {
          DATABASE_HOST = var.db_host
          DATABASE_USER = var.db_username
          REDIS_HOST    = var.redis_host
          NODE_ENV      = var.environment
        }


        # Secure Secrets (Pulled via IAM role at runtime)
        runtime_environment_secrets = {
          DATABASE_PASSWORD = var.secrets_manager_secret_arn
        }
      }
    }
  }


  network_configuration {
    egress_configuration {
      egress_type       = "VPC"
      vpc_connector_arn = aws_apprunner_vpc_connector.main.arn
    }
  }
}
“Each module manages a single layer of the stack, keeping the infrastructure organized, reusable, and secure.”
Automating the deployment
A modular Terraform architecture solves the problem of organization — but without an automated pipeline, deployments still rely on a series of manual steps. Building Docker images, authenticating with AWS, pushing to ECR, and running Terraform commands one by one quickly becomes inefficient and error-prone.
To fully realize the benefits of a modular setup, these steps need to be streamlined into a repeatable deployment process.
If you have not yet set up the underlying AWS stack, our guide on deploying a website with App Runner, RDS, and ElastiCache covers the manual foundation this automation builds upon.
Setting up the local environment
The setup below targets Windows 11 development machines specifically. Before running the deployment script, the following tools need to be installed and configured:
- Terraform: download the Windows executable from HashiCorp, place it in a dedicated folder, and add that folder path to Windows System Environment Variables.
- AWS CLI: download and run the AWS CLI MSI installer for Windows. Once installed, run <mark>aws configure</mark> to securely link the local machine to the AWS account.
- Docker Desktop: install Docker Desktop for Windows, which leverages WSL2 for native performance.
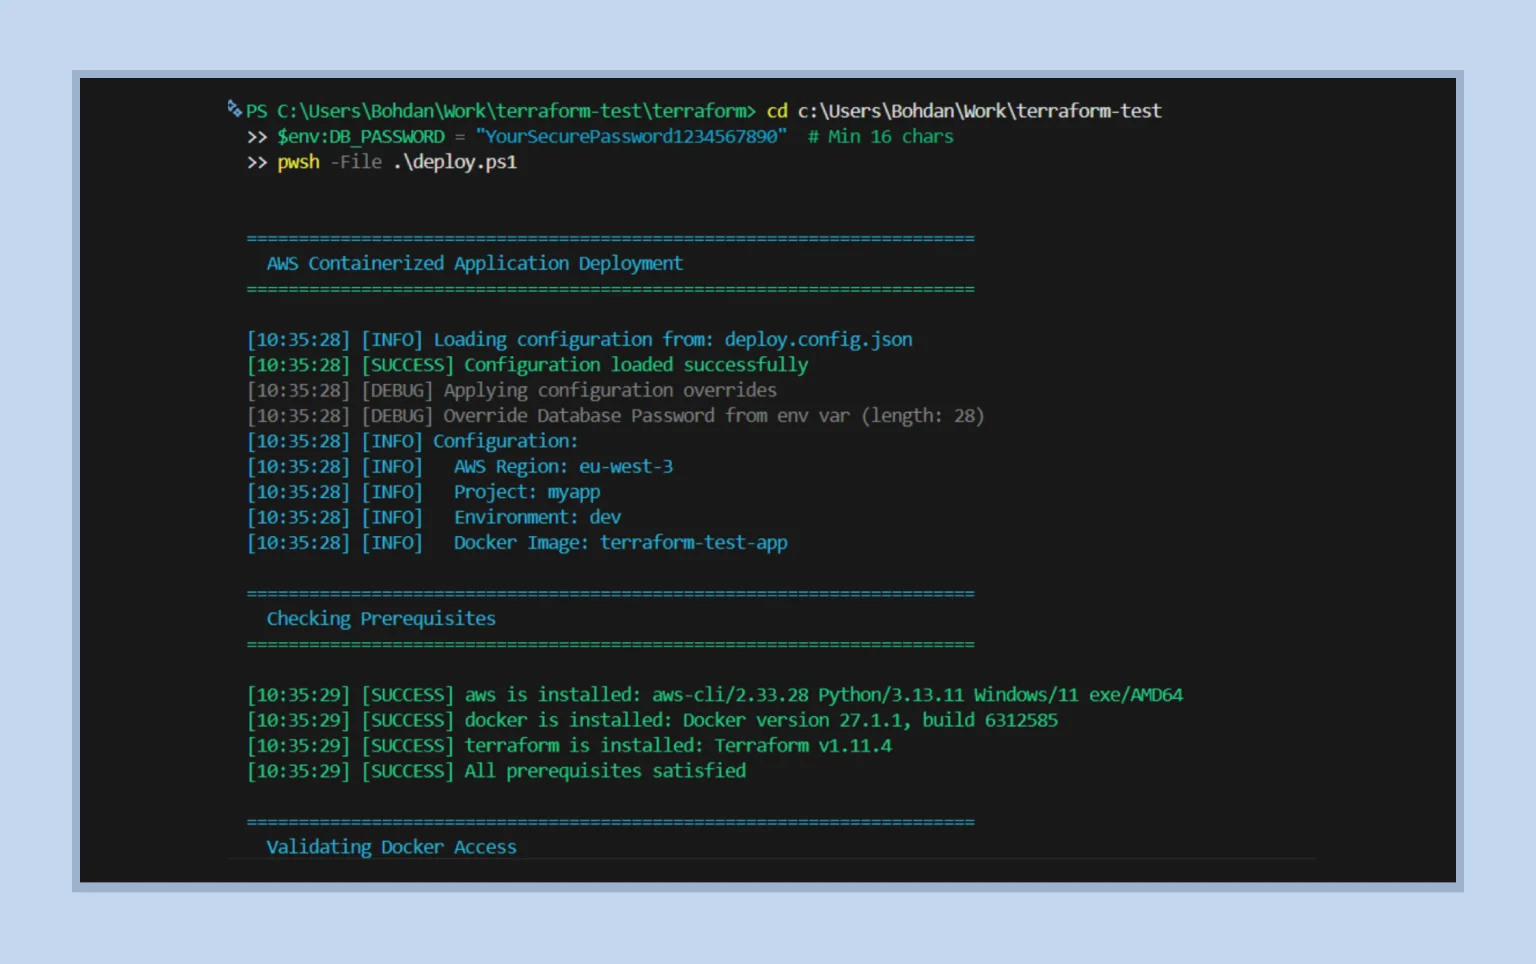
The deployment script
Instead of running a dozen disconnected commands, a single PowerShell script (<mark>deploy.ps1</mark>) wraps the entire deployment lifecycle — from validating prerequisites and building the Docker image to pushing it to ECR and provisioning the infrastructure via Terraform. The core execution flow looks like this:
# deploy.ps1 (Core Execution Snippet)


# 1. Securely pass database credentials (never hardcoded!)
$env:TF_VAR_db_password = $env:DB_PASSWORD


# 2. Build the Docker Image locally
Write-Host "Building Docker image..." -ForegroundColor Cyan
docker build -t "${ImageName}:latest" -f Dockerfile .


# 3. Authenticate and Push to AWS ECR
Write-Host "Authenticating and pushing to ECR..." -ForegroundColor Cyan
aws ecr get-login-password --region $Region | docker login --username AWS --password-stdin $registryUrl
docker tag "${ImageName}:latest" "${ecrUri}:latest"
docker push "${ecrUri}:latest"


# 4. Inject the new ECR Image URI into our Terraform variables
$varsContent = $varsContent -replace 'app_image_uri = ".*"', "app_image_uri = `"$ecrUri`:latest`""
Set-Content $varsFile $varsContent


# 5. Deploy the Modular Infrastructure
Write-Host "Deploying infrastructure with Terraform..." -ForegroundColor Cyan
terraform init -no-color
terraform validate -no-color
terraform plan -var-file="$resolvedVarsFile" -out=tfplan -no-color
terraform apply -no-color tfplan
Scaling across environments with .tfvars
Modular architecture solves more than code organization — it enables full environment reusability. Because all hardcoded values are extracted into variables, the same underlying infrastructure logic can be used to deploy entirely isolated AWS environments without modifying a single module.
By passing a different <mark>.tfvars</mark> file to the deployment script (for example, <mark>.\deploy.ps1 -Environment prod</mark>), the deployment’s scale, cost, and security profile can be adjusted completely.
Setting up and maintaining this type of infrastructure requires deep AWS expertise. If your team would rather focus on the product, Halo Lab’s AWS development services cover the full cycle — from architecture to deployment.
Now, let’s look at how to configure three standard environments: Development, Staging, and Production.
Development (terraform.dev.tfvars)
In the development environment, the goal is to minimize cost and keep resources lightweight. Use the smallest instance types, run Redis as a single node, and disable data retention safeguards to allow fast teardown when needed.
# terraform.dev.tfvars (Snippet)
environment  = "dev"


# Database - Optimized for cost
db_instance_class      = "db.t4g.micro"
db_deletion_protection = false
db_skip_final_snapshot = true


# Redis - Single node, no failover
redis_num_cache_nodes  = 1


# AppRunner - Minimal compute
apprunner_cpu          = "1024"
apprunner_memory       = "2048"
Staging (terraform.staging.tfvars)
In the staging environment, the focus shifts to production parity so issues can be identified before they reach end users. To support this, increase instance sizes and enable database backups (<mark>db_skip_final_snapshot = false</mark>), allowing backup and restore procedures to be properly tested.
# terraform.staging.tfvars (Snippet)
environment  = "staging"


# Database - Closer to production specs
db_instance_class      = "db.t4g.small"
db_allocated_storage   = 50
db_skip_final_snapshot = false # Backups enabled for testing


# Redis
redis_num_cache_nodes  = 1
Production (terraform.prod.tfvars)
Production environments prioritize reliability, resilience, and data protection. Increase App Runner compute capacity, add a second ElastiCache Redis node for automatic failover, and enforce database deletion protection to prevent accidental data loss. Database backups should also remain enabled to support recovery scenarios.
Apply structured tagging to support cost tracking and operational visibility across the environment.
Note: Although a password variable is defined, the production database password should always be passed via a secure environment variable (<mark>TF_VAR_db_password</mark>) during CI/CD, rather than being hardcoded in this file.
# terraform.prod.tfvars (Snippet)
environment  = "prod"


# Database - Premium configuration and data safety
db_instance_class      = "db.t4g.small" # Scalable to medium/large
db_allocated_storage   = 200
db_deletion_protection = true  # CRITICAL: Prevents accidental teardown
db_skip_final_snapshot = false # CRITICAL: Keep backups


# Redis - High Availability
redis_num_cache_nodes  = 2 # Multi-node for failover


# AppRunner - Scaled for high traffic
apprunner_cpu          = "2048"
apprunner_memory       = "4096"


# Tags
common_tags = {
  Stage          = "Production"
  CostCenter     = "Engineering"
  BackupRequired = "true"
  Criticality    = "High"
}
“Modular code and automation make infrastructure reliable, repeatable, and easier to scale across environments.”
Verification and payoff
Once <mark>.\deploy.ps1 -Environment dev</mark> runs, the entire stack comes to life — code is containerized, networking is provisioned, the database is secured via Secrets Manager, and the AppRunner service is deployed.
But how do we verify that the modular networking is working as intended — that a public App Runner service can securely communicate with private resources like the database and cache? The answer is simple: call the <mark>/health</mark> endpoint.
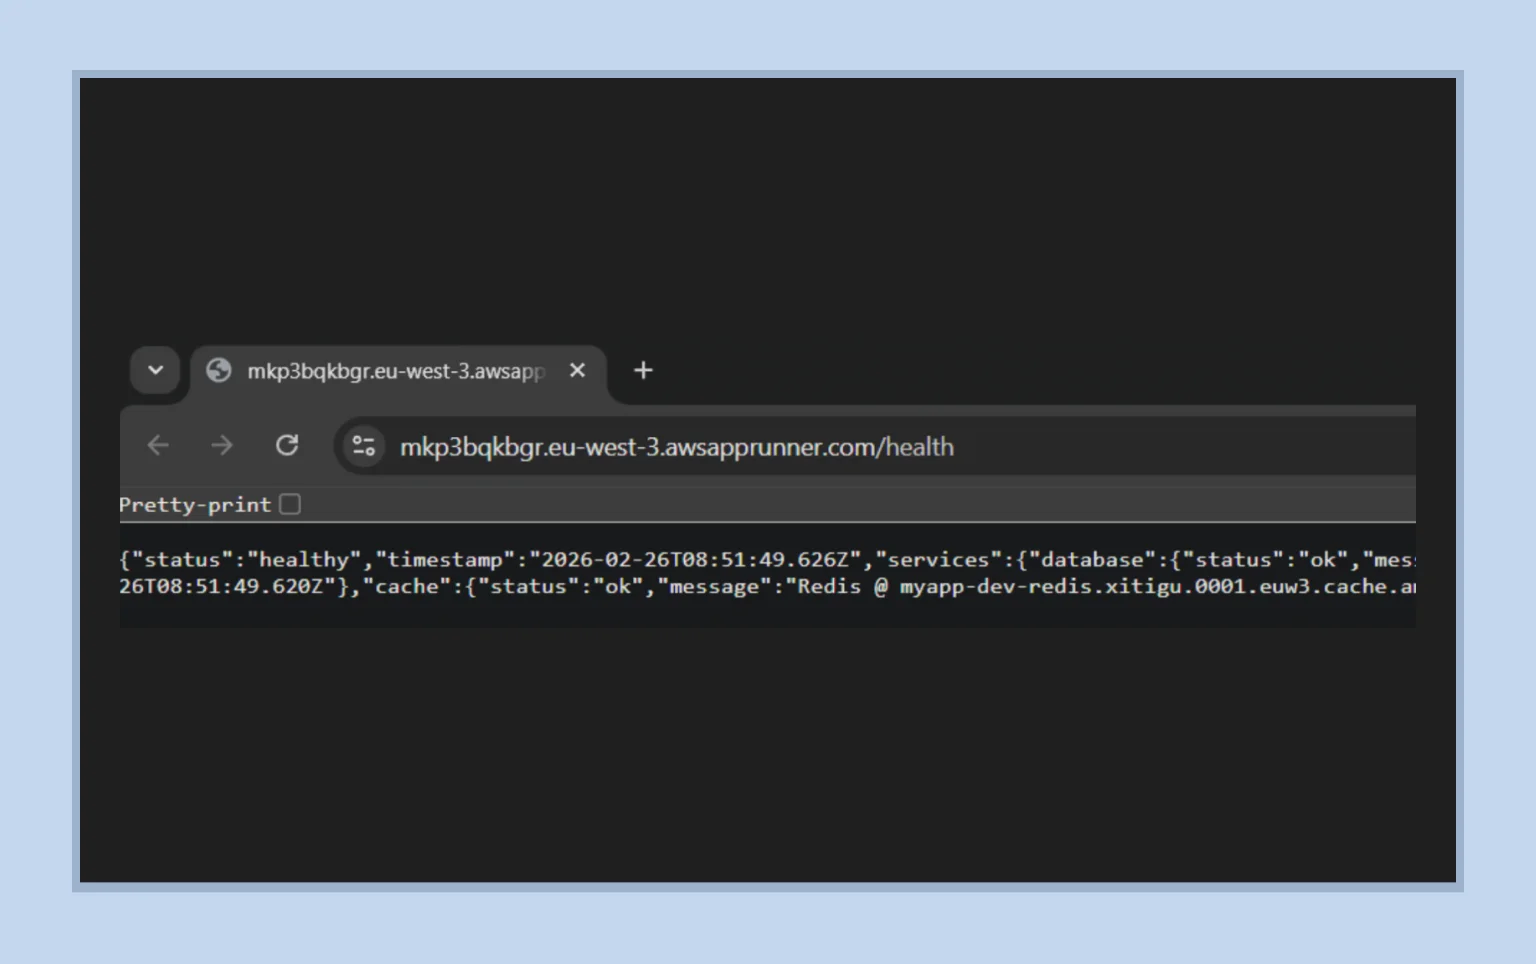
The response speaks for itself: both the database and cache return <mark>"status": "ok"</mark>. This confirms that the VPC Connector is functioning as expected — App Runner is communicating with PostgreSQL and Redis through the private network, without exposing those services publicly.
At this point, the workflow becomes straightforward: select the target environment and run the deployment. The infrastructure handles the rest.
The ROI of cloud automation
The transition from a flat-file Terraform setup to a fully automated, modular architecture is a natural milestone in cloud engineering. While it requires an upfront investment in configuration and scripting, the resulting gains in reliability, security, and scalability quickly justify the effort.
With this approach, sensitive data is no longer exposed in plaintext, but securely managed through scoped IAM access to AWS Secrets Manager. Infrastructure becomes reusable by design, allowing new environments to be provisioned in minutes rather than hours. At the same time, removing manual steps from the deployment process reduces the risk of human error and configuration drift, bringing consistency to every release.
Modern infrastructure should do more than simply exist as code — it should operate as a reliable, repeatable system that supports the entire development lifecycle.
.webp)