If you are working with modern web development, you have likely already encountered the concept of a headless CMS. These systems are designed to store and manage content without dictating how or where that content is displayed. This decoupling offers unprecedented flexibility to developers. One of the most trusted and popular solutions in this category is Prismic CMS. It serves as an efficient and convenient repository for texts, images, and various other data formats, delivering all the necessary content through a powerful, universally accessible API.

Developers frequently select Prismic for several key strategic advantages. It includes a robust tool called Slice Machine, which allows teams to create ready-made, reusable content “slices” that can be easily composed into pages. Furthermore, Prismic offers ready-made integrations with numerous front-end frameworks, minimizing the time required for initial setup. Most importantly, its inherent flexibility makes it equally suitable for both straightforward portfolio websites and complex, large-scale web applications.
This article will provide a practical, code-rich guide on how to perform the essential integration of Prismic with several popular front-end frameworks, ensuring your content workflow is as convenient and high-performing as possible.
Basic steps for Prismic CMS integration
Before you begin writing any code or installing framework-specific packages, the foundational step involves configuring your content environment within Prismic. This process begins with the creation of a repository — your dedicated cloud space for structured content storage. You can conceptualize this repository as the central, intelligent database for all your project’s texts, images, and data types.
To initiate this setup, you must navigate to the official Prismic website. After a simple registration process, head directly to your dashboard. Here, you will be prompted to create a new repository.
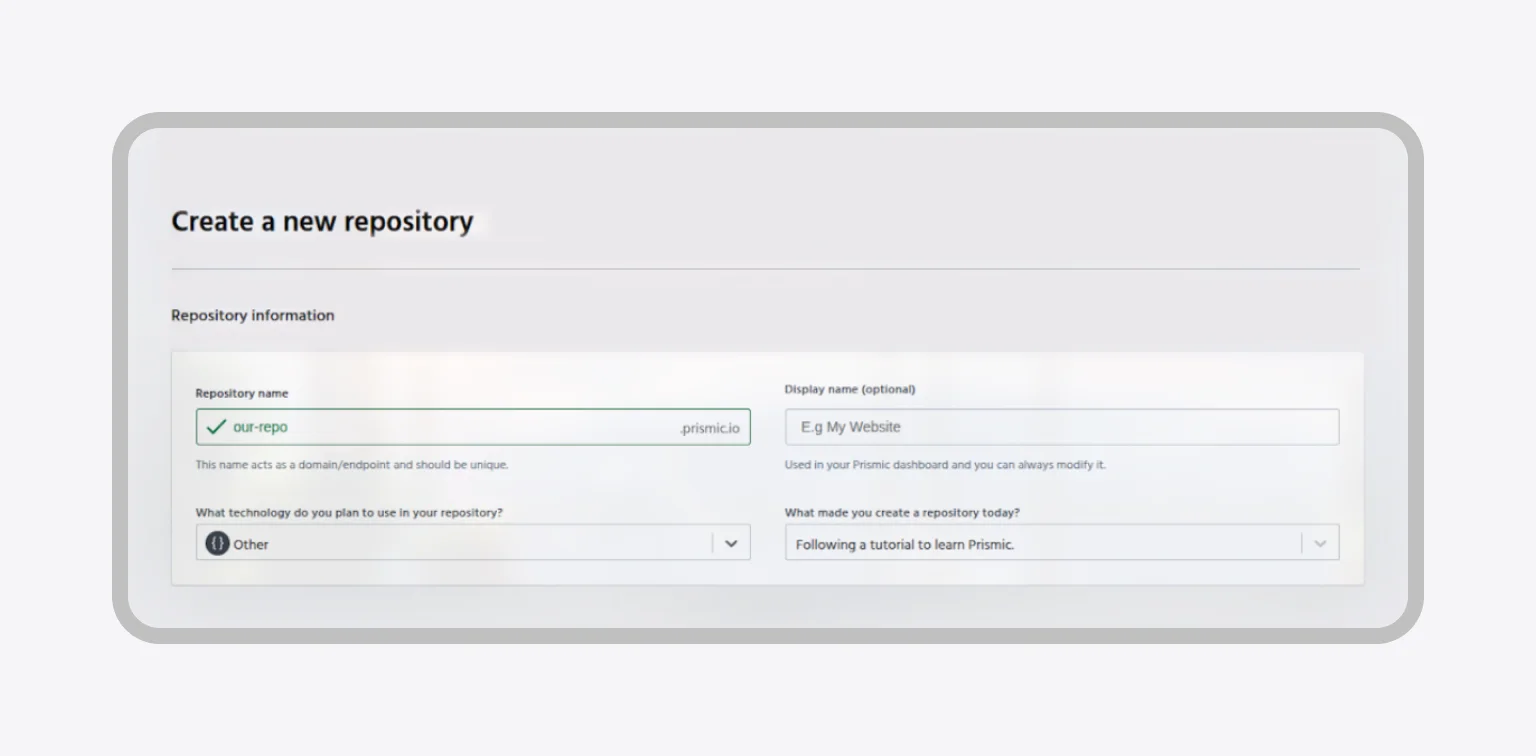
During this configuration, you will specify its name and the project’s name. When asked, “What technology do you plan to use in your repository?”, it is beneficial to select the “Other” option. This ensures the repository remains universally compatible, allowing us to leverage the same content models for all the different framework examples covered in this guide.
Content model setup (custom types, slices)
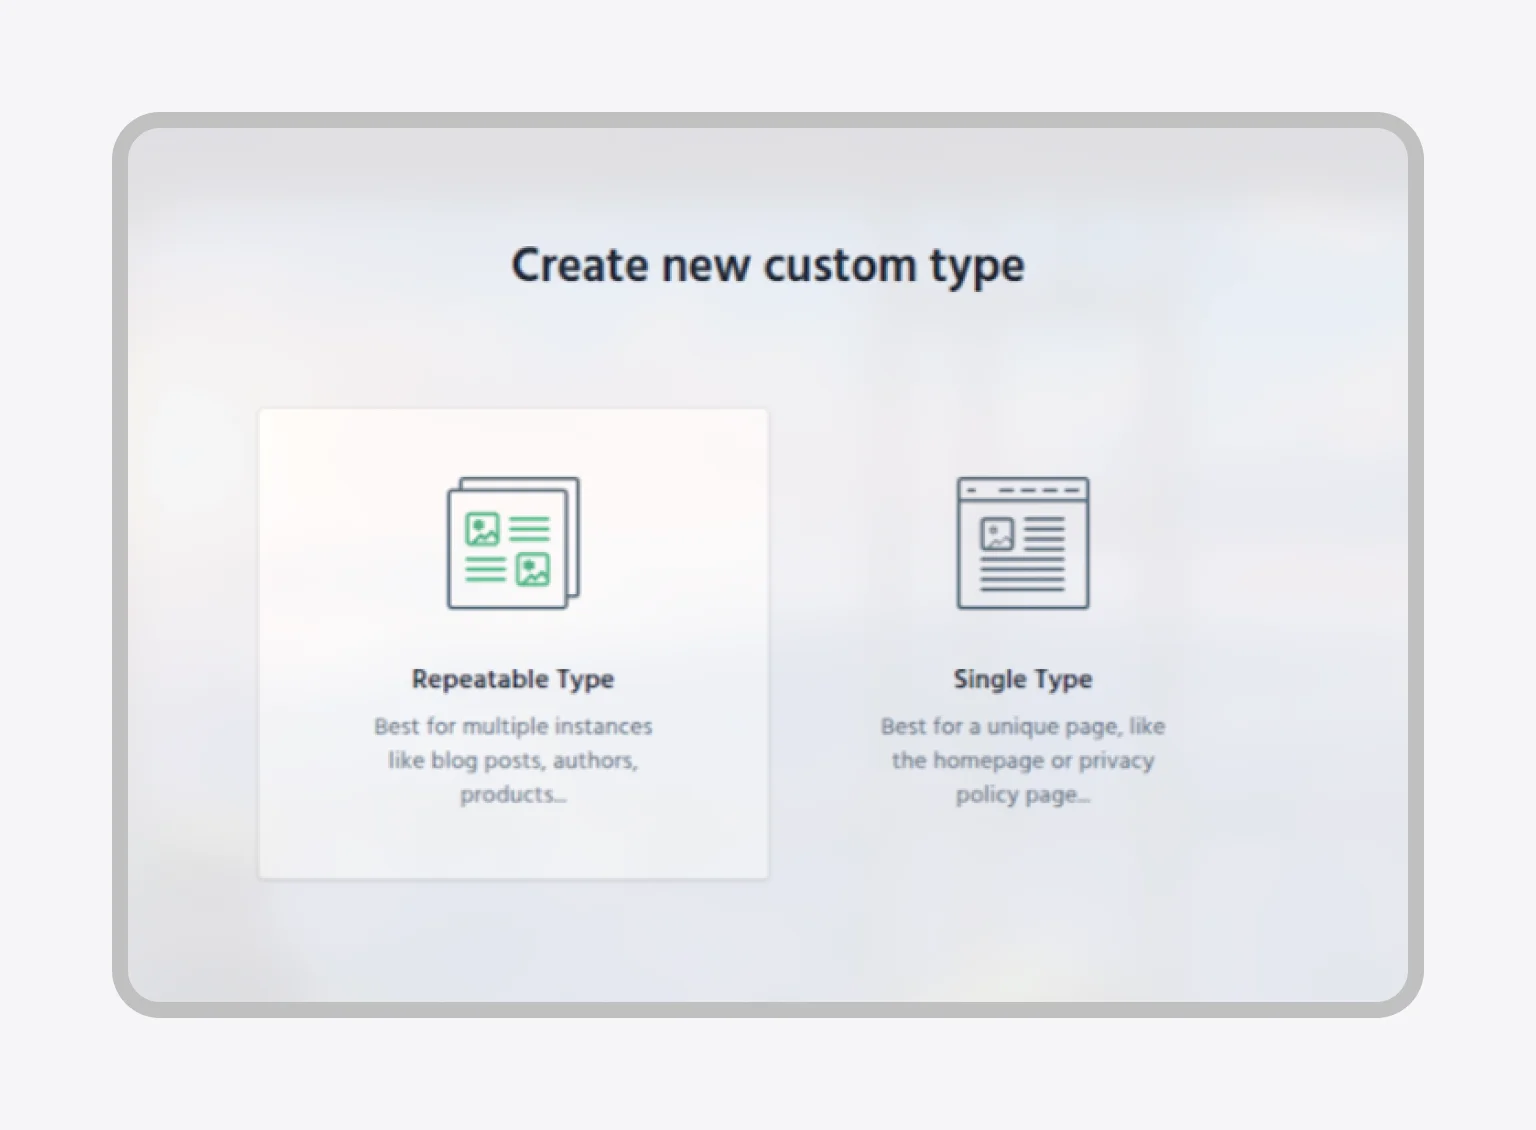
A critical phase in any successful headless implementation is content modeling — defining the precise structure and fields of the data you plan to store. For clarity and simplicity throughout our framework examples, we will create one repeatable custom type named “Product.” This type acts as the blueprint for every item in our theoretical e-commerce catalog.

The following fields were added and saved here:
- title (text)
- description (rich text)
- price (number or text)
- image
- UID (text, unique identifier)
Now we must add a few products to see them in our app:
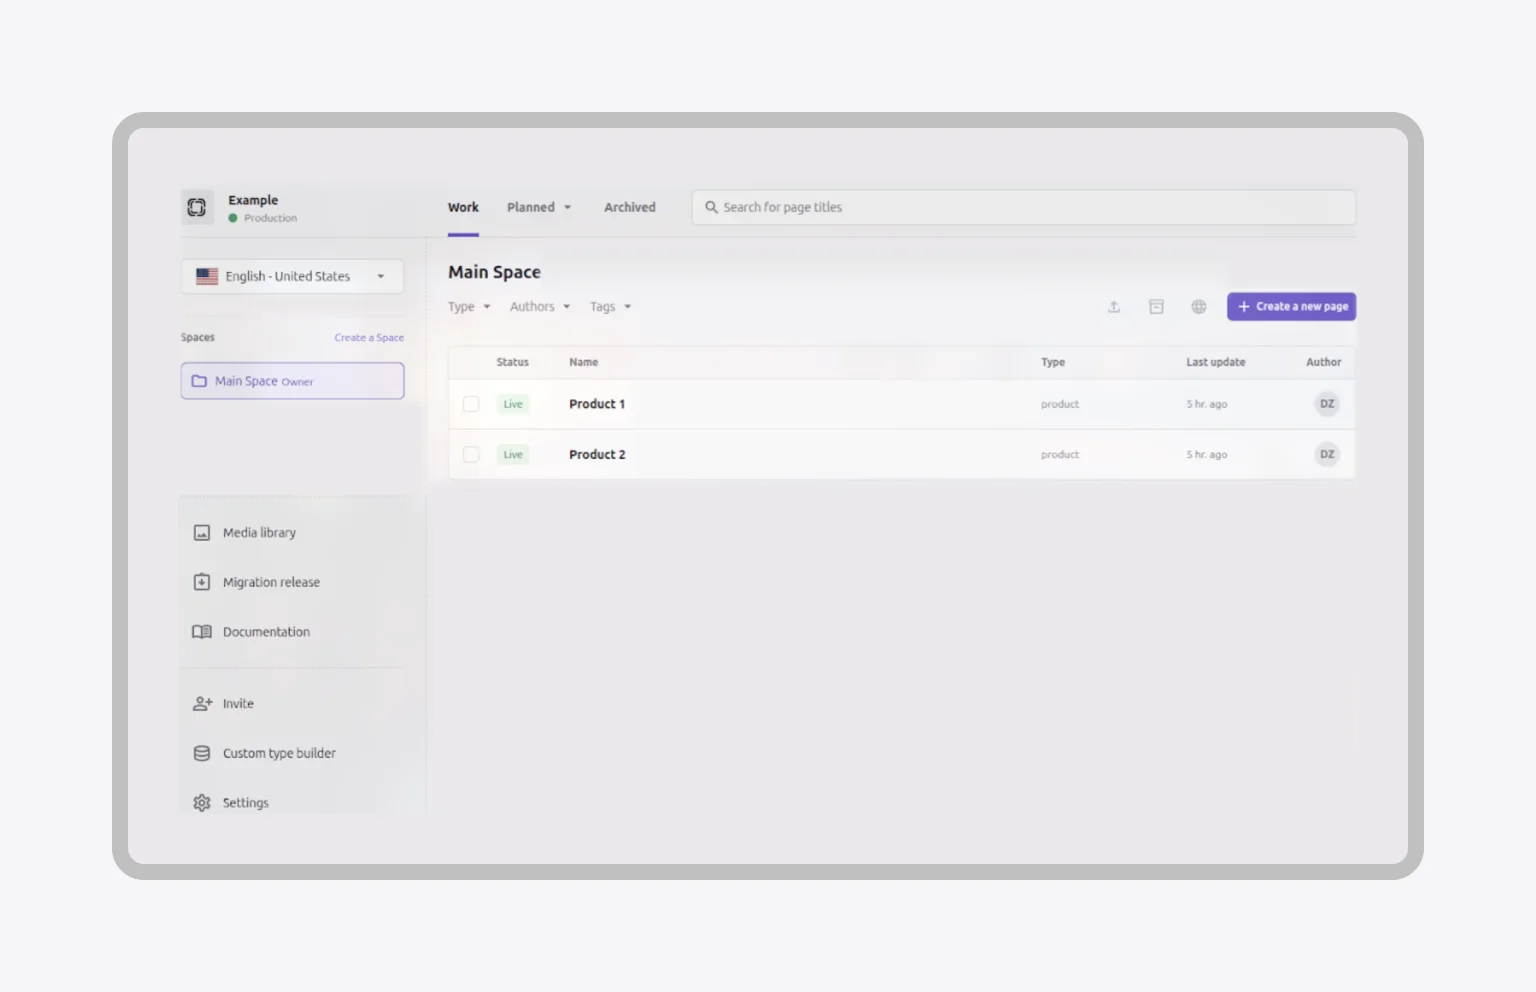
Once this structure is finalized, we must populate the repository with actual data so that our application has content to fetch. To do this, click on “Create a new page,” select our “Product” custom type, fill it with representative values for a few items, and be sure to publish them. Publishing makes the content immediately accessible via the Prismic API.
Obtaining an API token
The final step in preparing your Prismic environment is securing the API access. While public repositories can often be accessed using only the repository URL, private repositories or those requiring restricted access must utilize an API token. This token serves as a secure key, ensuring only authorized applications can query your content.
You can obtain this token by navigating to the “Settings” tab within your Prismic dashboard, selecting the “API & Security” section, scrolling down the page, and clicking “Create new app.” This action generates a new API token that will be used by the official SDK (Software Development Kit) to securely connect your front-end project to your repository.
We are now ready to approach practical integration with front-end frameworks. The core API interaction remains consistent because Prismic provides a universal interface. The only fundamental difference lies in how each framework handles asynchronous data fetching: in environments like React and Vue, this is managed via client-side hooks and reactive state; in meta-frameworks like Next.js and Nuxt.js, the logic is often executed on the server via SSR or SSG.
The crucial first connection is less about coding and more about establishing a secure and type-safe digital blueprint, which ensures the repository and its content models are perfectly aligned with the application’s structure.
Connecting Prismic to React
Integrating Prismic into a React application is an exercise in utilizing functional components and hooks for efficient state and side-effect management. When using a tool like Vite for project scaffolding, the setup process is clean and highly reproducible.
Creating a new React project via Vite
You start by setting up your basic React project structure via the Vite command-line interface:
Open the terminal and run:
npm create vite@latest my-prismic-app
After the prompt, select:
- Framework: React
- Variant: TypeScript
Navigate to the project folder and install the dependencies:
cd my-prismic-app
npm install
Run the project to check that everything is working:
npm run dev
With the base project functional, you must now install the official Prismic SDK packages. These packages provide the tools necessary for API interaction, rendering, and data manipulation.
Installing the Prismic SDK
In the terminal, install the official packages:
npm install @prismicio/client @prismicio/react @prismicio/helpers- @prismicio/client — for working with the Prismic API
- @prismicio/react — for rendering Rich Text and other fields
- @prismicio/helpers — for convenient work with fields, such as converting Rich Text to text (asText), generating links, and safely rendering content
Creating a Prismic client
To ensure your repository credentials are secure and centralized, you first create an environment file, followed by a dedicated client initialization file. This is standard practice for separating configuration from application logic.
In the project, create a file named prismic.ts in the src folder with the following code, and don’t forget to create an .env file beforehand:
#.env
VITE_REPOSITORY_NAME=your-repo-name
VITE_PRISMIC_TOKEN=your-api-token
The client is then instantiated and exported in src/prismicio.ts, allowing it to be imported and used anywhere in your application:
#src/prismicio.ts
import * as prismic from "@prismicio/client";

const repositoryName = import.meta.env.VITE_REPOSITORY_NAME;
const accessToken = import.meta.env.VITE_PRISMIC_TOKEN;

export const client = prismic.createClient(repositoryName, {
 accessToken: accessToken,
});
Example of Prismic integration into React
The main App component leverages the useState hook to maintain the list of products and the useEffect hook to execute the asynchronous data fetch immediately after the component mounts. A helper function, mapPrismicProducts, is used to transform the raw document array into a clean, type-safe product object array.
//src/app.tsx
import { useEffect, useState } from "react";
import * as prismic from "@prismicio/client";
import { client } from "./prismic";
import Product from "./components/Product";
import type { IProduct } from "./components/Product";

function mapPrismicProducts(
 docs: prismic.PrismicDocument[]
): IProduct[] {
 return docs.map((doc) => ({
   id: doc.id,
   title: doc.data.product_title ?? [],
   description: doc.data.product_description ?? [],
   price: doc.data.price ?? 0,
   imageUrl: doc.data.product_image?.url ?? "",
   uid: doc.uid || "",
 }));
}

function App() {
 const [products, setProducts] = useState<IProduct[]>([]);

 useEffect(() => {
   const fetchProducts = async () => {
     try {
       const response = await client.getAllByType("product");
       setProducts(mapPrismicProducts(response));
     } catch (error) {
       console.error("Error fetching products:", error);
     }
   };

   fetchProducts();
 }, []);

 return (
   <>
     <h1>Products from Prismic</h1>
     <ul>
       {products.map((p) => (
         <Product key={p.id} {...p} />
       ))}
     </ul>
   </>
 );
}

export default App;
The data flow is clear:
- Use useState to store the array of products
- In useEffect, perform an asynchronous request to Prismic via our client
- After receiving the data, apply mapPrismicProducts and update the products state
- render the list of products through the Product component, passing each object as props
The child component is purely presentational, designed to accept the product object as props and utilize the Prismic helper components and functions for clean rendering.
//src/components/Product.ts
import type { FC } from "react";
import { PrismicRichText } from "@prismicio/react";
import type { RichTextField } from "@prismicio/types";
import { asText } from "@prismicio/helpers";

export interface IProduct {
 id: string;
 title: RichTextField;
 description: RichTextField;
 price: number;
 imageUrl: string;
 uid: string;
}

const Product: FC<IProduct> = ({
 id,
 title,
 description,
 price,
 imageUrl,
 uid,
}) => {
 return (
   <li>
     <PrismicRichText field={title} />
     <img src={imageUrl} alt={asText(title)} width={200} />
     <div>
       <PrismicRichText field={description} />
     </div>
     <p>Price: ${price}</p>
   </li>
 );
};

export default Product;
The component receives props with information about the product (title, description, price, imageUrl). For Rich Text, the PrismicRichText component is used to render content from Prismic. asText(title) is used to create a text alternative description from Rich Text, which is needed for the alt attribute in images. The final display renders the product’s name, image, detailed description, and price.
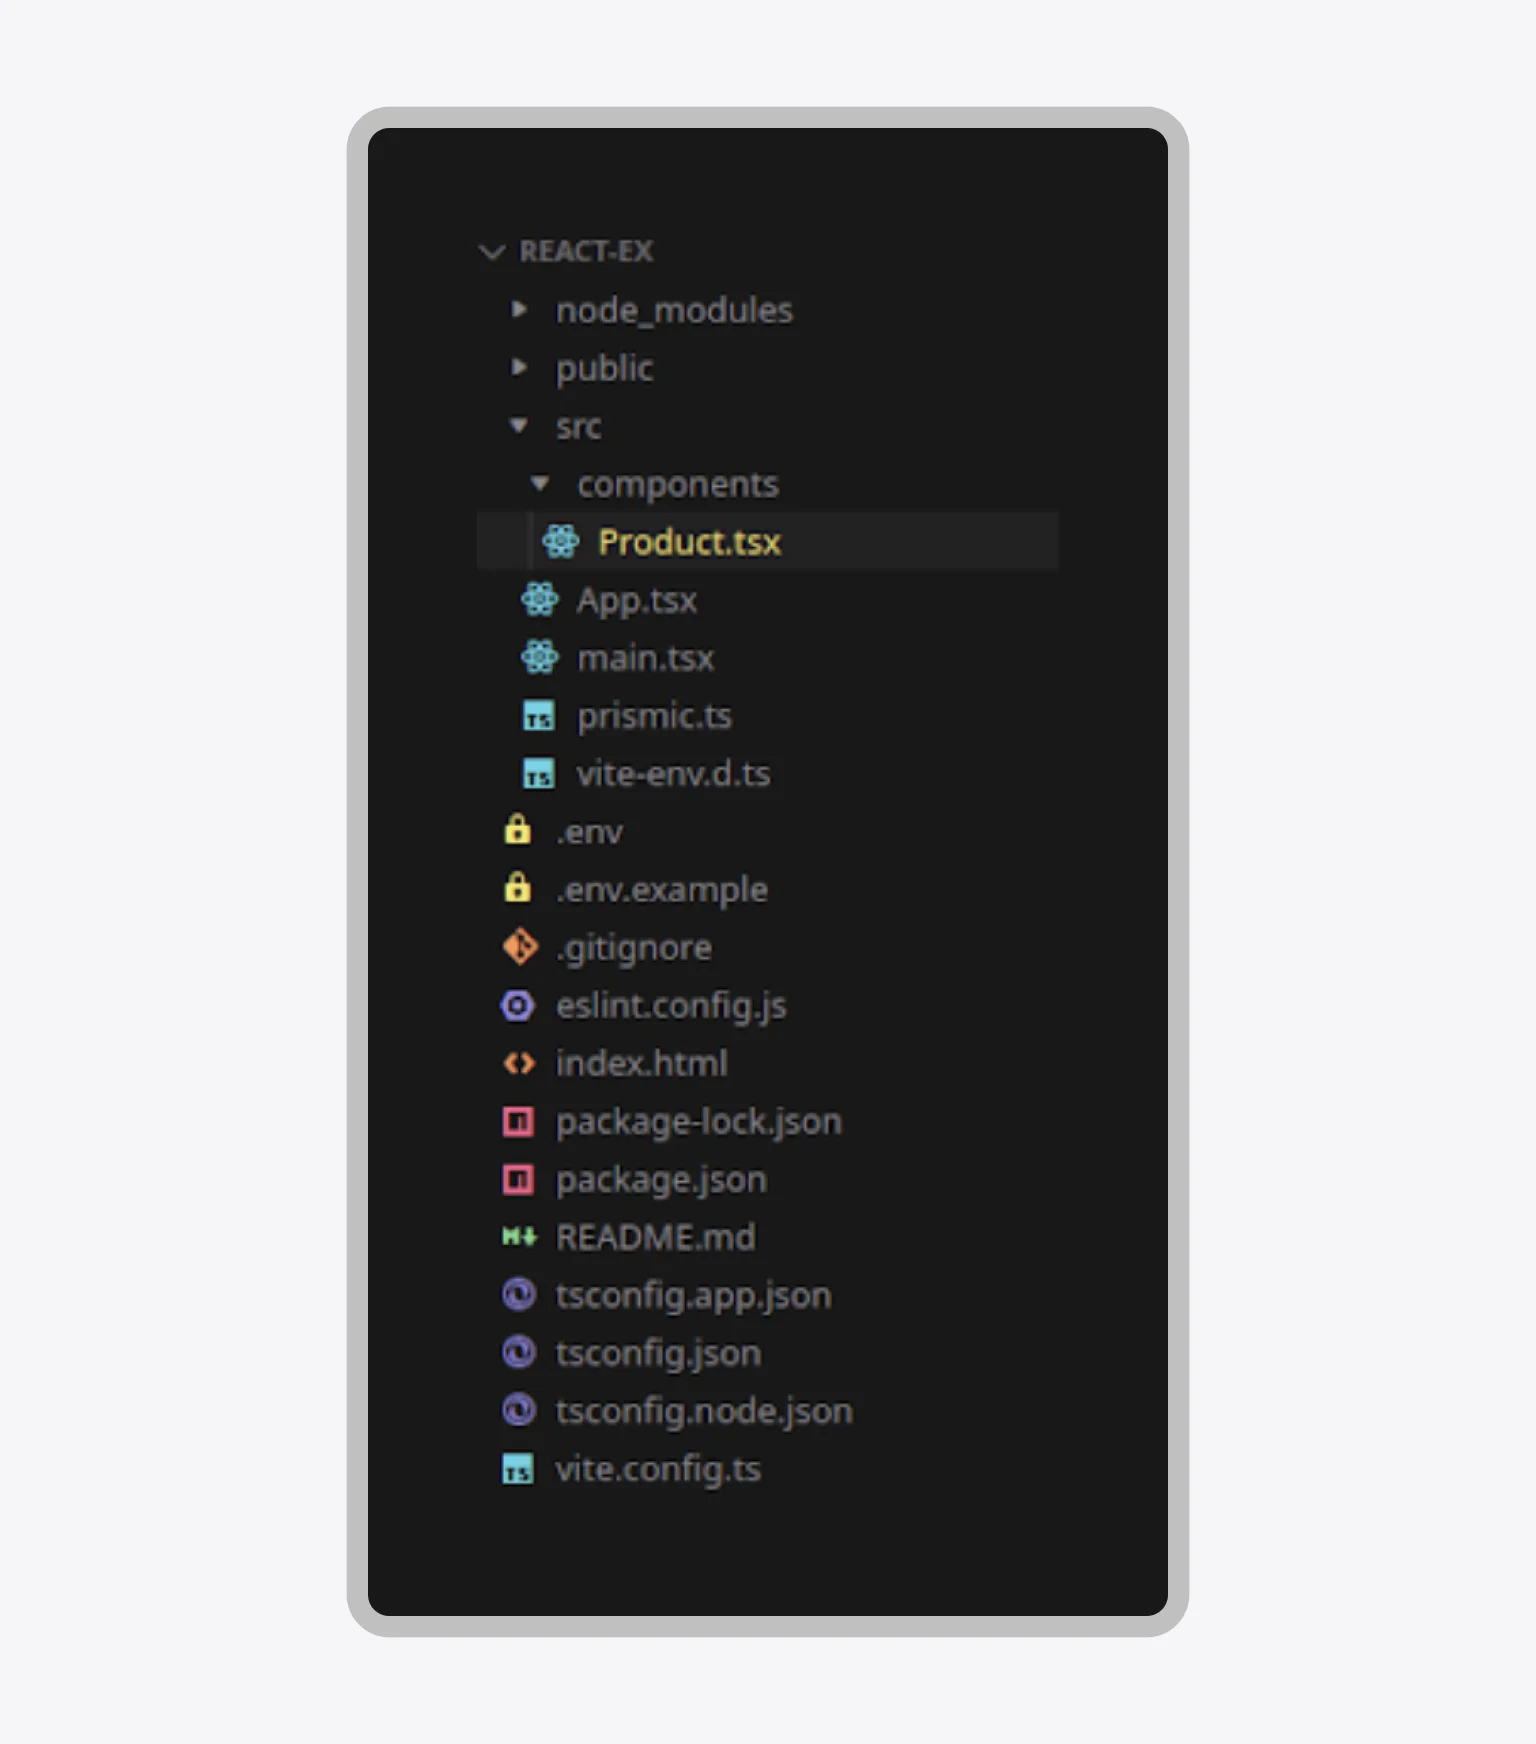
The overall project structure looks like this:
Connecting Prismic to Vue
Integrating Prismic into a Vue application follows a very similar architectural pattern to React, relying on a manual client setup coupled with Vue’s highly intuitive reactivity system. The key technical difference is the specific Prismic component package used and the utilization of Vue’s onMounted hook for component lifecycle management.
The process almost completely repeats the steps that were performed for React: creating a project via Vite, initializing .env, and setting up the client in src/prismicio.ts. The only difference is in package installation. Instead of @prismicio/react, we install:
npm install @prismicio/client @prismicio/vue @prismicio/helpers
The primary variation is the required Prismic helper package that enables Vue-specific rendering.
Example of Prismic integration into Vue
The Vue component uses the Composition API and the ref utility for state management. The asynchronous data fetching logic is contained within the onMounted hook, which guarantees the operation executes only after the component is fully mounted to the DOM.
//src/app.vue
<template>
 <div>
   <h1>Products from Prismic</h1>
   <ul v-if="products.length">
     <Product v-for="p in products" :key="p.id" :product="p" />
   </ul>
   <p v-else>Loading products...</p>
 </div>
</template>
The template displays a list of products, incorporating a loading state via v-if until the products array is successfully populated.
<script lang="ts">
import { defineComponent, ref, onMounted } from "vue";
import { client } from "./prismicio";
import Product from "./components/Product.vue";
import type { PrismicDocument } from "@prismicio/client";
import type { IProduct } from "./components/Product.vue";

function mapPrismicProducts(
 docs: PrismicDocument<Record<string, any>>[]
): IProduct[] {
 return docs.map((doc) => ({
   id: doc.id,
   title: doc.data.product_title ?? [],
   description: doc.data.product_description ?? [],
   price: doc.data.price ?? 0,
   imageUrl: doc.data.product_image?.url ?? "",
   uid: doc.uid || "",
 }));
}

export default defineComponent({
 name: "App",
 components: { Product },
 setup() {
   const products = ref<IProduct[]>([]);

   const fetchProducts = async () => {
     try {
       const response = await client.getAllByType("product");
       products.value = mapPrismicProducts(response);
     } catch (err) {
       console.error("Error fetching products:", err);
     }
   };

   onMounted(fetchProducts);

   return { products };
 },
});
</script>
The data flow is governed by the Composition API:
- The client that connects to the Prismic API is imported.
- The ref utility is used for the reactive array of products.
- Within the onMounted hook, the asynchronous function fetchProducts is called. This function retrieves documents of the type “product” and transforms them via mapPrismicProducts.
The child component is designed to accept a product object as a prop. It uses the Vue-specific PrismicRichText component for rendering and a computed property to dynamically generate the plain text needed for the image’s alt attribute.
//src/components/Product.vue
<template>
 <li>
   <PrismicRichText :field="product.title" />
   <img :src="product.imageUrl" :alt="titleText" width="200" />
   <div>
     <PrismicRichText :field="product.description" />
   </div>
   <p>Price: ${{ product.price }}</p>
 </li>
</template>
<script lang="ts">
import { defineComponent, computed } from "vue";
import { PrismicRichText } from "@prismicio/vue";
import { asText } from "@prismicio/helpers";
import type { RichTextField } from "@prismicio/types";
export interface IProduct {
id: string;
title: RichTextField;
description: RichTextField;
price: number;
imageUrl: string;
uid: string;
}
export default defineComponent({
name: "Product",
components: {
PrismicRichText,
},
props: {
product: {
type: Object as () => IProduct,
required: true,
},
},
setup(props) {
const titleText = computed(() => asText(props.product.title));
return { titleText };
},
});
</script>
The component utilizes PrismicRichText to render the complex fields. The image’s alt text is dynamically generated using the titleText computed property, which calls the asText helper on the Rich Text field, ensuring accessibility standards are met.
Connecting Prismic to Next.js
Next.js excels at high-performance content delivery through server-side rendering (SSR) and static site generation (SSG), making it an ideal choice for a headless architecture. The integration is robust, utilizing the App Router to perform data fetching directly on the server, a method that significantly boosts performance and SEO.
Create a new Next project
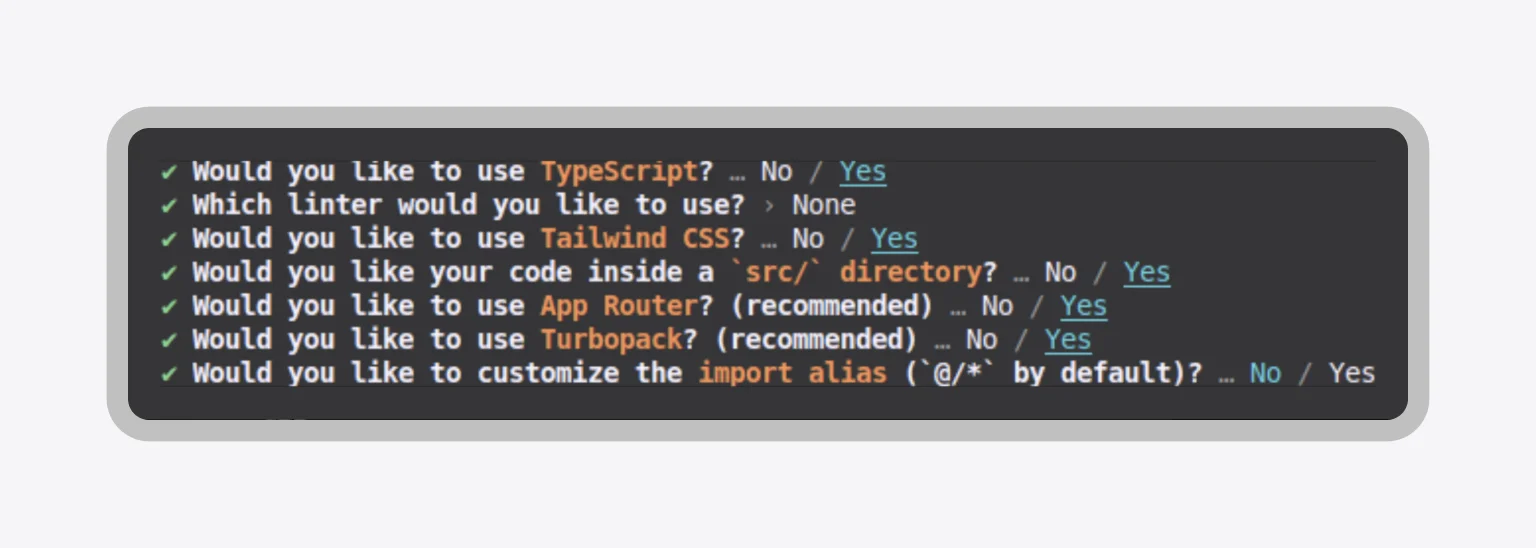
Start by creating a new Next.js project using the CLI and selecting the recommended options, including the App Router:
npx create-next-app@latest my-next-project
Choose the following options:
Afterwards, enter the created project and install the already familiar dependencies:
npm install @prismicio/client @prismicio/react @prismicio/helpersCreate a Prismic client
The client setup in libs/prismicio.ts is crucial. It includes an important Prismic feature: Routes. Routes define URL patterns for documents of a specific type, automating the creation of ready-to-use URLs.
We need to create an identical “.env”, but name it “.env.local”. It will look like this:
#.env.local
REPOSITORY_NAME='your repo name'
PRISMIC_TOKEN='your access token'
Similarly, for this example, add one of the interesting Prismic features:
import * as prismic from "@prismicio/client";

export const repositoryName = process.env.REPOSITORY_NAME!;
export const accessToken = process.env.PRISMIC_TOKEN;

export const client = prismic.createClient(repositoryName, {
 accessToken,
 routes: [{ type: "product", path: "/product/:uid" }],
});
Project Structure
The App Router structure is designed for clear separation of concerns, crucial for high-performance applications:
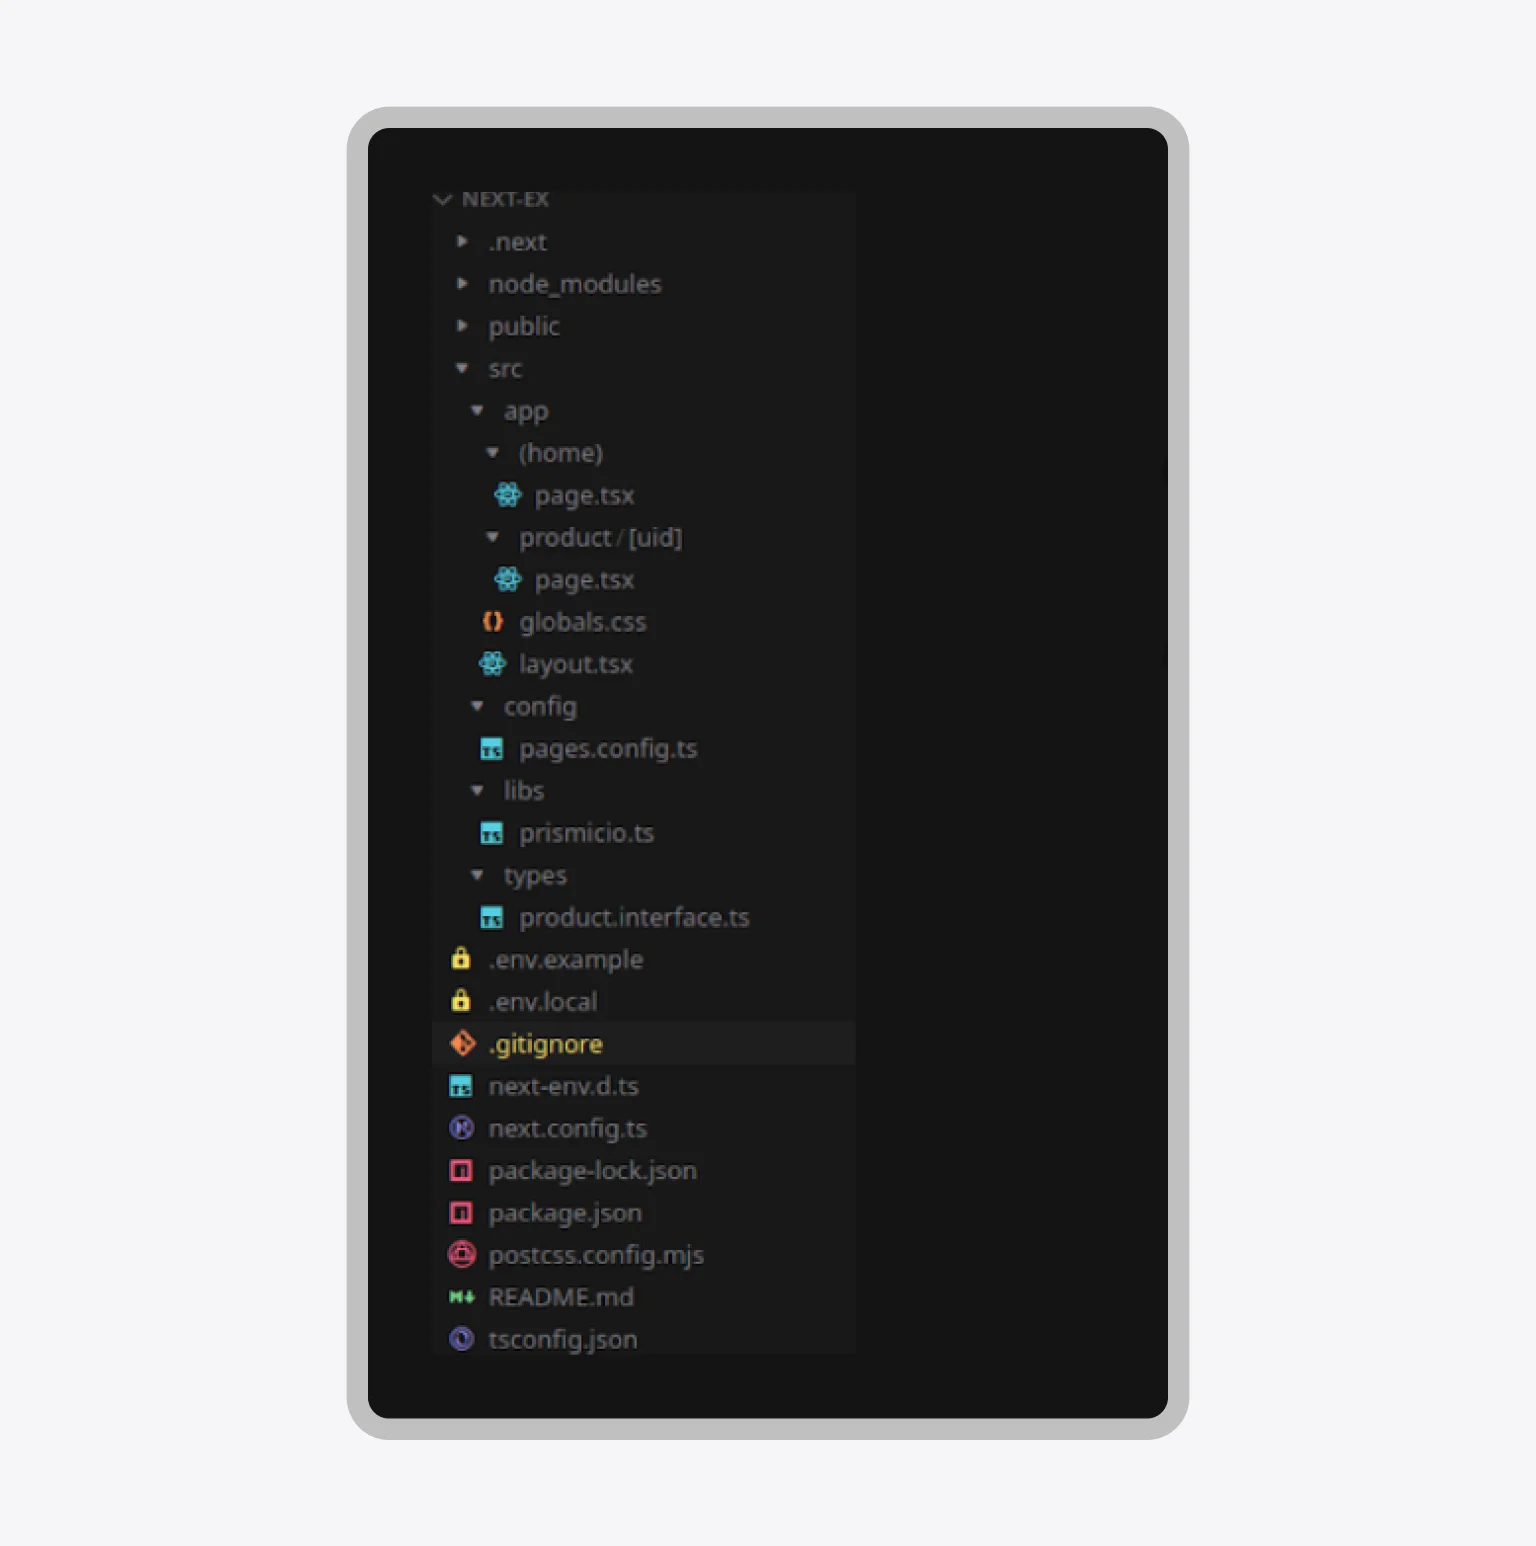
The main Next.js (App Router) folder where pages, layouts, and global styles are located:
- globals.css — file with global styles for the entire project.
- (home)/page.tsx — website home screen page. The parentheses (home) denote a “route segment” and help organize routes in the App Router.
- layout.tsx — the general application layout where the header, footer, and common page wrappers can be placed.
- product/[uid]/page.tsx — dynamic product page. The [uid] is taken from Prismic and corresponds to the document’s unique identifier.
config folder:
- pages.config.ts — configuration data for pages, such as routes, SEO settings, or other constants used in the project.
libs folder:
- prismicio.ts — file with Prismic client setup and initialization for working with the API. Access tokens and methods for fetching data from the CMS are specified here.
types folder:
- product.interface.ts — TypeScript interfaces for type-checking data fetched from Prismic. For example, the product structure is so that TypeScript understands which fields exist and which data types are expected.
Example of Prismic Integration into Next
The Home Component demonstrates the power of Next.js Server Components. The Page() function is defined as an async function, allowing it to fetch data directly on the server. Furthermore, the revalidate export is used to enable ISR (Incremental Static Regeneration) for efficient content updates.
//src/app/(home)/page.tsx
import { client } from "../../libs/prismicio";
import { PrismicRichText } from "@prismicio/react";
import Link from "next/link";
import { PAGES } from "@/config/pages.config";
import type { Product } from "@/types/product.interface";
import { asText } from "@prismicio/helpers";

// ISR: refresh the page every 60 seconds
export const revalidate = 60;

export default async function Page() {
 // ISR:refresh the page every 60 seconds
 const response = await client.getAllByType("product");

 //Convert data into a convenient format
 const products: Product[] = response.map((doc) => ({
   id: doc.id,
   title: doc.data.product_title ?? [],
   description: doc.data.product_description ?? [],
   price: doc.data.price ?? 0,
   imageUrl: doc.data.product_image?.url ?? "",
   uid: doc.uid || "",
 }));

 return (
   <div>
     <h1>Products</h1>
     <ul>
       {products.map((p) => (
         <li key={p.id}>
           <PrismicRichText field={p.title} />
           <Link href={p.url || PAGES.PRODUCT(p.uid)}>
             <img src={p.imageUrl} alt={asText(p.title)} width={200} />
           </Link>
           <PrismicRichText field={p.description} />
           <p>Price: ${p.price}</p>
         </li>
       ))}
     </ul>
   </div>
 );
}
The home page clearly demonstrates the benefits of the Next.js approach:
- Server Components for fast initial load
- ISR for time-based content freshness
- Smart linking that prioritizes the ready URL provided by Prismic
The dynamic product page leverages two key Next.js features for superior performance: generateStaticParams for pre-rendering and an async page function for fetching specific data.
// app/products/[uid]/page.tsx
import { client } from "@/libs/prismicio";
import { PrismicRichText } from "@prismicio/react";
import type { IProduct } from "@/types/product.interface";
import { asText } from "@prismicio/helpers";

export async function generateStaticParams() {
 const products = await client.getAllByType("product");

 return products.map((p) => ({
   uid: p.uid,
 }));
}

export default async function ProductPage({
 params,
}: {
 params: Promise<{ uid: string }>;
}) {
 const uid = (await params).uid;
 const doc = await client.getByUID("product", uid);

 const product: IProduct = {
   id: doc.id,
   title: doc.data.product_title ?? [],
   description: doc.data.product_description ?? [],
   price: doc.data.price ?? 0,
   imageUrl: doc.data.product_image?.url ?? "",
   uid: doc.uid || "",
 };

 return (
   <div>
     <PrismicRichText field={product.title} />
     <img src={product.imageUrl} alt={asText(product.title)} width={300} />
     <PrismicRichText field={product.description} />
     <p>Price: ${product.price}</p>
   </div>
 );
}
The combination of generateStaticParams and the async component ensures the page is pre-rendered for maximum speed. The page safely retrieves the UID from the URL parameters and uses client.getByUID to fetch the specific product’s content.
Connecting Prismic to Nuxt.js
Nuxt.js, the meta-framework for Vue, offers the most streamlined approach to Prismic integration, primarily due to its official, dedicated module. This module automates the client creation and configuration process, resulting in the lowest setup overhead compared to manual approaches.
Create a new Nuxt project
In the terminal, run:
npx nuxi@latest init my-nuxt-project
This will create the project; enter the folder and install the additional Prismic module:
npx nuxi@latest module add prismic
And the already familiar dependencies:
npm install @prismicio/helpers @prismicio/vue
In the .env file, add not just the repository name, but the full path to the repository:
#.env
PRISMIC_ENDPOINT="https://your-repo-name.cdn.prismic.io/api/v2"
PRISMIC_ACCESS_TOKEN="your-access-token"
Project Setup
In the root of the project, a file named nuxt.config.ts can be seen. Add the Prismic client there:
// https://nuxt.com/docs/api/configuration/nuxt-config
export default defineNuxtConfig({
 compatibilityDate: "2025-07-15",
 devtools: { enabled: true },
 modules: ["@nuxtjs/prismic"],
 prismic: {
   endpoint: process.env.PRISMIC_ENDPOINT,
   clientConfig: {
     accessToken: process.env.PRISMIC_ACCESS_TOKEN,
     routes: [
       {
         type: "product",
         path: "/product/:uid",
       },
     ],
   },
 },
});
As can be noticed, the Prismic client is added differently than in previous examples, where manual client creation in the prismicio.ts file was required. This is all thanks to the built-in module @nuxtjs/prismic:
- Nuxt automatically creates a ready Prismic client that can be used via usePrismic() on any page or in components.
- Only the endpoint and access token are specified via .env.
- Also, as in the previous example, routes can be added.
Our root component for multiple products:
<template>
 <div>
   <h1>Products</h1>
   <ul>
     <li v-for="p in products" :key="p.id">
       <PrismicRichText :field="p.title" />
       <NuxtLink :to="p.url || PAGES.PRODUCT(p.uid)">
         <img :src="p.imageUrl" :alt="String(asText(p.title))" width="200" />
       </NuxtLink>
       <PrismicRichText :field="p.description" />
       <p>Price: ${{ p.price }}</p>
     </li>
   </ul>
 </div>
</template>
<script setup lang="ts">
import { asText } from "@prismicio/helpers";
import { PrismicRichText } from "@prismicio/vue";
import { PAGES } from "../../config/pages.config";
const prismic = usePrismic();
const products = await (async () => {
const response = await prismic.client.getAllByType("product");
return response.map((doc) => ({
id: doc.id,
title: doc.data.product_title ?? [],
description: doc.data.product_description ?? [],
price: doc.data.price ?? 0,
imageUrl: doc.data.product_image?.url ?? "",
uid: doc.uid || "",
}));
})();
</script>
The combination of usePrismic() and the top-level await keyword ensures all product data is fetched during the server render, resulting in a fully rendered page being sent to the client.
Component for a single product:
<template>
 <div v-if="product">
   <h1><PrismicRichText :field="product.title" /></h1>
   <img :src="product.imageUrl" :alt="asText(product.title)" width="300" />
   <PrismicRichText :field="product.description" />
   <p>Price: ${{ product.price }}</p>
 </div>
</template>
v-if="product" — check that the product data has already arrived.
<script setup lang="ts">
import { useRoute } from "vue-router";
import { useAsyncData } from "#app";
import { PrismicRichText } from "@prismicio/vue";
import type { IProduct } from "../../../../types/product.interface";
import { asText } from "@prismicio/helpers";

const route = useRoute();
const uid = route.params.uid as string;
const prismic = usePrismic();

const { data: productDoc } = await useAsyncData("product", async () => {
 return await prismic.client.getByUID("product", uid);
});

const product: IProduct | null = productDoc.value
 ? {
     id: productDoc.value.id,
     title: productDoc.value.data.product_title ?? [],
     description: productDoc.value.data.product_description ?? [],
     price: productDoc.value.data.price ?? 0,
     imageUrl: productDoc.value.data.product_image?.url ?? "",
     uid: productDoc.value.uid || "",
   }
 : null;
</script>
The data fetching is elegantly managed by useAsyncData(), which abstracts the logic for fetching and managing the loading state for the single product document.
Project structure looks like this:
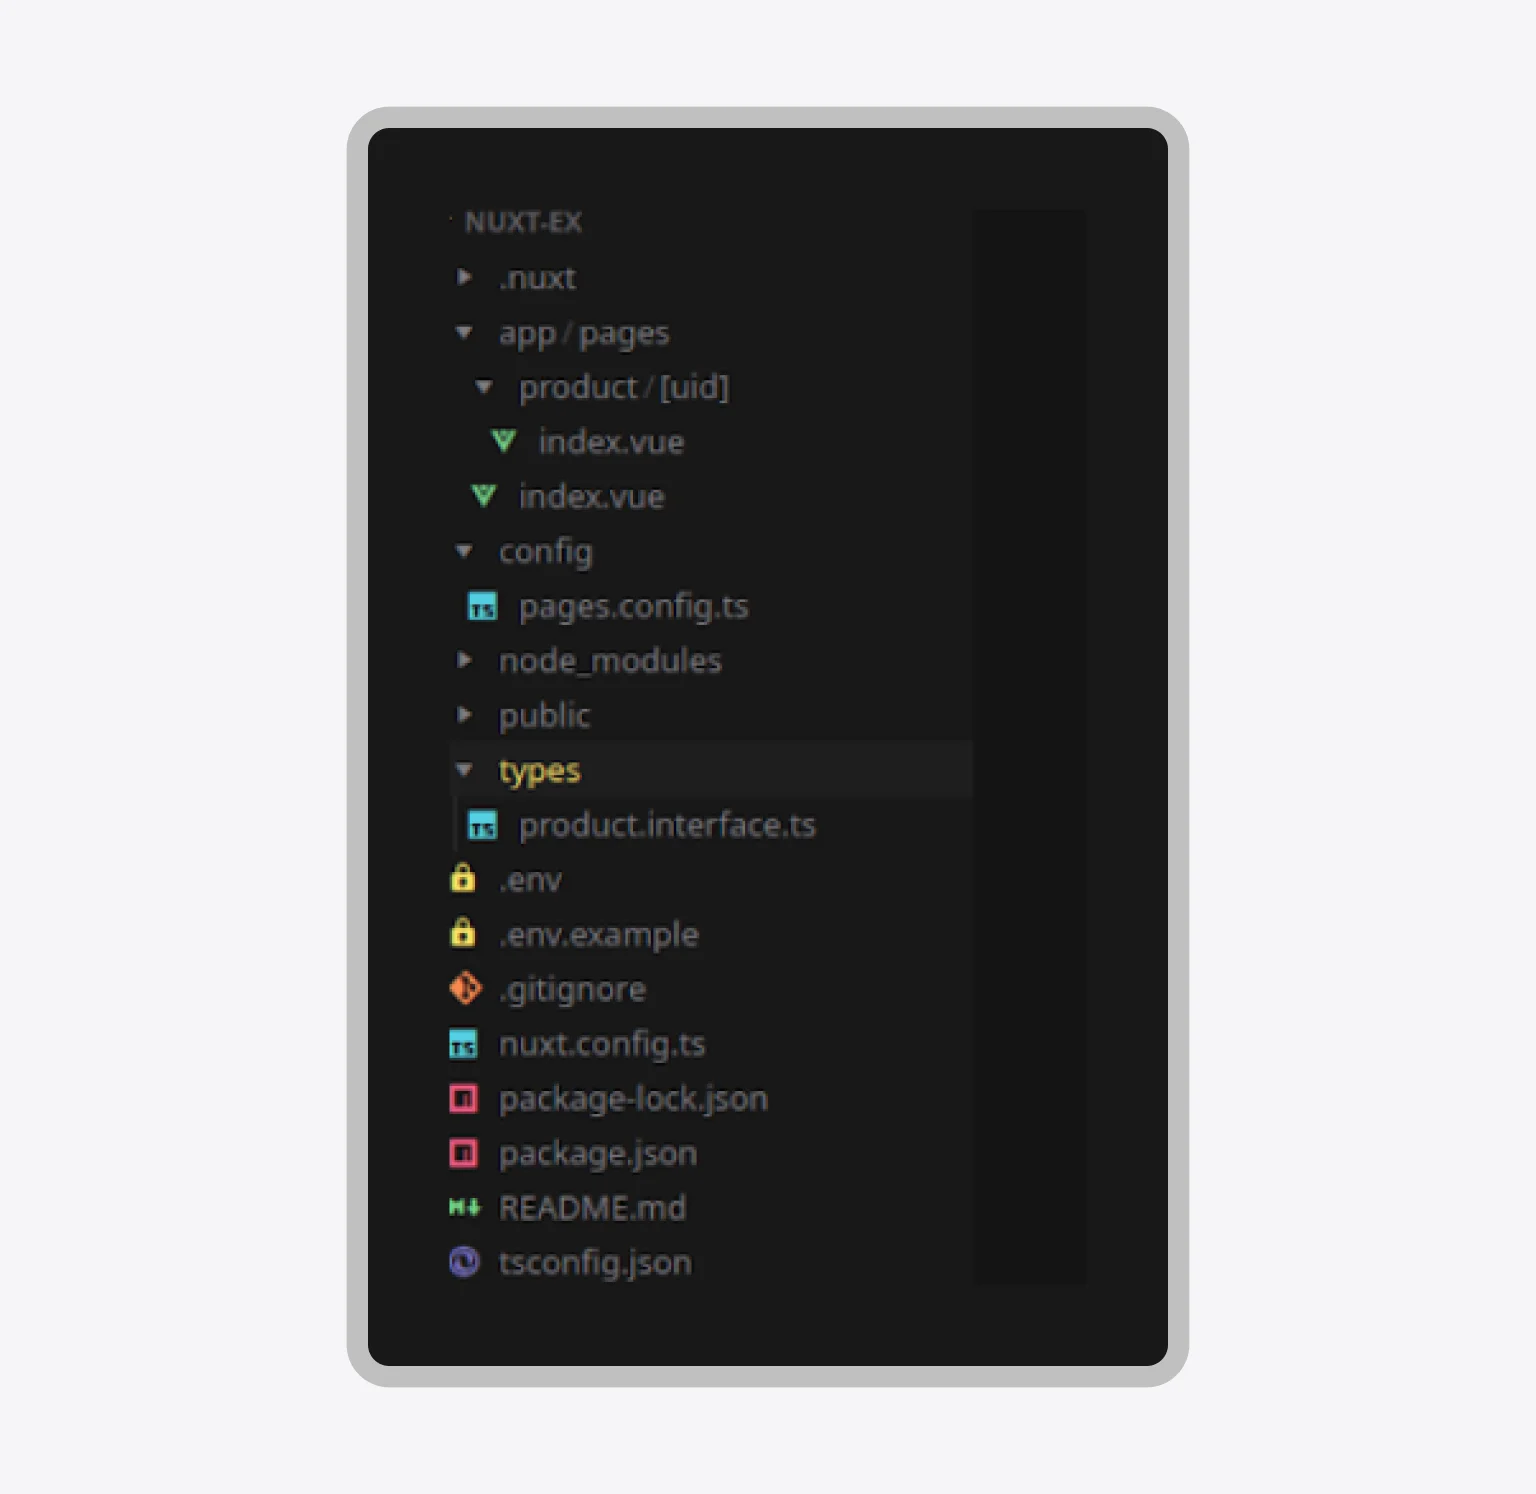
All routing logic takes place in app/pages, and otherwise, the project is similar to the Next project.
Connecting Prismic to Svelte
For frameworks that prioritize minimal overhead and smaller bundle sizes, such as Svelte, the integration of Prismic is performed entirely manually. This approach utilizes the framework’s native lifecycle hooks and reactivity system, offering the developer maximum control over the data flow. The process almost completely repeats the steps performed for React and Vue: project creation via Vite, .env initialization, client setup in src/prismicio.ts. The only difference is in package installation.
npm create vite@latest
After the prompt, choose:
- Framework: Svelte
- Variant: TypeScript
After entering the project, install additional dependencies:
npm install @prismicio/client @prismicio/helpers
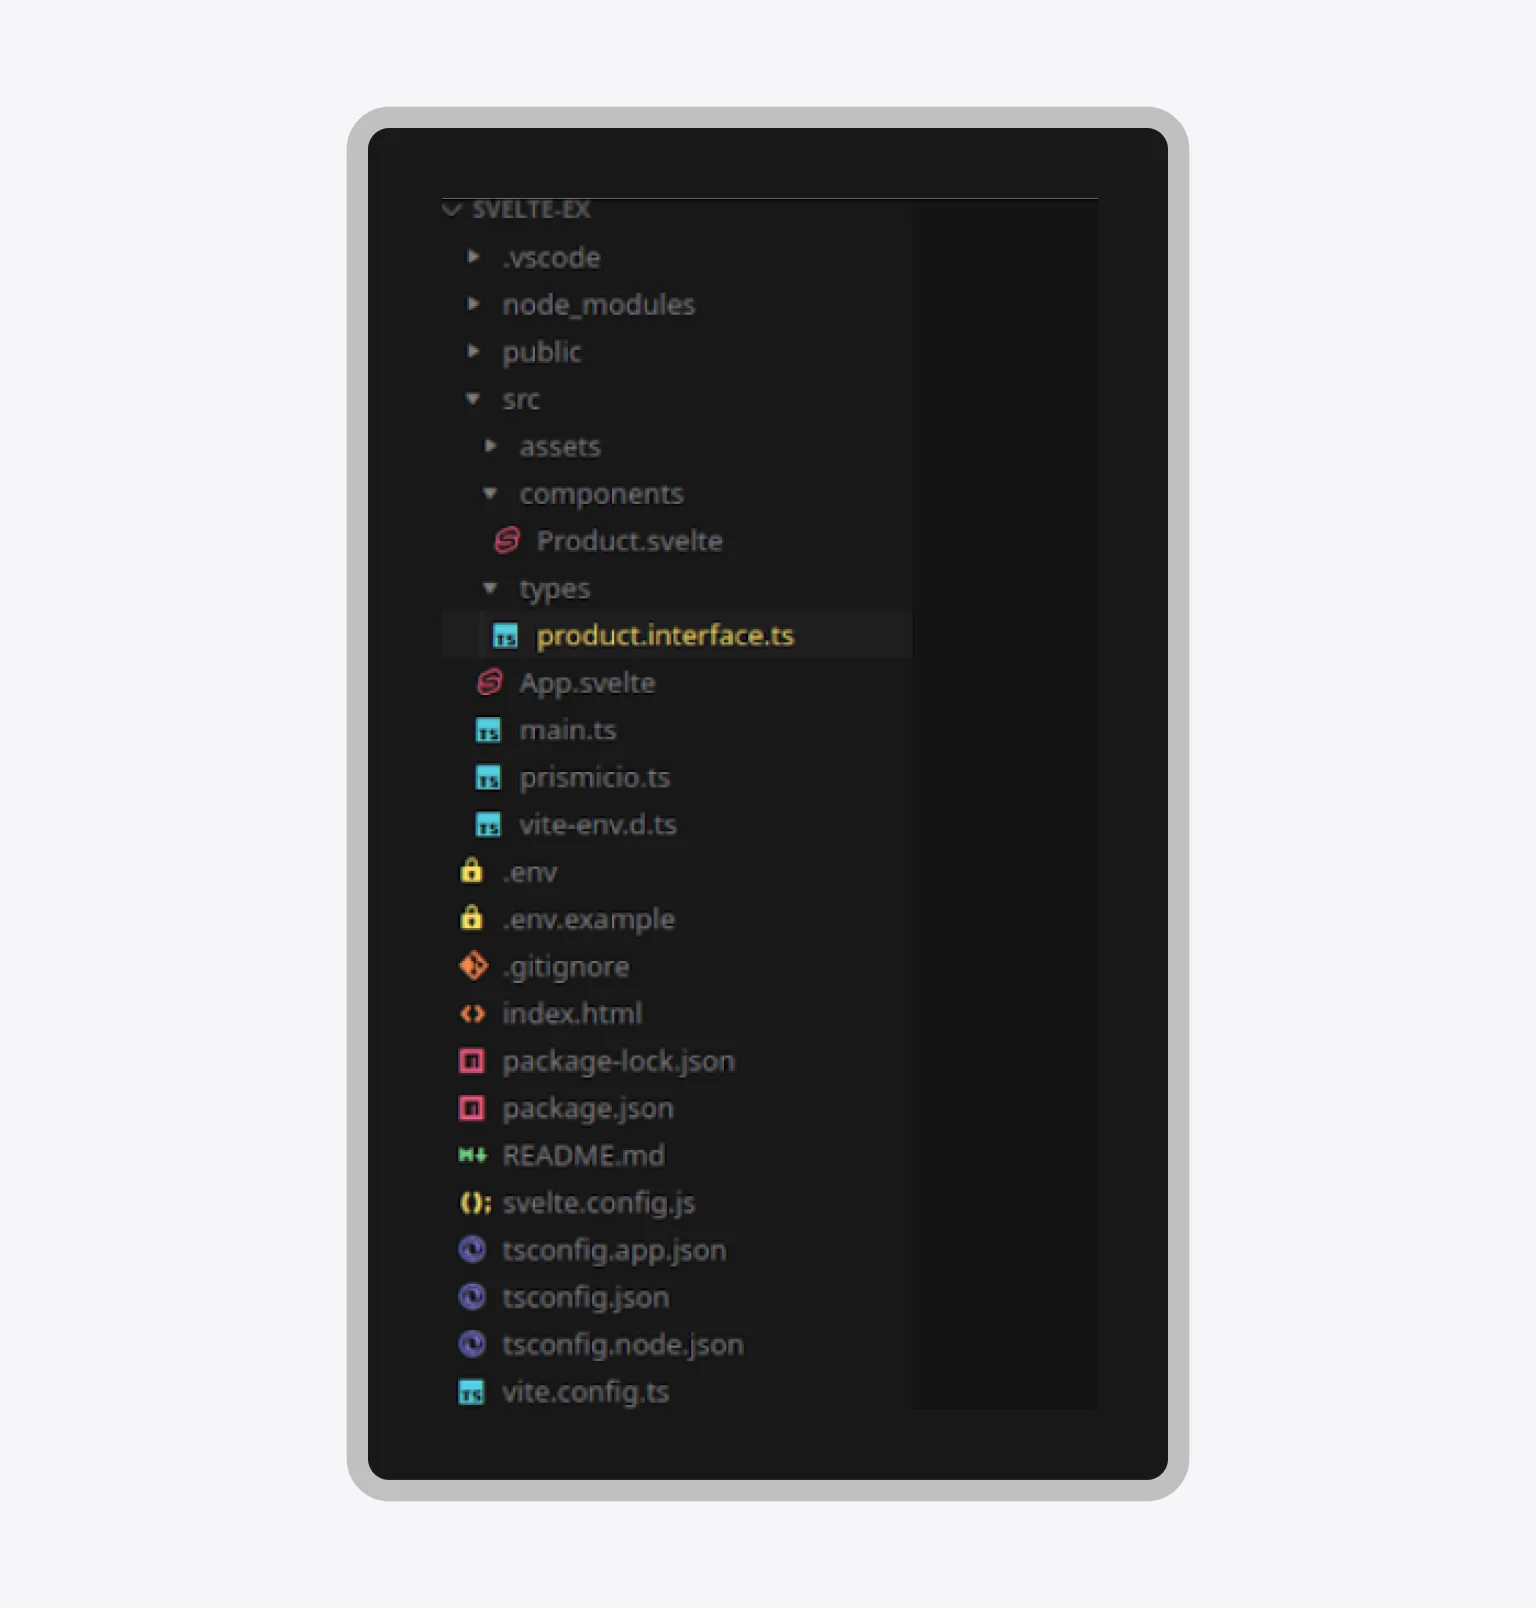
The project structure remains the same as in React:
Example of Prismic integration into Svelte
The Svelte component uses the onMount lifecycle hook to trigger the asynchronous data fetch. Svelte’s powerful built-in reactivity automatically updates the UI once the products variable is assigned a new value. Main component looks like this:
//src/app.svelte
<script lang="ts">
 import { onMount } from 'svelte';
 import { client } from './prismicio';
 import type { PrismicDocument } from '@prismicio/types';
 import type { IProduct } from './types/product.interface';
 import Product from './components/Product.svelte';


 let products: IProduct[] = [];

 function mapPrismicProducts(docs: PrismicDocument[]): IProduct[] {
   return docs.map((doc) => ({
     id: doc.id,
     title: doc.data.product_title ?? [],
     description: doc.data.product_description ?? [],
     price: doc.data.price ?? 0,
     imageUrl: doc.data.product_image?.url ?? '',
     uid: doc.uid || ''
   }));
 }

 onMount(async () => {
   try {
     const response = await client.getAllByType('product');
     products = mapPrismicProducts(response);
   } catch (error) {
     console.error('Error fetching products:', error);
   }
 });
</script>

<h1>Products</h1>

{#if products.length === 0}
 <p>Loading...</p>
{:else}
 <ul>
   {#each products as product (product.id)}
     <Product product={product} />
   {/each}
 </ul>
{/if}
The component’s logic is straightforward: onMount executes the fetch, and the component template uses Svelte’s native control flow ({#if} and {#each}) to handle the loading state and render the product list.
The child component is defined to accept props using the export let syntax, a Svelte-specific pattern for passing data down the component tree.
<script lang="ts">
   import type { IProduct } from '../types/product.interface';
   import { asText } from '@prismicio/helpers';
   export let product: IProduct;
 </script>
  <li>
   <h2>{asText(product.title)}</h2>
   <p>{asText(product.description)}</p>
   <p>Price: ${product.price}</p>
   {#if product.imageUrl}
     <img src={product.imageUrl} alt={asText(product.title)} width="200" />
   {/if}
 </li>
The template uses the asText helper extensively, as Svelte does not have a dedicated rich text component in its core package, relying instead on the helper to safely convert content for display.
Connecting Prismic to Solid
The initial setup repeats the manual process: project creation, .env file, and src/prismicio.ts client setup. The App component demonstrates how createResource efficiently handles data retrieval:
import { createResource, For } from "solid-js";
import * as prismic from "@prismicio/client";
import { client } from "./prismicio";
import Product from "./components/Product";
import type { IProduct } from "./components/Product";

function mapPrismicProducts(docs: prismic.PrismicDocument[]): IProduct[] {
 return docs.map((doc) => ({
   id: doc.id,
   title: doc.data.product_title ?? [],
   description: doc.data.product_description ?? [],
   price: doc.data.price ?? 0,
   imageUrl: doc.data.product_image?.url ?? "",
   uid: doc.uid || "",
 }));
}

async function fetchProducts() {
 const response = await client.getAllByType("product");
 return mapPrismicProducts(response);
}

export default function App() {
 const [products] = createResource(fetchProducts);

 return (
   <>
     <h1>Products from Solid</h1>
     <ul>
       <For each={products()}>{(p) => <Product {...p} />}</For>
     </ul>
   </>
 );
}
In SolidJS, createResource is used for working with asynchronous data. createResource combines useState and useEffect from React: launches an asynchronous function, stores the result, and tracks the loading and error states. The remaining implementation details align closely with the patterns established in other frameworks.
The SolidJS product component, similar to React, uses the PrismicRichText component, which is compatible across the component ecosystem.
import type { Component } from "solid-js";
import type { RichTextField } from "@prismicio/types";
import { asText } from "@prismicio/helpers";
import { PrismicRichText } from "@prismicio/react";

export interface IProduct {
 id: string;
 title: RichTextField;
 description: RichTextField;
 price: number;
 imageUrl: string;
 uid: string;
}

const Product: Component<IProduct> = ({
 id,
 title,
 description,
 price,
 imageUrl,
}) => {
 return (
   <li>
     <PrismicRichText field={title} />
     <img src={imageUrl} alt={asText(title)} width={200} />
     <div>
       <PrismicRichText field={description} />
     </div>
     <p>Price: ${price}</p>
   </li>
 );
};

export default Product;
The logic remains consistent: the component receives the data and uses Prismic-specific rendering tools for the content fields.
Comparison of integrations
The developer experience when connecting to Prismic is highly dependent on the chosen front-end framework’s architecture. While the core API logic remains universal, the amount of manual configuration and the ultimate performance ceiling vary significantly.
For optimal development speed and convenience, it is important to understand where each framework excels in the integration process.
- Next.js / Nuxt — These meta-frameworks offer the most streamlined integration because they have official modules and built-in server-side rendering mechanisms, quickly connecting Prismic and configuring API interaction.
- React / Vue — These libraries require manual client configuration (prismicio.ts), but the process is straightforward, relying on well-known client-side hooks (useEffect, onMounted).
- Svelte and Solid — Integration is performed entirely manually, demanding the developer manage all aspects of the data lifecycle. However, the universal Prismic API ensures the same core query logic can be reused.
It is worth noting that Prismic provides the Slice Machine — a powerful tool for creating and managing reusable components (slices) — but in this article, the focus was exclusively on connecting the foundational Prismic API. For deeper integration and development velocity, especially in large projects, consulting the official documentation on Slice Machine is highly recommended.
Ultimately, while Prismic’s API provides the universal language, the framework’s native architecture dictates the development speed and performance ceiling of the final content delivery system.
The strategic advantage of headless integration
Integrating Prismic represents a clear commitment to a modern, decoupled architecture, future-proofing your content delivery across any digital channel. The ease of connection with any front-end framework — from the highly optimized environments of Next.js and Nuxt to the minimal ecosystems of Svelte and Solid — ensures that your choice of front-end technology is driven purely by performance and developer preference, not content limitations. By adopting a headless CMS, you are fundamentally improving agility and maximizing the ROI on your development resources.
The key to long-term success with a headless strategy lies not just in the initial connection, but in ensuring a clean, type-safe, and highly performant data layer that can scale with your business. Whether you prioritize the speed of Nuxt’s modules or the superior performance of Next.js’s server components, maintaining a consistent API interaction is your ultimate competitive advantage. Our expertise in platform implementation and custom Prismic CMS development can help you navigate these complex architectural decisions, ensuring your project launches with a robust foundation that is ready to adapt and thrive.