








AWS bills for static site hosting look manageable until they don’t. Egress charges have no ceiling — a single traffic spike can cost more in a day than a typical month. How do you get off that billing model without downtime?
.avif)
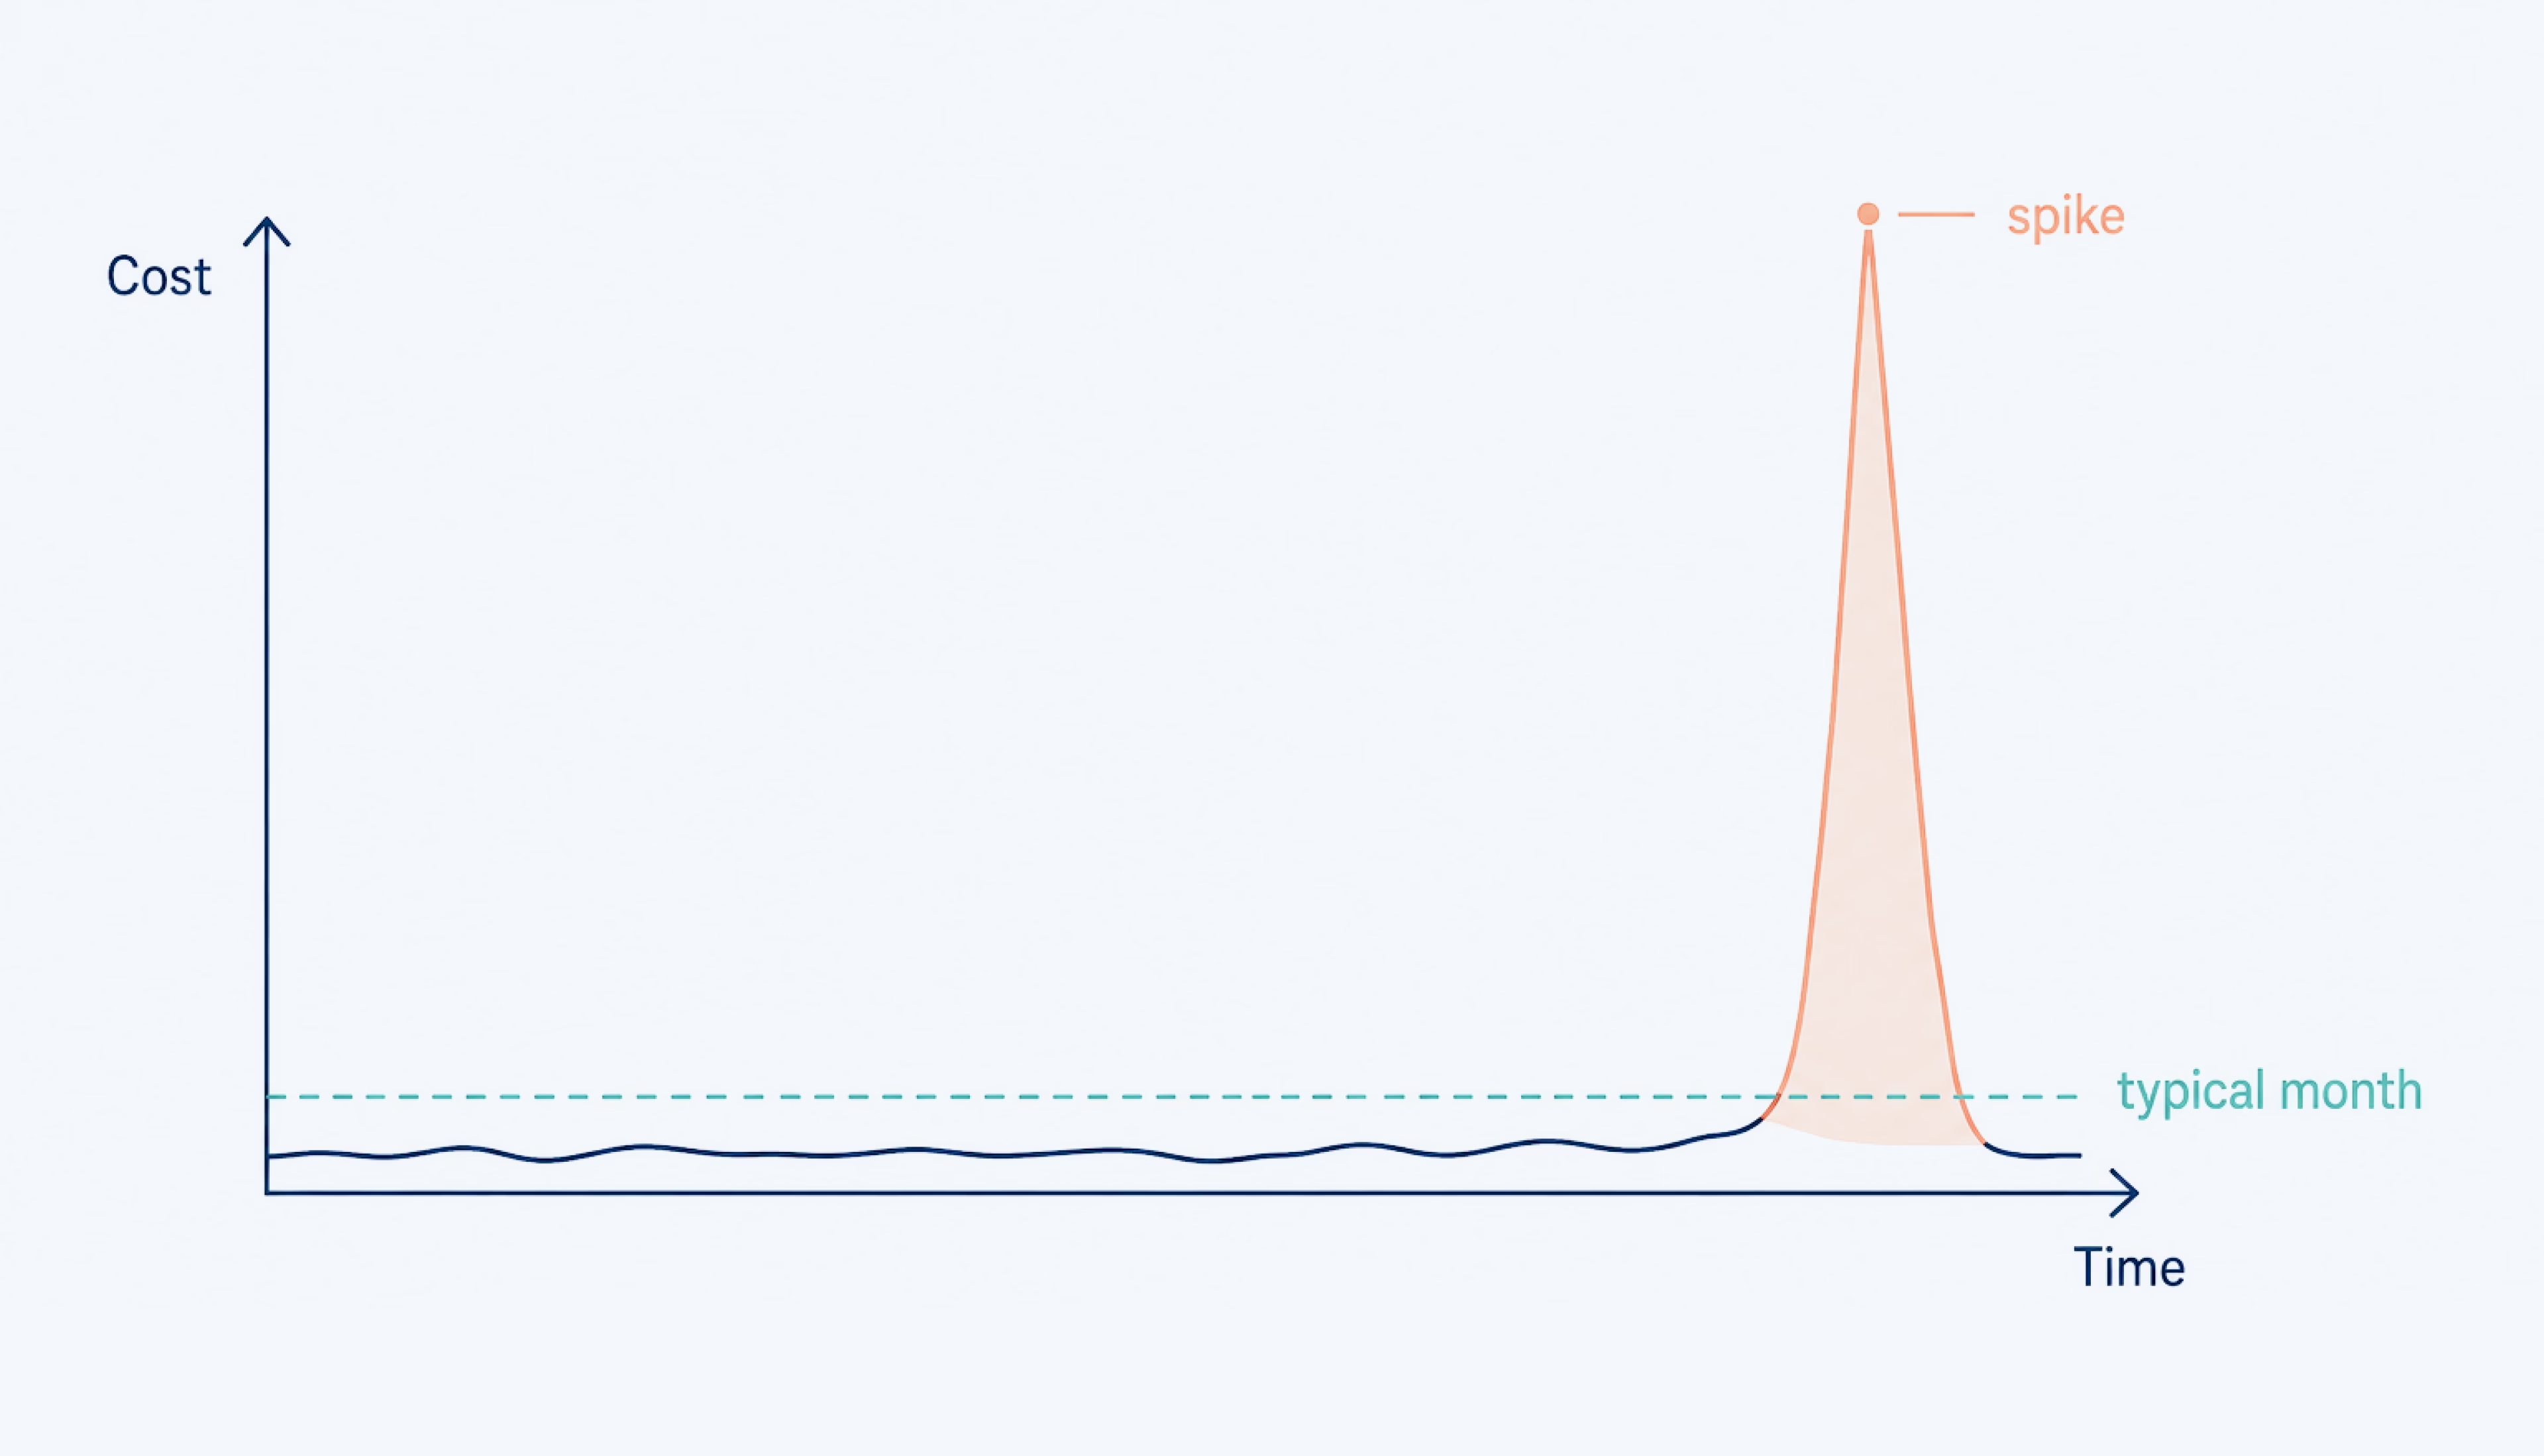
On CloudFront, it runs on egress — the one thing a static site produces in volume, and the one thing you stop controlling the moment someone else links to you. Cloudflare R2 leaves that meter off entirely and bills for storage instead, which, on a site made of HTML and images, is the cheap part.
The rest of the AWS stack simplifies with it: content delivery and certificate management come bundled at every tier — down to the free one. This guide covers the engineering side of that trade: data migration, Terraform, CI/CD, and a DNS cutover that stays reversible at every stage.
The egress argument is easy to make in the abstract and easy to overstate. The numbers below come from a live deployment rather than a pricing calculator: thrigma.org, an image-heavy Astro photography gallery running on S3 and CloudFront out of us-east-1.
Both stacks get priced the same way — line by line, at real usage, including the one-time cost of moving between them. A migration that pays for itself only in theory is worth knowing about before the work starts, rather than after.
Five services carry the gallery on AWS, and they bill on wildly different scales. Storage comes first, and it prices on three axes — bytes at rest, writes on deploy, and reads whenever CloudFront refreshes an expired edge cache:
| Line item | Unit cost | Monthly usage | Monthly cost |
|---|---|---|---|
| S3 Standard Storage | $0.023/GB | ~2 GB | $0.046 |
| S3 PUT/POST requests | $0.005/1,000 | ~500 (deploys) | $0.0025 |
| S3 GET requests | $0.0004/1,000 | ~50,000 (CF origin pulls) | $0.020 |
S3 storage and request charges for a 2 GB gallery
That puts S3 at roughly $0.07/month, a figure small enough to rule storage out as the source of the bill entirely.
CloudFront bills on a similar shape — transfer, requests, invalidations — at rates that produce a very different number:
| Line item | Unit cost | Monthly usage | Monthly cost |
|---|---|---|---|
| Data transfer out (first 10 TB) | $0.085/GB | ~50 GB | $4.25 |
| HTTPS requests | $0.0100/10,000 | ~200,000 | $0.20 |
| CloudFront invalidations (>1,000 paths) | $0.005/path | ~200 | $0.00 (free tier) |
CloudFront transfer, request, and invalidation charges
CloudFront lands at roughly $4.45/month, sixty times the storage line for the same files serving the same traffic.
The remaining three services contribute nothing. ACM issues and renews the certificate free of charge as long as it terminates on CloudFront. DNS already sits on Cloudflare’s free tier — the same records on Route 53 would run $0.50 per hosted zone plus $0.40 per million queries. IAM costs nothing, and the gallery stays comfortably inside the GitHub Actions free tier.
That brings the total to ~$4.52/month for a low-traffic photography site, which seems cheap until traffic spikes. A single popular Reddit or HN post can push 500 GB of egress in a day, and at $0.085/GB, that becomes a $42.50 surprise on a single day. CloudFront applies no egress cap and offers no circuit breaker, so the first indication that anything has happened arrives with the bill.
R2 ships with a free tier that comfortably absorbs a site of this size: 10 GB of storage, 10 million Class B (read) operations, and 1 million Class A (write) operations per month. For the 2 GB gallery, the entire R2 bill falls inside it:
| Line item | Unit cost | Monthly usage | Free tier allowance | Monthly cost |
|---|---|---|---|---|
| R2 Storage | $0.015/GB | ~2 GB | 10 GB free | $0.00 |
| R2 Class A ops (writes) | $4.50/million | ~500 | 1M free | $0.00 |
| R2 Class B ops (reads) | $0.36/million | ~200,000 | 10M free | $0.00 |
| Data transfer out (egress) | $0.00 | 50 GB | Unlimited (always free) | $0.00 |
| Cloudflare CDN | $0.00 (included) | ∞ | Included on all plans | $0.00 |
| Cloudflare TLS | $0.00 (included) | ∞ | Universal SSL, auto-renewed | $0.00 |
| Cloudflare DNS | $0.00 (free tier) | ∞ | Unlimited queries | $0.00 |
| Cache purge | $0.00 (unlimited) | ∞ | Unlimited purges | $0.00 |
Every R2 line item falls inside the free tier
The total comes to $0.00/month — and the zeros in the bottom half of that table matter as much as the ones at the top. Content delivery, TLS, DNS, and cache purging are bundled at every pricing tier rather than metered as separate services, which is where a meaningful part of the CloudFront and ACM configuration overhead disappears, along with the cost.
Sites larger than the gallery still land somewhere modest. At 50 GB of storage and 50 million reads, the bill works out to roughly $0.60 for storage plus $14.40 for operations — about $15/month, dominated entirely by read operations. Egress contributes nothing to that figure at any volume.
The spike scenario settles the same way. A Reddit or HN post that produces a $42.50 day on CloudFront produces a $0.00 day here, because egress is free regardless of how much of it there is. Nothing in the Cloudflare bill grows with traffic the way CloudFront’s transfer line does — there is simply no equivalent line item to grow.
On R2, the busiest day of the year and the quietest one cost exactly the same to serve.
The migration itself adds a one-time AWS egress charge of about $0.09/GB — roughly $0.18 for the 2 GB gallery or $45 for 500 GB.
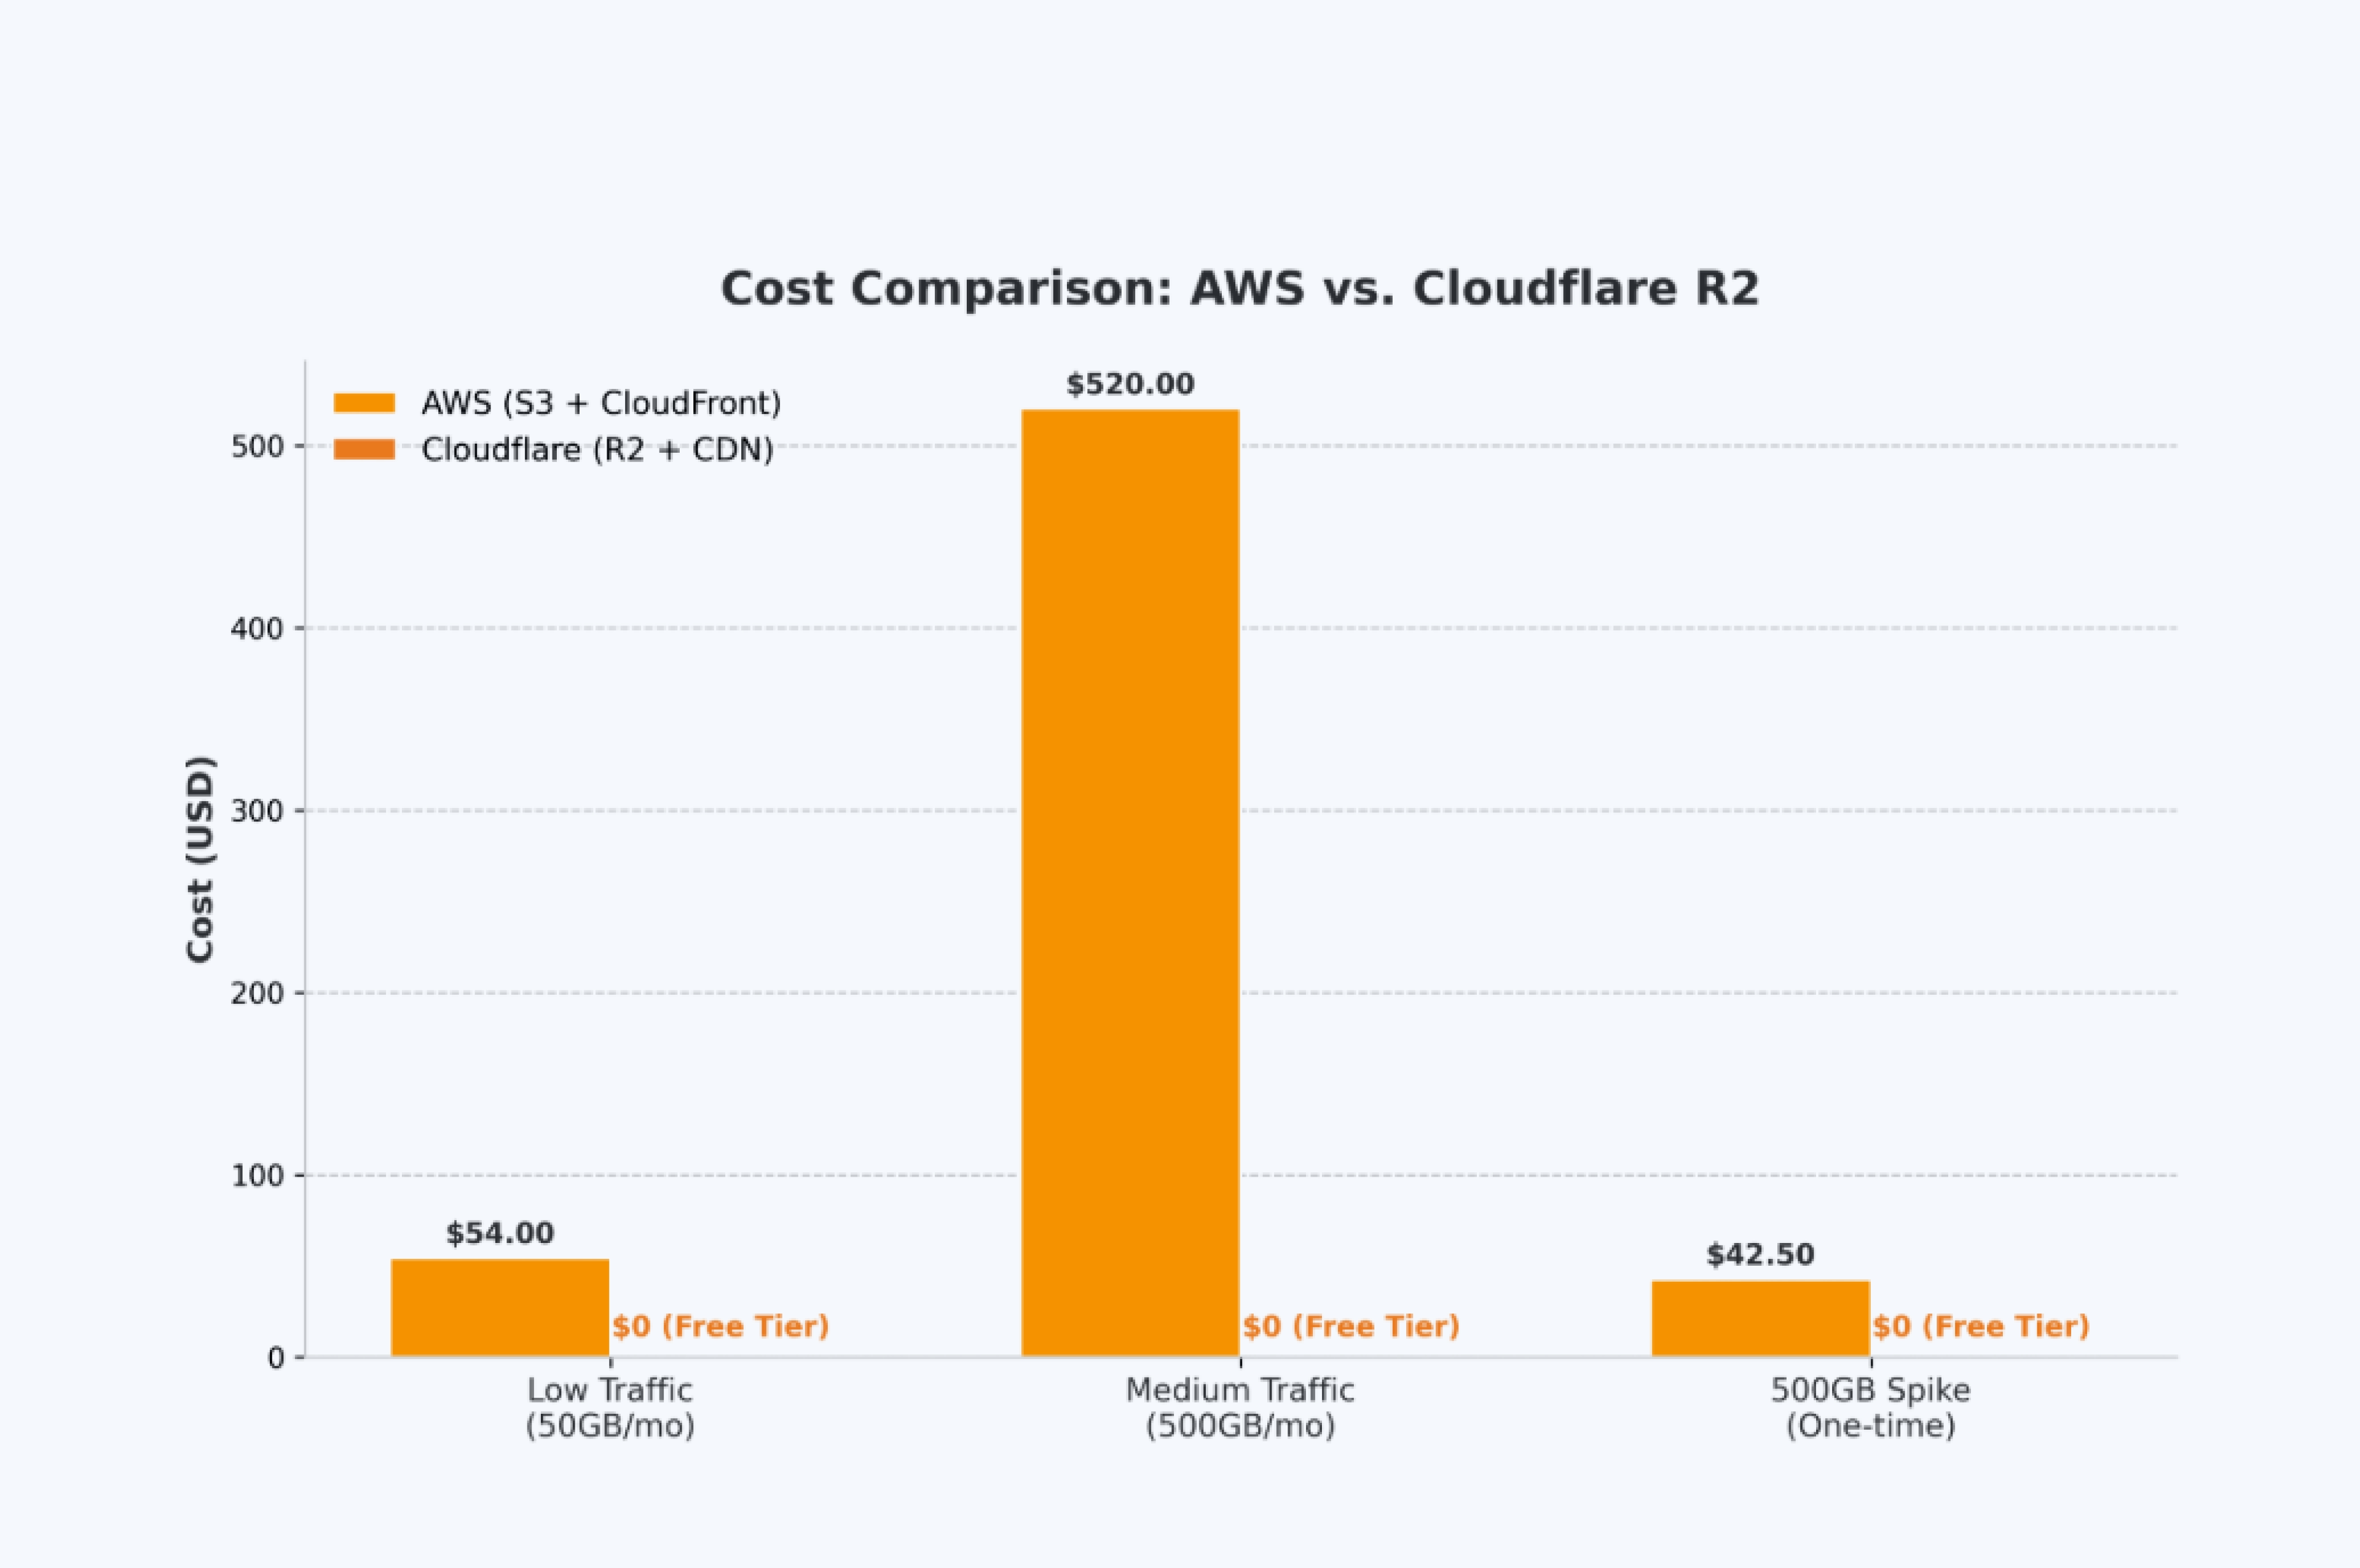
Extended across a year, the difference between the two bills stops being a rounding error:
| Traffic profile | AWS (S3+CF) | Cloudflare R2 |
|---|---|---|
| Low traffic (~50 GB/mo egress) | ~$54/year | ~$0.00/year (within free tier) |
| Medium traffic (~500 GB/mo) | ~$520/year | ~$0.00/year (within free tier) |
| Spike scenario (single 500 GB day) | +$42.50 one-time | +$0.00 |
Annual cost of the same traffic on each stack
Egress is the only line that differs. Remove it, and the bill stops scaling with the size of the audience.
A note on Cloudflare’s Terms of Service. Cloudflare’s free-tier TOS historically restricted using the CDN primarily to serve non-HTML content, a clause (the old §2.8) that gave image-heavy sites reason to hesitate. That restriction no longer applies.
R2 is explicitly designed and marketed for serving static assets, images, and video, among them, and the updated TOS — effective 2022 onward — removed the §2.8 language for R2-backed traffic. A photography gallery sits squarely inside R2’s intended purpose.
The cost case is clear. From here, the work is about moving the site without breaking delivery: preparing access, copying the data, reproducing the infrastructure, switching deployment, and cutting DNS only when the fallback is ready.
Have these in place before touching the infrastructure. If the domain is not already on Cloudflare DNS, move the nameservers 24–48 hours before migration.
{
  "Version": "2012-10-17",
  "Statement": [
    {
      "Sid": "ReadOnlyAccessForMigration",
      "Effect": "Allow",
      "Action": ["s3:GetObject", "s3:ListBucket"],
      "Resource": [
        "arn:aws:s3:::<YOUR_BUCKET_NAME>",
        "arn:aws:s3:::<YOUR_BUCKET_NAME>/*"
      ]
    }
  ]
}
# Install wrangler globally
npm install -g wrangler

# Authenticate -- opens browser for OAuth
wrangler login

# Verify authentication
wrangler whoami
# Should print: Account Name, Account ID
Collect these identifiers before you start:
| Value | Where to find it | Used in |
|---|---|---|
| Cloudflare Account ID | Dashboard → right sidebar on any zone page | Terraform, wrangler |
| Cloudflare Zone ID | Dashboard → zone Overview → right sidebar | Terraform |
| Source S3 bucket name | terraform output s3_bucket_name or AWS console | Data migration |
| Source S3 region | AWS console → S3 → bucket → Properties | Data migration |
| CloudFront distribution ID | terraform output cloudfront_distribution_id | Verification, cleanup |
| Domain name | Your domain, e.g., thrigma.org | DNS, R2 custom domain |
Identifiers to collect before starting the migration
Use a Custom Token rather than a Global API Key. For this migration, grant these account-level permissions:
| Scope | Permission | Level |
|---|---|---|
| Account | Transform rules | Edit |
| Account | Workers R2 storage | Edit |
| Account | Workers scripts | Edit |
Account-level permissions for the migration token
At the zone level:
| Scope | Permission | Level |
|---|---|---|
| Zone | Cache rules | Edit |
| Zone | Workers routes | Edit |
| Zone | Cache purge | Purge |
| Zone | DNS | Edit |
Zone-level permissions for the migration token
Under Zone Resources, select Include → Specific zone → <YOUR_DOMAIN>.
Together, these permissions cover the R2 bucket, DNS, rulesets, Worker routes, and cache purge. Restrict the token to the target zone.
The objective here is narrow: get every object out of the S3 bucket and into an R2 bucket with its metadata intact. Nothing about the live site changes while this happens — traffic keeps hitting CloudFront, DNS stays where it is, and users see nothing at all.
You can create the R2 bucket via Terraform (covered in Phase 2) or manually via the dashboard for an immediate start. If you are following this guide sequentially, create it manually now and import it into Terraform later:
# Create R2 bucket via wrangler.
# The --location flag is a hint, not a hard constraint.
# enam = Eastern North America -- pick the region closest to your primary audience.
# Options: enam, wnam, eeur, weur, apac
wrangler r2 bucket create <YOUR_BUCKET_NAME> --location enam
Confirm it exists before moving on:
wrangler r2 bucket list
# Should show: <YOUR_BUCKET_NAME>
The location hint deserves a moment’s thought, though less than the name suggests. It tells Cloudflare where to place the authoritative copy of the data, while reads are served from the CDN globally, regardless of what you pick. What matters is proximity to where the writes happen — for a site deployed from GitHub Actions on US-based runners, enam or wnam makes sense.
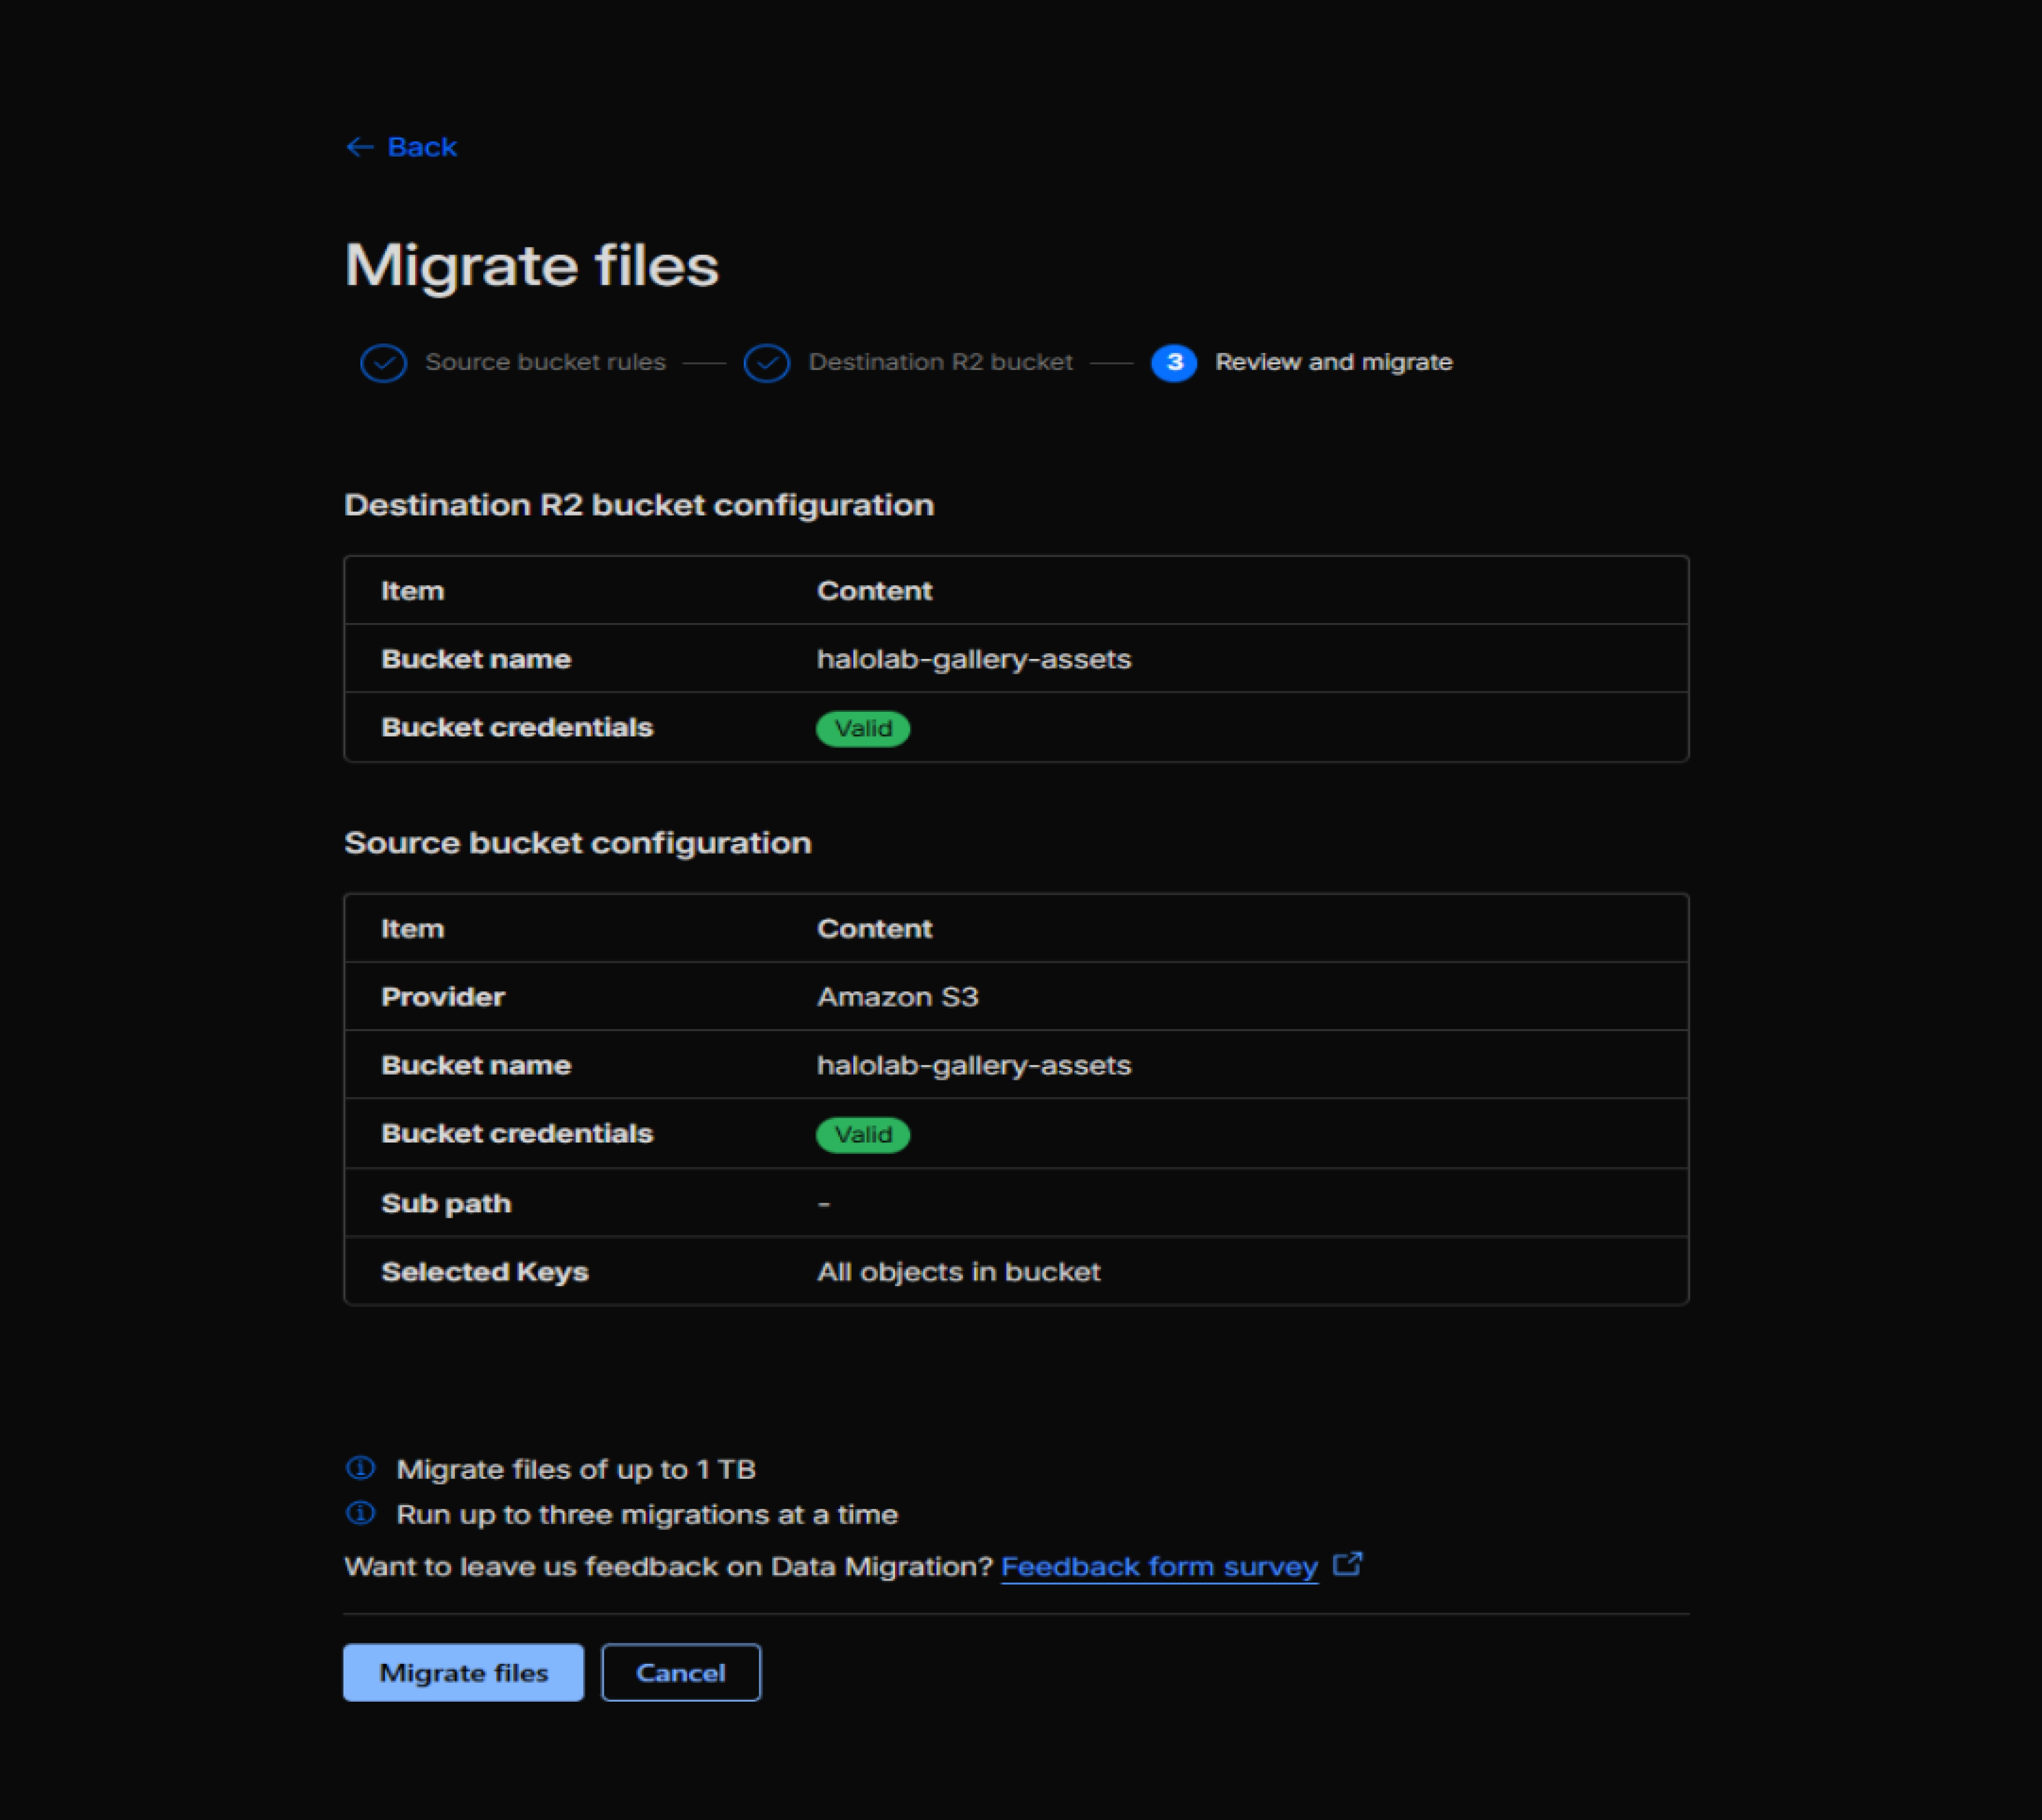
Cloudflare’s dashboard ships with a migration tool called Super Slurper that copies objects straight from S3 to R2 server-side. The transfer runs entirely between the two clouds — nothing routes through your local machine, which makes this the fastest path for buckets small enough to qualify. Walk through it in the dashboard:
Super Slurper runs in the background, and how long it takes scales with the bucket: a 2 GB bucket finishes in minutes, while 10–50 GB takes somewhere in the range of 30 to 60 minutes.
The convenience comes with real boundaries, and they are worth knowing before relying on the tool. Super Slurper handles up to roughly 50 GB reliably — larger buckets can time out or stall partway. It reports a single completion status rather than per-object progress, leaving no live view of what has been copied and what hasn’t.
A failed run is safe to restart, since already-copied objects get skipped. And only Content-Type survives the trip — any custom S3 metadata (x-amz-meta-*) stays behind.
When you want scripting control, live progress, and a run you can repeat reliably, the AWS CLI works directly against R2’s S3-compatible endpoint. It takes three steps.
First, create an R2 API token with Object Read & Write permissions at Dashboard → R2 → Manage R2 API Tokens.
Then configure two separate AWS CLI profiles — one pointing at the S3 source, one at the R2 destination:
# Profile 1: AWS S3 (source) -- uses your existing AWS credentials.
# If you already have a default profile or named profile for AWS, you can reuse it.
aws configure --profile aws-source

# When prompted:
# AWS Access Key ID: <AWS_ACCESS_KEY_ID>
# AWS Secret Access Key: <AWS_SECRET_ACCESS_KEY>
# Default region name: us-east-1
# Default output format: json

# Profile 2: Cloudflare R2 (destination) -- uses R2 API token credentials.
# Replace <ACCOUNT_ID> with your Cloudflare Account ID from the dashboard.
aws configure --profile r2

# When prompted:
# AWS Access Key ID: <R2_ACCESS_KEY_ID>
# AWS Secret Access Key: <R2_SECRET_ACCESS_KEY>
# Default region name: auto
# Default output format: json
Finally, sync through a local intermediary:
# IMPORTANT: aws s3 sync's --endpoint-url flag applies to ALL S3 calls in the
# command -- both source and destination. You CANNOT do a direct S3-to-R2 sync
# in a single command because the source lookup would also hit the R2 endpoint.
#
# Two-step approach: download from S3 to local, then upload from local to R2.

# Step 3a: Download from S3 to a local directory.
# --profile aws-source uses your standard AWS credentials against real S3.
mkdir -p /tmp/s3-mirror
aws s3 sync \
  s3://<YOUR_BUCKET_NAME> \
  /tmp/s3-mirror/ \
  --profile aws-source

# Step 3b: Upload from local directory to R2.
# --endpoint-url points the AWS CLI at R2's S3-compatible API.
# --profile r2 uses the R2 API token credentials.
aws s3 sync \
  /tmp/s3-mirror/ \
  s3://<YOUR_BUCKET_NAME> \
  --endpoint-url https://<ACCOUNT_ID>.r2.cloudflarestorage.com \
  --profile r2
This gives per-file progress output and can be cancelled/resumed at either step.
The two-step detour through the local disk is deliberate, and the reason catches people out. The AWS CLI v2 applies --endpoint-url to every S3 call in a command, so a direct aws s3 sync s3://source s3://dest --endpoint-url <R2> resolves the source against R2 as well, which either fails outright, because the bucket isn’t there yet, or reads from the wrong place entirely.
Downloading first and uploading second sidesteps the conflict. For a direct server-to-server copy with no local disk in the middle, rclone supports dual remotes natively.
Two things to keep in mind before running it. The local mirror needs enough free disk to hold the entire bucket — trivial at 2 GB, but past 100 GB, this approach stops making sense, and rclone takes over. And leave --delete out entirely during migration: if the destination is empty and a sync fails midway, --delete on a retry can remove objects that have already copied successfully. It belongs only in CI/CD deployments, where the build output is the authoritative set and stale files are meant to be pruned.
The obvious way to copy S3 to R2 in one command is exactly the way that breaks.
Past 100 GB, both Super Slurper and aws s3 sync start to strain — timeouts on one, disk pressure on the other. rclone is built for exactly this case, syncing server-to-server with checksumming and heavy parallelism:
# Install rclone
# macOS: brew install rclone
# Windows: winget install Rclone.Rclone
# Linux: curl https://rclone.org/install.sh | sudo bash

# Configure source (AWS S3)
rclone config create aws-s3 s3 \
  provider AWS \
  access_key_id <AWS_ACCESS_KEY> \
  secret_access_key <AWS_SECRET_KEY> \
  region us-east-1

# Configure destination (Cloudflare R2)
# Note: R2 uses the s3 provider type -- it's S3-compatible.
rclone config create cloudflare-r2 s3 \
  provider Cloudflare \
  access_key_id <R2_ACCESS_KEY> \
  secret_access_key <R2_SECRET_KEY> \
  endpoint https://<ACCOUNT_ID>.r2.cloudflarestorage.com \
  acl private

# Run the sync.
# --checksum: verify each object by MD5, not just size/mtime. Catches silent corruption.
# --progress: real-time transfer stats.
# --transfers=32: 32 parallel streams. Adjust based on your bandwidth.
# --checkers=16: 16 parallel hash-check workers.
# --fast-list: uses fewer API calls by listing the entire bucket upfront.
rclone sync \
  aws-s3:<YOUR_BUCKET_NAME> \
  cloudflare-r2:<YOUR_BUCKET_NAME> \
  --checksum \
  --progress \
  --transfers=32 \
  --checkers=16 \
  --fast-list
Once a bucket crosses 500 GB, a single copy is too long to hold everything still, so the migration splits into phases that let the site keep deploying until the last moment:
# Incremental sync -- only copies objects that changed since the last run.
# Much faster because most objects are already in R2.
rclone sync \
  aws-s3:<YOUR_BUCKET_NAME> \
  cloudflare-r2:<YOUR_BUCKET_NAME> \
  --checksum \
  --progress \
  --transfers=32
# Integrity check: compare every object in S3 against R2.
# Reports any missing or mismatched files.
# --one-way: only checks source→destination (are all S3 objects in R2?).
rclone check \
  aws-s3:<YOUR_BUCKET_NAME> \
  cloudflare-r2:<YOUR_BUCKET_NAME> \
  --one-way
# Expected output: "0 differences found" if migration is complete.
One thing to budget for at this scale: S3 charges $0.09/GB to move data out to the internet, so a 500 GB migration adds roughly $45 to the final AWS bill against $0.18 for a 2 GB site. It lands once, on the way out, and never again.
Once the data is across, the last thing to check is that every object still knows what it is. R2 generally preserves the Content-Type it inherited from S3, but any object that was originally uploaded without an explicit MIME type can arrive as application/octet-stream, which tells the browser to download the file rather than render it. Spot-check a handful before trusting the whole bucket:
# Spot-check a few objects.
# You need the R2 custom domain set up (Phase 2) or the R2.dev subdomain enabled.
# You can check either via wrangler:
wrangler r2 object get <YOUR_BUCKET_NAME> gallery/photo-1.jpg --pipe > /dev/null
# Or via Cloudflare R2 Bucket UI

# The headers printed will show Content-Type.
# Look for: content-type: image/jpeg
# BAD: content-type: application/octet-stream (browsers will download, not render)
Anything mistyped can be corrected in place. Re-uploading with an explicit --content-type rewrites the object’s metadata without moving the body again, since R2 deduplicates the content:
# Re-upload with correct Content-Type using wrangler.
# This overwrites the object's metadata without re-uploading the body
# (R2 deduplicates content).
wrangler r2 object put <YOUR_BUCKET_NAME>/gallery/photo-1.jpg \
  --file ./dist/gallery/photo-1.jpg \
  --content-type "image/jpeg"
For more than a handful, script it — iterate over the mistyped objects and let the file or mime-types npm package infer the correct type from each extension.
This is the destination state in full — the complete Cloudflare infrastructure that stands in for S3, CloudFront, and ACM combined. It’s worth reading all the way through before running a single terraform apply, because several of the resources below are interdependent, and one of them is deliberately held back until Phase 4. The shape it all adds up to is deceptively simple:
Both providers stay declared for now. Cloudflare handles everything on the destination side — R2, DNS, the CDN proxy, automatic TLS, and cache rules — while AWS remains only long enough to read from the S3 source during migration, and comes out entirely in the Phase 5 cleanup:
# terraform/environments/prod/providers.tf
#
# Key change from the AWS stack:
# - The AWS provider is retained temporarily for the S3 source bucket
#   (needed during migration, removed in Phase 5 cleanup).
# - The Cloudflare provider handles ALL destination infrastructure:
#   R2, DNS, CDN (via proxy), TLS (automatic), and cache rules.
terraform {
  required_version = ">= 1.5"
  required_providers {
    aws = {
      source  = "hashicorp/aws"
      version = "~> 5.0"
    }
    cloudflare = {
      source  = "cloudflare/cloudflare"
      # cloudflare_r2_bucket_domain was introduced in provider v4.20.
      # Pin to >= 4.20, < 5.0 to ensure the resource exists while staying
      # within the v4.x line. Using ~> 4.0 would resolve to 4.0.0 which
      # does NOT have this resource.
      version = ">= 4.20, < 5.0"
    }
  }
}

provider "aws" {
  region = "us-east-1"
}

# The Cloudflare provider reads CLOUDFLARE_API_TOKEN from the environment.
# Do NOT hardcode tokens in Terraform files.
provider "cloudflare" {}
The version pin on the Cloudflare provider is worth respecting rather than loosening. The cloudflare_r2_bucket_domain resource that carries the entire cutover only exists from v4.20 onward, so the constraint holds the provider inside the v4.x line while guaranteeing that resource is present — a convenient-looking ~> 4.0 would quietly resolve to 4.0.0, where it isn’t.
A single cloudflare_r2_bucket resource stands in for the whole cluster of S3 resources the old stack needed — the bucket itself plus its separate versioning, public-access-block, and lifecycle configurations all collapse into this one block:
# terraform/modules/storage-r2/main.tf
#
# Replaces: aws_s3_bucket, aws_s3_bucket_versioning,
# aws_s3_bucket_public_access_block, aws_s3_bucket_lifecycle_configuration
resource "cloudflare_r2_bucket" "site" {
  account_id = var.cloudflare_account_id
  name       = var.bucket_name

  # Location hint -- NOT the same as an AWS region.
  # R2 does not have regions in the AWS sense. This hint guides where the
  # authoritative data is physically stored. The CDN serves globally regardless.
  # Options: "ENAM" (Eastern North America), "WNAM", "EEUR", "WEUR", "APAC"
  location = var.location_hint
}
That simplicity costs you a few things S3 provided, and they are worth weighing before committing:
Most static sites can skip this one entirely. CORS rules only matter when assets are served across origins — images pulled by an <img> tag on another domain, cross-origin @font-face fonts, or API calls fetching R2-hosted JSON from a different origin. If everything lives on a single domain, move on. If not, this configures it:
# terraform/modules/storage-r2/cors.tf
#
# Include this ONLY if the site serves assets cross-origin:
# - Images loaded by <img> on a different domain
# - Fonts loaded cross-origin (@font-face)
# - API calls from a different origin to R2-hosted JSON
#
# For a standard public-read site where everything is on the same domain,
# you can skip this resource entirely.

resource "cloudflare_r2_bucket_cors_configuration" "site" {
  account_id = var.cloudflare_account_id
  bucket     = cloudflare_r2_bucket.site.name

  cors_rules = [
    {
      # Allow GET and HEAD from any origin.
      # Tighten "allowed_origins" to your specific domains in production
      # if you know exactly which origins will request assets.
      allowed_origins = ["https://<YOUR_DOMAIN>"]
      allowed_methods = ["GET", "HEAD"]
      allowed_headers = ["*"]
      max_age_seconds = 86400  # Browser caches preflight for 24 hours
    }
  ]
}
This is the resource the whole migration turns on. A single cloudflare_r2_bucket_domain maps the domain straight to the R2 bucket and switches on Cloudflare’s proxy — global CDN, DDoS protection, analytics, and TLS in one move — standing in for CloudFront and ACM together.
Which is exactly why it stays out of the Phase 2 apply. Applying it creates or replaces the domain’s DNS record, and that instantly flips live traffic off CloudFront and onto R2. This flip is the cutover itself, and it belongs in Phase 4 — after the data is verified and CI/CD has been switched over. The code is shown here for reference; you add it to the config and apply it later:
# terraform/modules/storage-r2/domain.tf
#
# Replaces: aws_cloudfront_distribution, aws_cloudfront_origin_access_control,
# aws_acm_certificate, aws_acm_certificate_validation,
# cloudflare_record (the CNAME to CloudFront)
#
# What this does:
# 1. Creates a DNS record pointing your domain to the R2 bucket
# 2. Enables Cloudflare proxy (orange cloud) -- this IS the CDN
# 3. Provisions a free Cloudflare TLS certificate automatically
# 4. Zero egress: requests served from Cloudflare's edge, not from R2 origin
#
# WARNING: Applying this resource IS the DNS cutover.
# It replaces any existing DNS record for the domain.
# Only apply after data migration (Phase 1) and CI/CD switchover (Phase 3) are complete.
resource "cloudflare_r2_bucket_domain" "site" {
  account_id = var.cloudflare_account_id
  bucket     = cloudflare_r2_bucket.site.name
  domain     = var.domain_name
  zone_id    = var.cloudflare_zone_id

  # The domain is automatically proxied (orange cloud) when using
  # cloudflare_r2_bucket_domain. This is what makes R2 a full CDN replacement.
  # Proxied = Cloudflare CDN + DDoS + TLS + Analytics. All free tier.
  enabled = true
}
Two things about this resource are easy to trip over. Because it creates the DNS record itself, you don't add a separate cloudflare_record for site routing — and if an existing cloudflare_record.site_routing still points at CloudFront; Terraform will hit a conflict. Remove the old DNS module, or that record, before applying the domain resource in Phase 4.
The TLS side, by contrast, asks nothing of you: Cloudflare issues a Universal SSL certificate automatically for any proxied domain and renews it for free, with no ACM resource and no DNS-validation step to manage.
CloudFront expresses caching through cache behaviors — path patterns tied to managed cache policies. Cloudflare uses rulesets instead, but the strategy underneath is identical: cache static assets hard with long TTLs, and keep mutable content like index.html fresh by revalidating it on every request:
# terraform/modules/cdn-r2/cache.tf
#
# Replaces: CloudFront default_cache_behavior + Managed-CachingOptimized policy
#
# Strategy:
# 1. Static assets (JS, CSS, images, fonts) → cache for 1 year, immutable.
#    These have content hashes in filenames from the Astro build (e.g., app.a1b2c3.js).
#    Safe to cache forever -- a new filename = a new cache entry.
#
# 2. HTML files (index.html, 404.html) → short TTL or bypass cache.
#    index.html changes on every deploy. If cached at the edge with a long TTL,
#    users see stale content until the TTL expires or you manually purge.
#    "no-cache" means Cloudflare revalidates with R2 origin on every request
#    (but still "caches" -- it uses If-None-Match/304 to avoid full re-downloads).
resource "cloudflare_ruleset" "cache_rules" {
  zone_id = var.cloudflare_zone_id
  name    = "R2 Cache Rules"
  kind    = "zone"
  phase   = "http_request_cache_settings"

  # Rule 1: Cache static assets aggressively.
  # Match by file extension -- same approach as CloudFront path patterns,
  # but Cloudflare expressions are more flexible.
  rules {
    action = "set_cache_settings"
    action_parameters {
      cache = true
      edge_ttl {
        mode    = "override_origin"
        default = 31536000  # 1 year in seconds
      }
      browser_ttl {
        mode    = "override_origin"
        default = 31536000
      }
    }
    expression  = "(http.request.uri.path.extension in {\"js\" \"css\" \"jpg\" \"jpeg\" \"png\" \"gif\" \"svg\" \"webp\" \"avif\" \"woff\" \"woff2\" \"ico\"})"
    description = "Cache static assets for 1 year"
    enabled     = true
  }

  # Rule 2: Bypass edge cache for HTML files.
  # This ensures a deploy to R2 is immediately visible without purging.
  # Cloudflare still uses conditional requests (304 Not Modified) so
  # the cost in origin reads is minimal.
  rules {
    action = "set_cache_settings"
    action_parameters {
      cache = true
      edge_ttl {
        mode    = "override_origin"
        default = 0  # Always revalidate with origin
      }
      browser_ttl {
        mode    = "override_origin"
        default = 0
      }
    }
    # Note: http.request.uri.path eq "" is omitted -- Cloudflare normalizes
    # the root path to "/", so an empty path never occurs in practice.
    expression  = "(http.request.uri.path.extension eq \"html\" or http.request.uri.path eq \"/\")"
    description = "Revalidate HTML on every request"
    enabled     = true
  }
}
The difference from CloudFront comes down to where the deploy cost lands:
The AWS stack injected its security headers — HSTS, X-Frame-Options, X-Content-Type-Options, Referrer-Policy, and X-XSS-Protection — through an aws_cloudfront_response_headers_policy. Cloudflare covers the same ground natively, with a Transform Rule that modifies response headers and needs no Worker or Page Rule behind it:
# terraform/modules/cdn-r2/security_headers.tf
#
# Replaces: aws_cloudfront_response_headers_policy.security_headers
#
# The AWS config set:
# - Strict-Transport-Security: max-age=31536000; includeSubDomains; preload
# - X-Frame-Options: DENY
# - X-Content-Type-Options: nosniff
# - Referrer-Policy: strict-origin-when-cross-origin
# - X-XSS-Protection: 1; mode=block
#
# Cloudflare can inject these via a Transform Rule (response header modification).
# No Worker or Page Rule needed -- this is a native Cloudflare feature.
resource "cloudflare_ruleset" "security_headers" {
  zone_id = var.cloudflare_zone_id
  name    = "Security Response Headers"
  kind    = "zone"
  phase   = "http_response_headers_transform"

  # Note on schema: the Cloudflare provider v4 expects 'headers' as a list
  # of objects inside action_parameters. Validate your exact provider version
  # against the registry docs -- run `terraform providers schema -json` if unsure.
  rules {
    action = "rewrite"
    action_parameters {
      # Each header is a separate object in the headers list.
      # The Cloudflare provider v4 uses repeated 'headers' blocks (HCL syntax)
      # which Terraform serializes as a list of objects internally.

      # Control what referrer info is sent with requests originating from this site.
      headers {
        name      = "Referrer-Policy"
        operation = "set"
        value     = "strict-origin-when-cross-origin"
      }

      # HSTS: force HTTPS for 1 year, include subdomains, eligible for preload list.
      # Identical to the AWS CloudFront HSTS config.
      headers {
        name      = "Strict-Transport-Security"
        operation = "set"
        value     = "max-age=31536000; includeSubDomains; preload"
      }

      # Prevent MIME-type sniffing: browser must respect Content-Type header.
      headers {
        name      = "X-Content-Type-Options"
        operation = "set"
        value     = "nosniff"
      }

      # Prevent clickjacking: the site cannot be loaded in an iframe.
      headers {
        name      = "X-Frame-Options"
        operation = "set"
        value     = "DENY"
      }

      # DEPRECATED: X-XSS-Protection is no longer recommended by OWASP.
      # Modern browsers ignore it, and in some older browsers it can introduce
      # vulnerabilities (reflected XSS via the filter itself).
      # Prefer Content-Security-Policy instead. Included here only for backward
      # compatibility with legacy browsers -- remove when your analytics confirm
      # zero traffic from IE/old Edge.
      headers {
        name      = "X-XSS-Protection"
        operation = "set"
        value     = "1; mode=block"
      }
    }
    expression  = "true"  # Apply to all requests
    description = "Add security response headers to all responses"
    enabled     = true
  }
}
Because the cloudflare_ruleset schema varies by provider version, validate this block against the version you pin.
R2 custom domains do not replicate CloudFront’s custom error responses or subdirectory index resolution, so both behaviors need to be handled explicitly.
A missing object otherwise returns Cloudflare’s generic error page instead of /404.html.
R2 also does not resolve subdirectory routes such as /gallery/ to /gallery/index.html, which breaks those routes on a static multi-page site.
A single Worker closes both gaps: it retries directory-like paths against index.html and falls back to /404.html when the content is genuinely missing.
# terraform/modules/cdn-r2/error_pages.tf
#
# Replaces:
# - aws_cloudfront_distribution.custom_error_response blocks (404 handling)
# - CloudFront default_root_object behavior for subdirectories
#
# This Worker handles two R2 custom domain limitations:
# 1. Subdirectory index.html resolution (/gallery/ → /gallery/index.html)
# 2. Custom 404 error pages (missing objects → /404.html)
#
# Does NOT add latency for direct asset requests (images, CSS, JS) -- those
# return immediately from R2. The Worker only does extra fetches for directory
# paths that 404 on the first attempt.
resource "cloudflare_worker_script" "error_pages" {
  account_id = var.cloudflare_account_id
  name       = "error-pages-${replace(var.domain_name, ".", "-")}"

  # module = true is REQUIRED for ES module syntax (export default {}).
  # Without it, the Cloudflare provider expects Service Worker syntax
  # (addEventListener("fetch", ...)) and deploy will fail.
  module = true

  # compatibility_date pins the Workers runtime behavior to a specific date.
  # This prevents breaking changes in the Workers runtime from affecting your
  # deployed Worker. Set to your deploy date or a known-good date.
  # See: https://developers.cloudflare.com/workers/configuration/compatibility-dates/
  compatibility_date = "2024-09-23"

  # Here, we place worker code directly inside the terraform. To make it more robust, we could've extracted this to JavaScript file and use file() expression to import it.
  content = <<-JS
export default {
  async fetch(request, env, ctx) {
    const url = new URL(request.url);

    // Fetch from the origin (R2 via custom domain).
    // Workers on a route do NOT re-trigger themselves -- fetch(request)
    // goes directly to the origin, not back through the Worker.
    let response = await fetch(request);

    // If R2 returned the object successfully, pass it through unchanged.
    // This is the fast path -- images, CSS, JS, and existing HTML all return here.
    if (response.ok) {
      return response;
    }

    // R2 returned 404. Two possible reasons:
    // 1. The path is a directory (e.g., /gallery/) and the actual object
    //    is /gallery/index.html. R2 doesn't auto-resolve this.
    // 2. The path genuinely doesn't exist -- serve the custom 404 page.

    // Try subdirectory index.html resolution.
    // Only attempt if the path looks like a directory (ends with / or has no extension).
    const path = url.pathname;
    const lastSegment = path.split("/").pop();
    const hasExtension = lastSegment.includes(".");

    if (!hasExtension) {
      // Normalize: /gallery → /gallery/ → /gallery/index.html
      const indexPath = path.endsWith("/")
        ? path + "index.html"
        : path + "/index.html";
      const indexUrl = new URL(request.url);
      indexUrl.pathname = indexPath;
      const indexResponse = await fetch(indexUrl.toString());
      if (indexResponse.ok) {
        // Found the subdirectory index.html -- return it.
        return indexResponse;
      }
    }

    // Genuinely missing -- serve the custom 404.html.
    url.pathname = "/404.html";
    const errorPage = await fetch(url.toString());
    // Return the custom error page with a 404 status code.
    // Preserve the 404 status so search engines correctly index this as "Not Found".
    return new Response(errorPage.body, {
      status: 404,
      statusText: "Not Found",
      headers: errorPage.headers,
    });
  }
};
JS
  # The Worker is attached to a route below, not deployed globally.
}

resource "cloudflare_worker_route" "error_pages" {
  zone_id     = var.cloudflare_zone_id
  pattern     = "${var.domain_name}/*"
  script_name = cloudflare_worker_script.error_pages.name
}
With every resource defined, the module layout falls into two clear groups — storage concerns under storage-r2, delivery concerns under cdn-r2:
terraform/
  environments/prod/
    main.tf            # Module calls
    providers.tf       # AWS + Cloudflare providers
    variables.tf       # Input variables
    terraform.tfvars   # Actual values (account IDs, domain, bucket name)
  modules/
    storage-r2/        # R2 bucket + CORS + custom domain
      main.tf
      domain.tf
      cors.tf          # Optional
      variables.tf
      outputs.tf
    cdn-r2/            # Cache rules + security headers + error pages
      cache.tf
      security_headers.tf
      error_pages.tf   # Worker for custom 404 handling
      variables.tf
The main.tf that wires the two modules together is the destination state in miniature, with one deliberate omission — the domain binding stays out until the cutover:
# terraform/environments/prod/main.tf
#
# THE "AFTER" STATE -- full Cloudflare R2 infrastructure.
# This replaces the S3 + CloudFront + ACM + OIDC CI/CD modules.
#
# NOTE: The cloudflare_r2_bucket_domain is NOT included here.
# It is applied separately in Phase 4 (the DNS cutover).
# Adding it here would immediately flip live traffic to R2.

module "storage_r2" {
  source                = "../../modules/storage-r2"

  cloudflare_account_id = var.cloudflare_account_id
  cloudflare_zone_id    = var.cloudflare_zone_id
  bucket_name           = var.bucket_name
  # domain_name is NOT passed here -- the domain binding is applied in Phase 4.
  location_hint = "ENAM"  # Eastern North America -- match your primary audience
}

module "cdn_r2" {

  source                = "../../modules/cdn-r2"

  cloudflare_account_id = var.cloudflare_account_id
  cloudflare_zone_id    = var.cloudflare_zone_id
  domain_name           = var.domain_name
}
The variable values that feed it go in terraform.tfvars, with each placeholder swapped for a real value — the Zone ID and Account ID both sit in the Cloudflare dashboard under a zone’s Overview, right sidebar:
# terraform/environments/prod/terraform.tfvars
domain_name           = "<YOUR_DOMAIN>"
bucket_name           = "<YOUR_BUCKET_NAME>"
cloudflare_zone_id    = "<CLOUDFLARE_ZONE_ID>"
cloudflare_account_id = "<CLOUDFLARE_ACCOUNT_ID>"
github_repo           = "<GITHUB_ORG>/<GITHUB_REPO>"
One step has to happen before the first apply. If you created the R2 bucket by hand earlier — the manual wrangler route from the bucket-creation step — Terraform doesn’t yet know it exists and will try to create it again, failing with a “bucket already exists” error. Import it into state first:
cd terraform/environments/prod

# Import the R2 bucket into Terraform state.
# Replace <CLOUDFLARE_ACCOUNT_ID> with your Account ID.
# The bucket name should match what you created: <YOUR_BUCKET_NAME>
terraform import \
  module.storage_r2.cloudflare_r2_bucket.site \
  <CLOUDFLARE_ACCOUNT_ID>/<YOUR_BUCKET_NAME>

# Expected output: "Import successful!"
# Terraform now knows the bucket exists and won't try to recreate it.
With the bucket imported, run a plan and read it carefully before applying — this is the checkpoint that confirms nothing destructive is about to happen. Four things should hold true:
With those four checks in mind, run the plan, confirm each one against the output, and apply:
cd terraform/environments/prod

terraform init -upgrade  # Pull latest Cloudflare provider
terraform plan
# Review output carefully. Expected: 3-5 resources to add (cache rules, security headers, Worker).
# The R2 bucket should show 0 changes (already imported).
# The DNS record should NOT change yet.

terraform apply
The current pipeline authenticates through AWS OIDC, syncs the build to S3, and invalidates CloudFront. In the R2 version, the build stays; authentication, upload target, and cache handling change.
The replacement deploy uses aws s3 sync against R2’s S3-compatible endpoint because wrangler still uploads R2 objects one file at a time.
The same two-pass Cache-Control strategy carries over:
#
# This workflow:
# 1. Builds the Astro site (identical build step)
# 2. Deploys build output to R2 using aws s3 sync against R2's S3-compatible API
# 3. No cache invalidation step needed -- edge TTL=0 on HTML means fresh
#    content is served immediately. Static assets use content-hashed filenames.
#
# Secrets required:
#   R2_ACCESS_KEY_ID     -- from Cloudflare R2 API token (S3-compatible credentials)
#   R2_SECRET_ACCESS_KEY -- from the same R2 API token
#   R2_ENDPOINT_URL      -- https://<ACCOUNT_ID>.r2.cloudflarestorage.com
#   R2_BUCKET_NAME       -- the R2 bucket name (e.g., <YOUR_BUCKET_NAME>)
#   CLOUDFLARE_API_TOKEN -- (optional) only needed if using explicit cache purge
#   CLOUDFLARE_ZONE_ID   -- (optional) only needed if using explicit cache purge
#
# What's gone:
#   - id-token:write permission (no OIDC)
#   - aws-actions/configure-aws-credentials (no IAM role assumption)
#   - aws cloudfront create-invalidation (no invalidation cost)
#
# What changed:
#   - aws s3 sync now targets R2's endpoint instead of S3
#   - Split Cache-Control headers are preserved (same two-pass approach)

name: Deploy Site to Cloudflare

on:
  workflow_dispatch:
    inputs:
      environment:
        description: "Deployment environment"
        required: true
        default: "production"
        type: choice
        options:
          - production

# No id-token permission needed. Cloudflare uses S3-compatible API credentials.
permissions:
  contents: read

jobs:
  build:
    name: Build Astro Site
    runs-on: ubuntu-latest
    steps:
      - uses: actions/checkout@v4
      - uses: oven-sh/setup-bun@v2
        with:
          bun-version: latest
      - run: bun install --frozen-lockfile
      - run: bun run build

      - uses: actions/upload-artifact@v4
        with:
          name: dist
          path: dist/
          retention-days: 7

  deploy:
    name: Deploy to Cloudflare R2
    runs-on: ubuntu-latest
    needs: build
    environment: ${{ inputs.environment }}

    # Configure AWS CLI to talk to R2's S3-compatible API.
    # R2 accepts standard AWS Signature v4 requests.
    env:
      AWS_ACCESS_KEY_ID: ${{ secrets.R2_ACCESS_KEY_ID }}
      AWS_SECRET_ACCESS_KEY: ${{ secrets.R2_SECRET_ACCESS_KEY }}
      AWS_DEFAULT_REGION: auto

    steps:
      - uses: actions/download-artifact@v4
        with:
          name: dist
          path: dist/

      # Deploy to R2 using aws s3 sync with the R2 endpoint.
      # This replaces: configure-aws-credentials + s3 sync to S3 + cloudfront invalidation.
      #
      # Two-pass sync replicates the AWS workflow's split Cache-Control strategy:
      # Pass 1: Hashed static assets (JS, CSS, images, fonts) with immutable 1-year cache.
      # Pass 2: Mutable files (HTML, XML, TXT) with must-revalidate so deploys are immediate.
      #
      # Note on --delete: safe to use here because dist/ is the build output and is
      # the authoritative set of files. Any object in R2 not in dist/ is stale.
      - name: Sync to R2
        run: |
          # Pass 1: Static assets -- long cache, immutable.
          aws s3 sync dist/ s3://${{ secrets.R2_BUCKET_NAME }}/ \
            --endpoint-url ${{ secrets.R2_ENDPOINT_URL }} \
            --delete \
            --exclude "gallery/*" \ # Exclude gallery from the first pass to ensure index.html gets the correct cache-control.
            --cache-control "public, max-age=31536000, immutable" \
            --exclude "*.html" \
            --exclude "*.xml" \
            --exclude "*.txt"

          # Pass 2: HTML and mutable files -- revalidate on every request.
          # This ensures users see the latest deploy without a cache purge.
          aws s3 sync dist/ s3://${{ secrets.R2_BUCKET_NAME }}/ \
            --endpoint-url ${{ secrets.R2_ENDPOINT_URL }} \
            --cache-control "public, max-age=0, must-revalidate" \
            --exclude "*" \
            --include "*.html" \
            --include "*.xml" \
            --include "*.txt"

      # Optional: explicit cache purge if you serve long-TTL assets at stable URLs.
      # NOT needed if all JS/CSS filenames are content-hashed (which Astro does).
      # Uncomment only if you have assets at fixed URLs that change on deploy.
      #
      # - name: Purge Cloudflare cache
      #   run: |
      #     curl -X POST \
      #       "https://api.cloudflare.com/client/v4/zones/${{ secrets.CLOUDFLARE_ZONE_ID }}/purge_cache" \
      #       -H "Authorization: Bearer ${{ secrets.CLOUDFLARE_API_TOKEN }}" \
      #       -H "Content-Type: application/json" \
      #       --data '{"purge_everything":true}'

      - name: Deployment summary
        run: |
          echo "## Deployment Successful" >> $GITHUB_STEP_SUMMARY
          echo "" >> $GITHUB_STEP_SUMMARY
          echo "- **Target:** Cloudflare R2 (${{ secrets.R2_BUCKET_NAME }})" >> $GITHUB_STEP_SUMMARY
          echo "- **Domain:** https://<YOUR_DOMAIN>" >> $GITHUB_STEP_SUMMARY
          echo "- **Cache:** HTML revalidates on every request. Static assets cached 1 year." >> $GITHUB_STEP_SUMMARY
R2 is S3-compatible, so aws s3 sync keeps directory uploads, per-file Cache-Control headers, progress reporting, and --delete for stale build output.
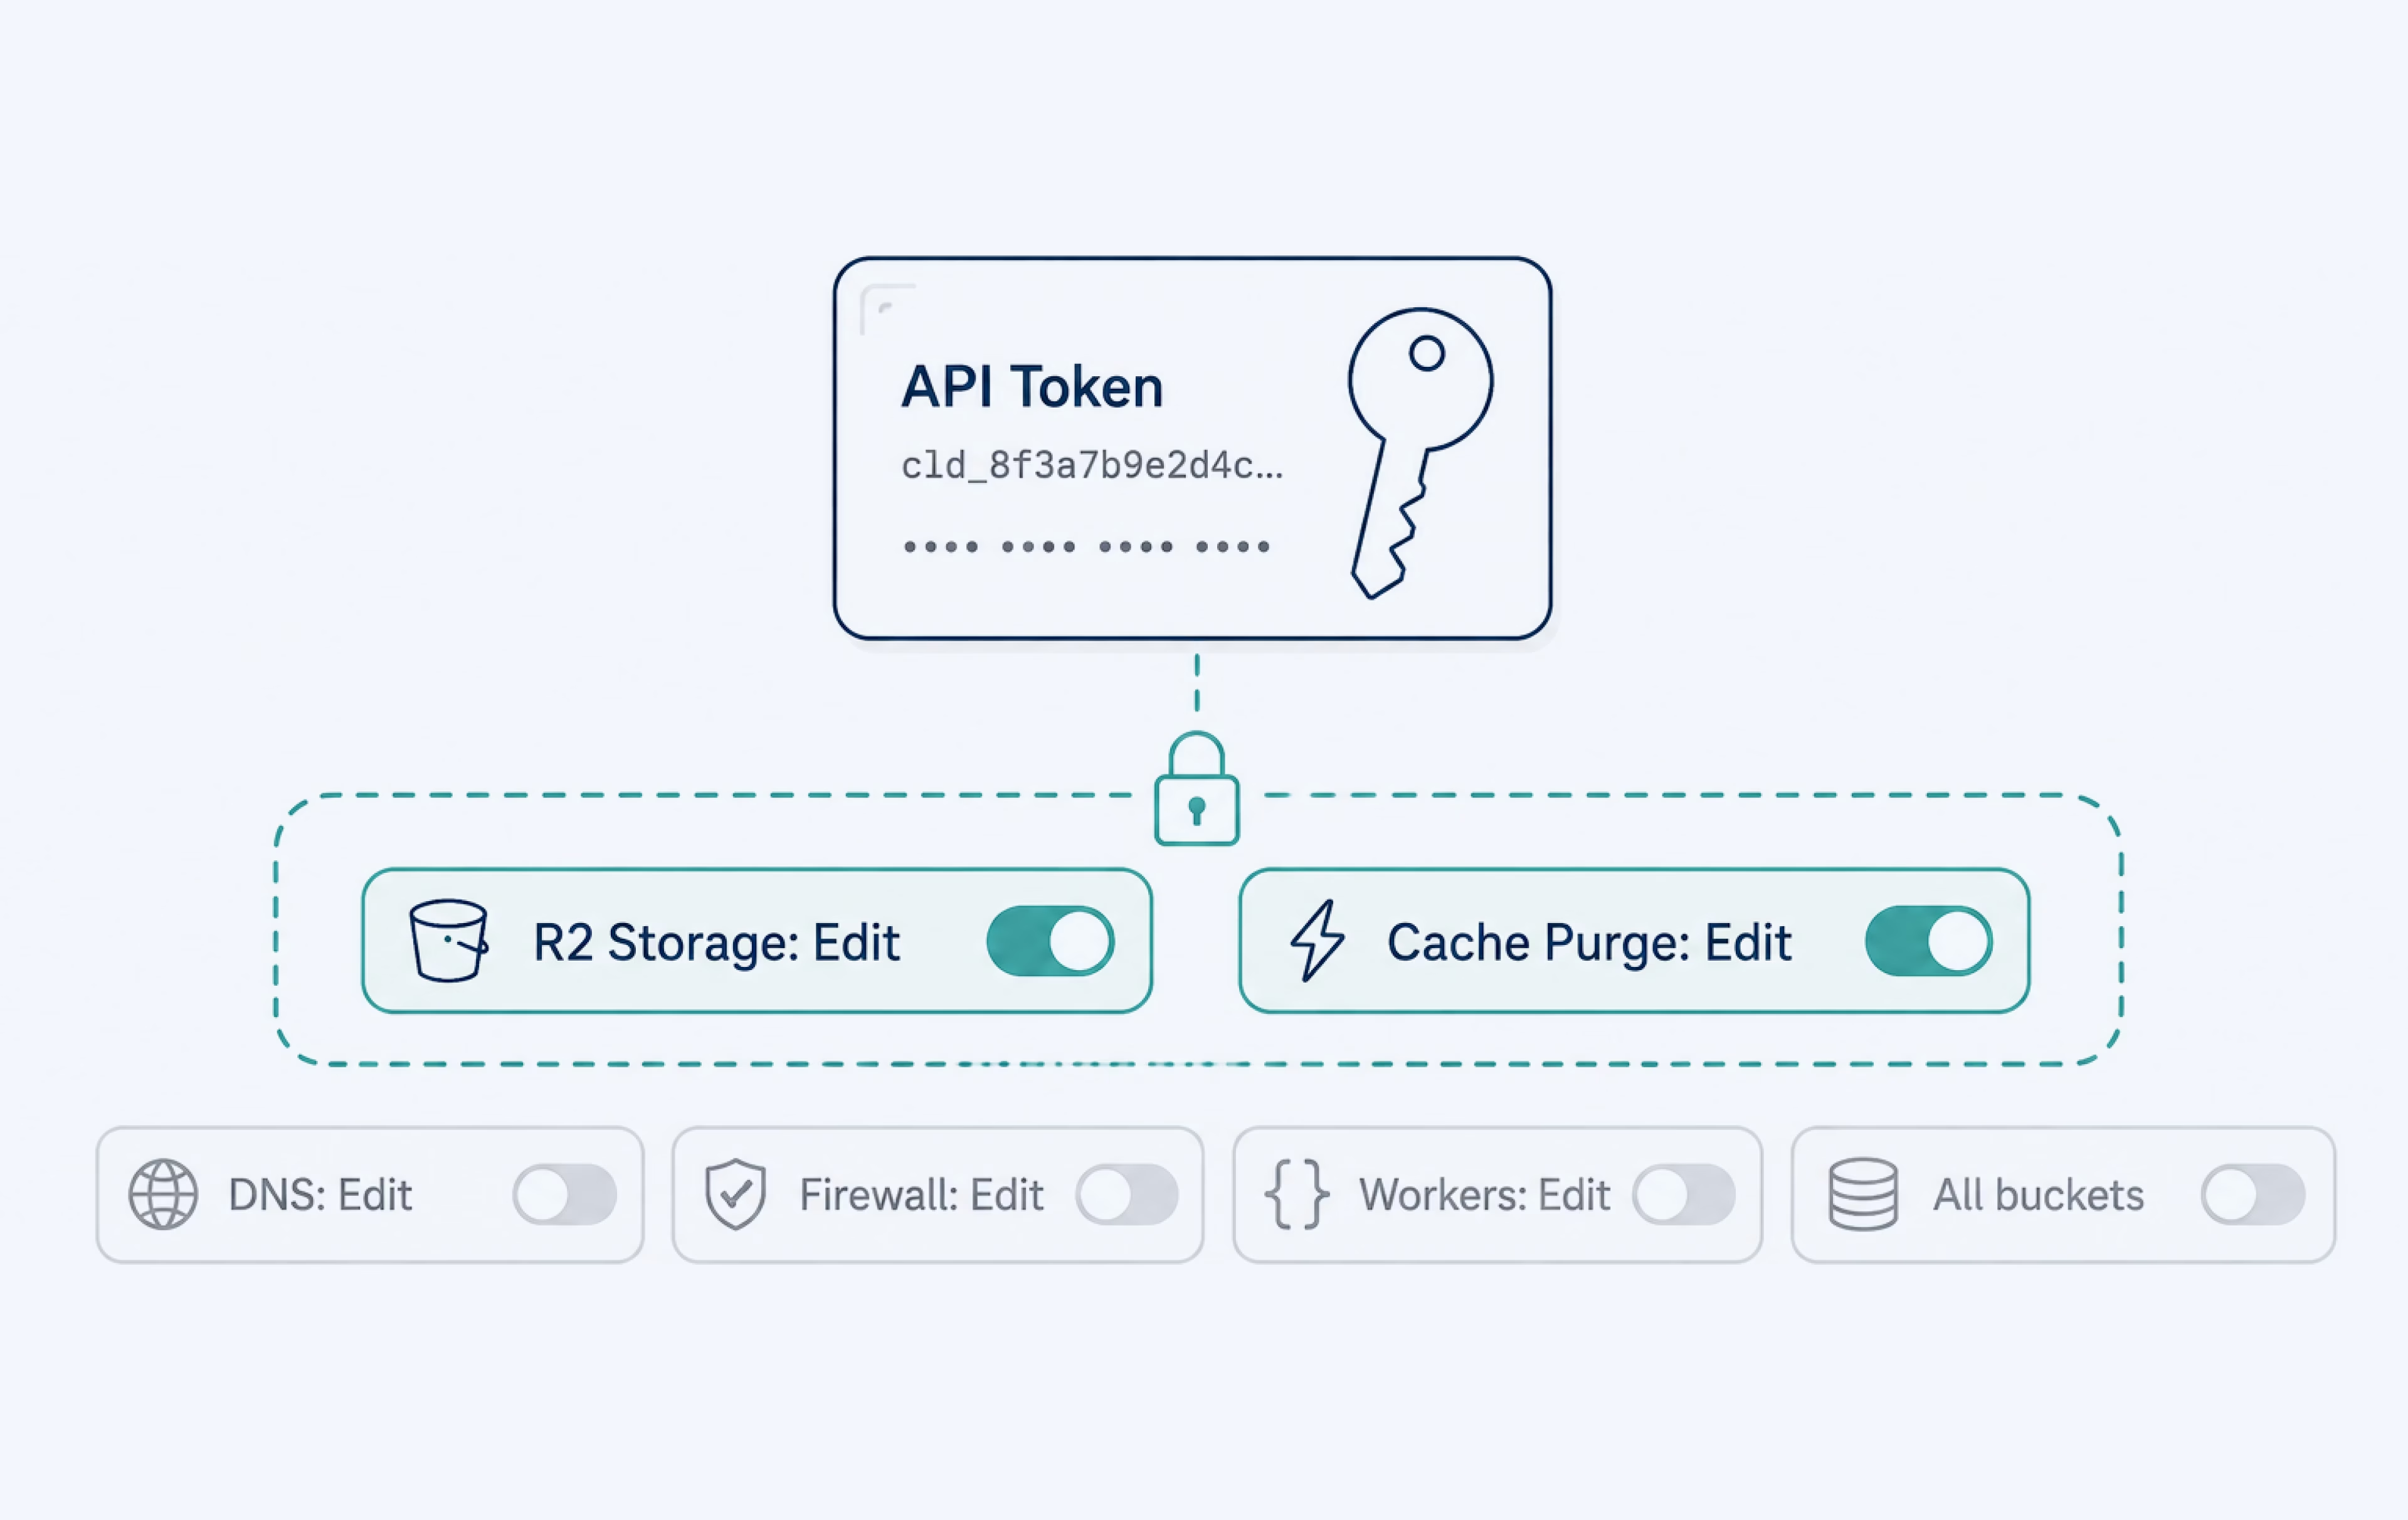
The deploy pipeline needs its own token, created at dash.cloudflare.com → My Profile → API Tokens → Create Token, and scoped as tightly as the job allows. The required permission is a single one — Account → Cloudflare R2 Storage → Edit, restricted to the specific bucket rather than all of them. If the workflow also purges cache explicitly, add Zone → Cache Purge → Edit, scoped to the one zone. Nothing beyond that belongs on a CI/CD token.
Do not use a Global API Key in CI/CD. The deploy credential should reach only the R2 bucket and, if used, cache purge for the target zone.
With the token created, the repository’s secrets need to swap sides — old AWS credentials out, Cloudflare ones in, under Settings → Secrets and Variables → Actions. Once the migration is verified, four secrets have nothing left to do:
| Secret | Reason |
|---|---|
| AWS_ROLE_ARN | No longer assuming IAM roles |
| AWS_REGION | Not needed for Cloudflare |
| S3_BUCKET_NAME | Replaced by R2 bucket in wrangler command |
| CLOUDFRONT_DISTRIBUTION_ID | No CloudFront to invalidate |
AWS secrets the Cloudflare pipeline no longer needs
In their place go the three that the Cloudflare workflow relies on:
| Secret | Value | Notes |
|---|---|---|
| CLOUDFLARE_API_TOKEN | <token from 5.3> | R2 write + cache purge |
| CLOUDFLARE_ACCOUNT_ID | <from dashboard> | Account identifier |
| CLOUDFLARE_ZONE_ID | <CLOUDFLARE_ZONE_ID> | Only if using cache purge |
Cloudflare secrets the new workflow relies on
This is where the two stacks finally part ways. Up to now they’ve run in parallel — S3 and CloudFront serving every live request, R2 holding the data and the Terraform config but with no domain attached to it. The DNS cutover is the single move that shifts users onto Cloudflare.
The existing cloudflare_record.site_routing uses a default (auto) TTL. Auto means 300 seconds for proxied records, but this record is proxied = false since it points at CloudFront, so its TTL governs how long resolvers cache the CNAME. Lower it to 60 seconds a full 48 hours ahead of the cutover:
# In terraform/modules/dns/main.tf -- temporary TTL reduction.
# Do this 48 hours before cutover to allow the old TTL to expire
# from all resolver caches worldwide.
resource "cloudflare_record" "site_routing" {
  zone_id = var.cloudflare_zone_id
  name    = var.domain_name
  type    = "CNAME"
  content = var.cloudfront_domain_name
  proxied = false
  ttl     = 60  # <-- Changed from default. 60 seconds = fast rollback capability.
}
terraform apply
# Confirm: cloudflare_record.site_routing will be updated in-place (ttl: auto → 60)
The 48-hour lead time exists to outlast the old TTL. If that TTL was 86400 — 24 hours — any resolver that cached the record just before the change holds the old value for up to a full day.
Waiting two days guarantees even the worst-case resolver has expired and re-fetched at the new 60-second TTL, and only then is a rollback genuinely a 60-second operation. Skip this step with the old TTL still at 86400 and a failed cutover strands users on the wrong stack for up to 24 hours, with no way to force external resolvers to flush their cache.
At cutover time, all CI/CD deploys to AWS stop. From this point on the S3 bucket takes no new objects — R2 is the authoritative destination, and anything written to S3 afterward would simply be lost in the switch. Two practical ways to enforce the freeze:
The cutover itself runs on the cloudflare_r2_bucket_domain resource held back in Phase 2 — the one that creates the DNS record and switches on the Cloudflare proxy for R2 in a single move. It goes in three steps.
First, remove the old DNS module, since the existing cloudflare_record.site_routing CNAME to CloudFront conflicts with the record the new resource creates for itself:
# terraform/environments/prod/main.tf
#
# REMOVE or comment out the old DNS module:
# module "dns" {
#   source                 = "../../modules/dns"
#   cloudflare_zone_id     = var.cloudflare_zone_id
#   domain_name            = var.domain_name
#   cloudfront_domain_name = module.cdn.cloudfront_domain_name
# }
Remove the old DNS record from Terraform state.
# This tells Terraform to stop managing the resource without deleting it from Cloudflare.
# We do this instead of letting Terraform destroy it, because destroying and recreating
# the DNS record would cause a brief gap in resolution.
terraform state rm module.dns.cloudflare_record.site_routing
Then add the domain binding — either through the storage_r2 module, passing it domain_name and zone_id, or directly:
# terraform/environments/prod/main.tf
#
# Add the R2 custom domain -- THIS IS THE CUTOVER.
# Applying this resource:
# 1. Replaces the old CNAME with a new record pointing to R2
# 2. Enables Cloudflare proxy (CDN + TLS + DDoS)
# 3. Immediately starts serving traffic from R2

resource "cloudflare_r2_bucket_domain" "site" {
  account_id = var.cloudflare_account_id
  bucket     = module.storage_r2.bucket_name  # Output from the storage-r2 module
  domain     = var.domain_name
  zone_id    = var.cloudflare_zone_id
  enabled    = true
}
Finally, apply — and because the TTL came down 48 hours ago, the new record propagates worldwide within about 60 seconds:
terraform plan
# Expected:
# - cloudflare_r2_bucket_domain.site will be created
# - No other changes (old DNS record was already removed from state)

terraform apply
The moment the apply completes, five quick checks confirm traffic is actually coming from Cloudflare rather than still routing through CloudFront:
# Check 1: HTTP headers.
# Cloudflare-served responses include "server: cloudflare" and "cf-ray:" headers.
# CloudFront-served responses have "x-amz-cf-*" headers and "server: AmazonS3" or "server: CloudFront".
curl -I https://<YOUR_DOMAIN>

# Expected output (Cloudflare):
# HTTP/2 200
# server: cloudflare
# cf-ray: 8a1b2c3d4e5f6-IAD
# cf-cache-status: HIT (or MISS on first request)
# content-type: text/html; charset=utf-8
# strict-transport-security: max-age=31536000; includeSubDomains; preload
# x-frame-options: DENY
# x-content-type-options: nosniff

# BAD (still on CloudFront):
# server: CloudFront
# x-amz-cf-id: ...
# x-amz-cf-pop: IAD79-C1

# Check 2: Spot-check an asset.
curl -I https://<YOUR_DOMAIN>/gallery/photo-001.jpg
# Verify: content-type: image/jpeg (not application/octet-stream)
# Verify: cf-cache-status: HIT (or MISS → HIT on second request)

# Check 3: Root path serves index.html.
# R2 custom domains serve index.html for the root path automatically --
# no default_root_object setting needed (unlike CloudFront which requires it).
# Verify this works:
curl -s -o /dev/null -w "%{http_code}" https://<YOUR_DOMAIN>/
# Should return: 200

# Check 4: Custom 404 page.
# Hit a path that does not match any R2 object.
# If the error-pages Worker is deployed, this should return your custom 404.html.
# If you see a generic Cloudflare error page instead, the Worker route is misconfigured.
curl -s -o /dev/null -w "%{http_code}" https://<YOUR_DOMAIN>/this-page-does-not-exist
# Should return: 404
curl -s https://<YOUR_DOMAIN>/this-page-does-not-exist | head -5
# Should contain your custom 404 page content, NOT a Cloudflare 1000-series error

# Check 5: DNS resolution.
# Verify the CNAME no longer points to CloudFront.
dig <YOUR_DOMAIN> CNAME +short
# Should NOT return <CLOUDFRONT_DOMAIN_NAME>

nslookup <YOUR_DOMAIN>
# Should resolve to Cloudflare IP addresses (104.x.x.x or 172.x.x.x ranges)
With the checks passing, keep an eye on the crossover for the next hour or two, where the two stacks trade places:
The shift is clearest in Cloudflare’s own analytics, where the traffic arrives as a visible step up.
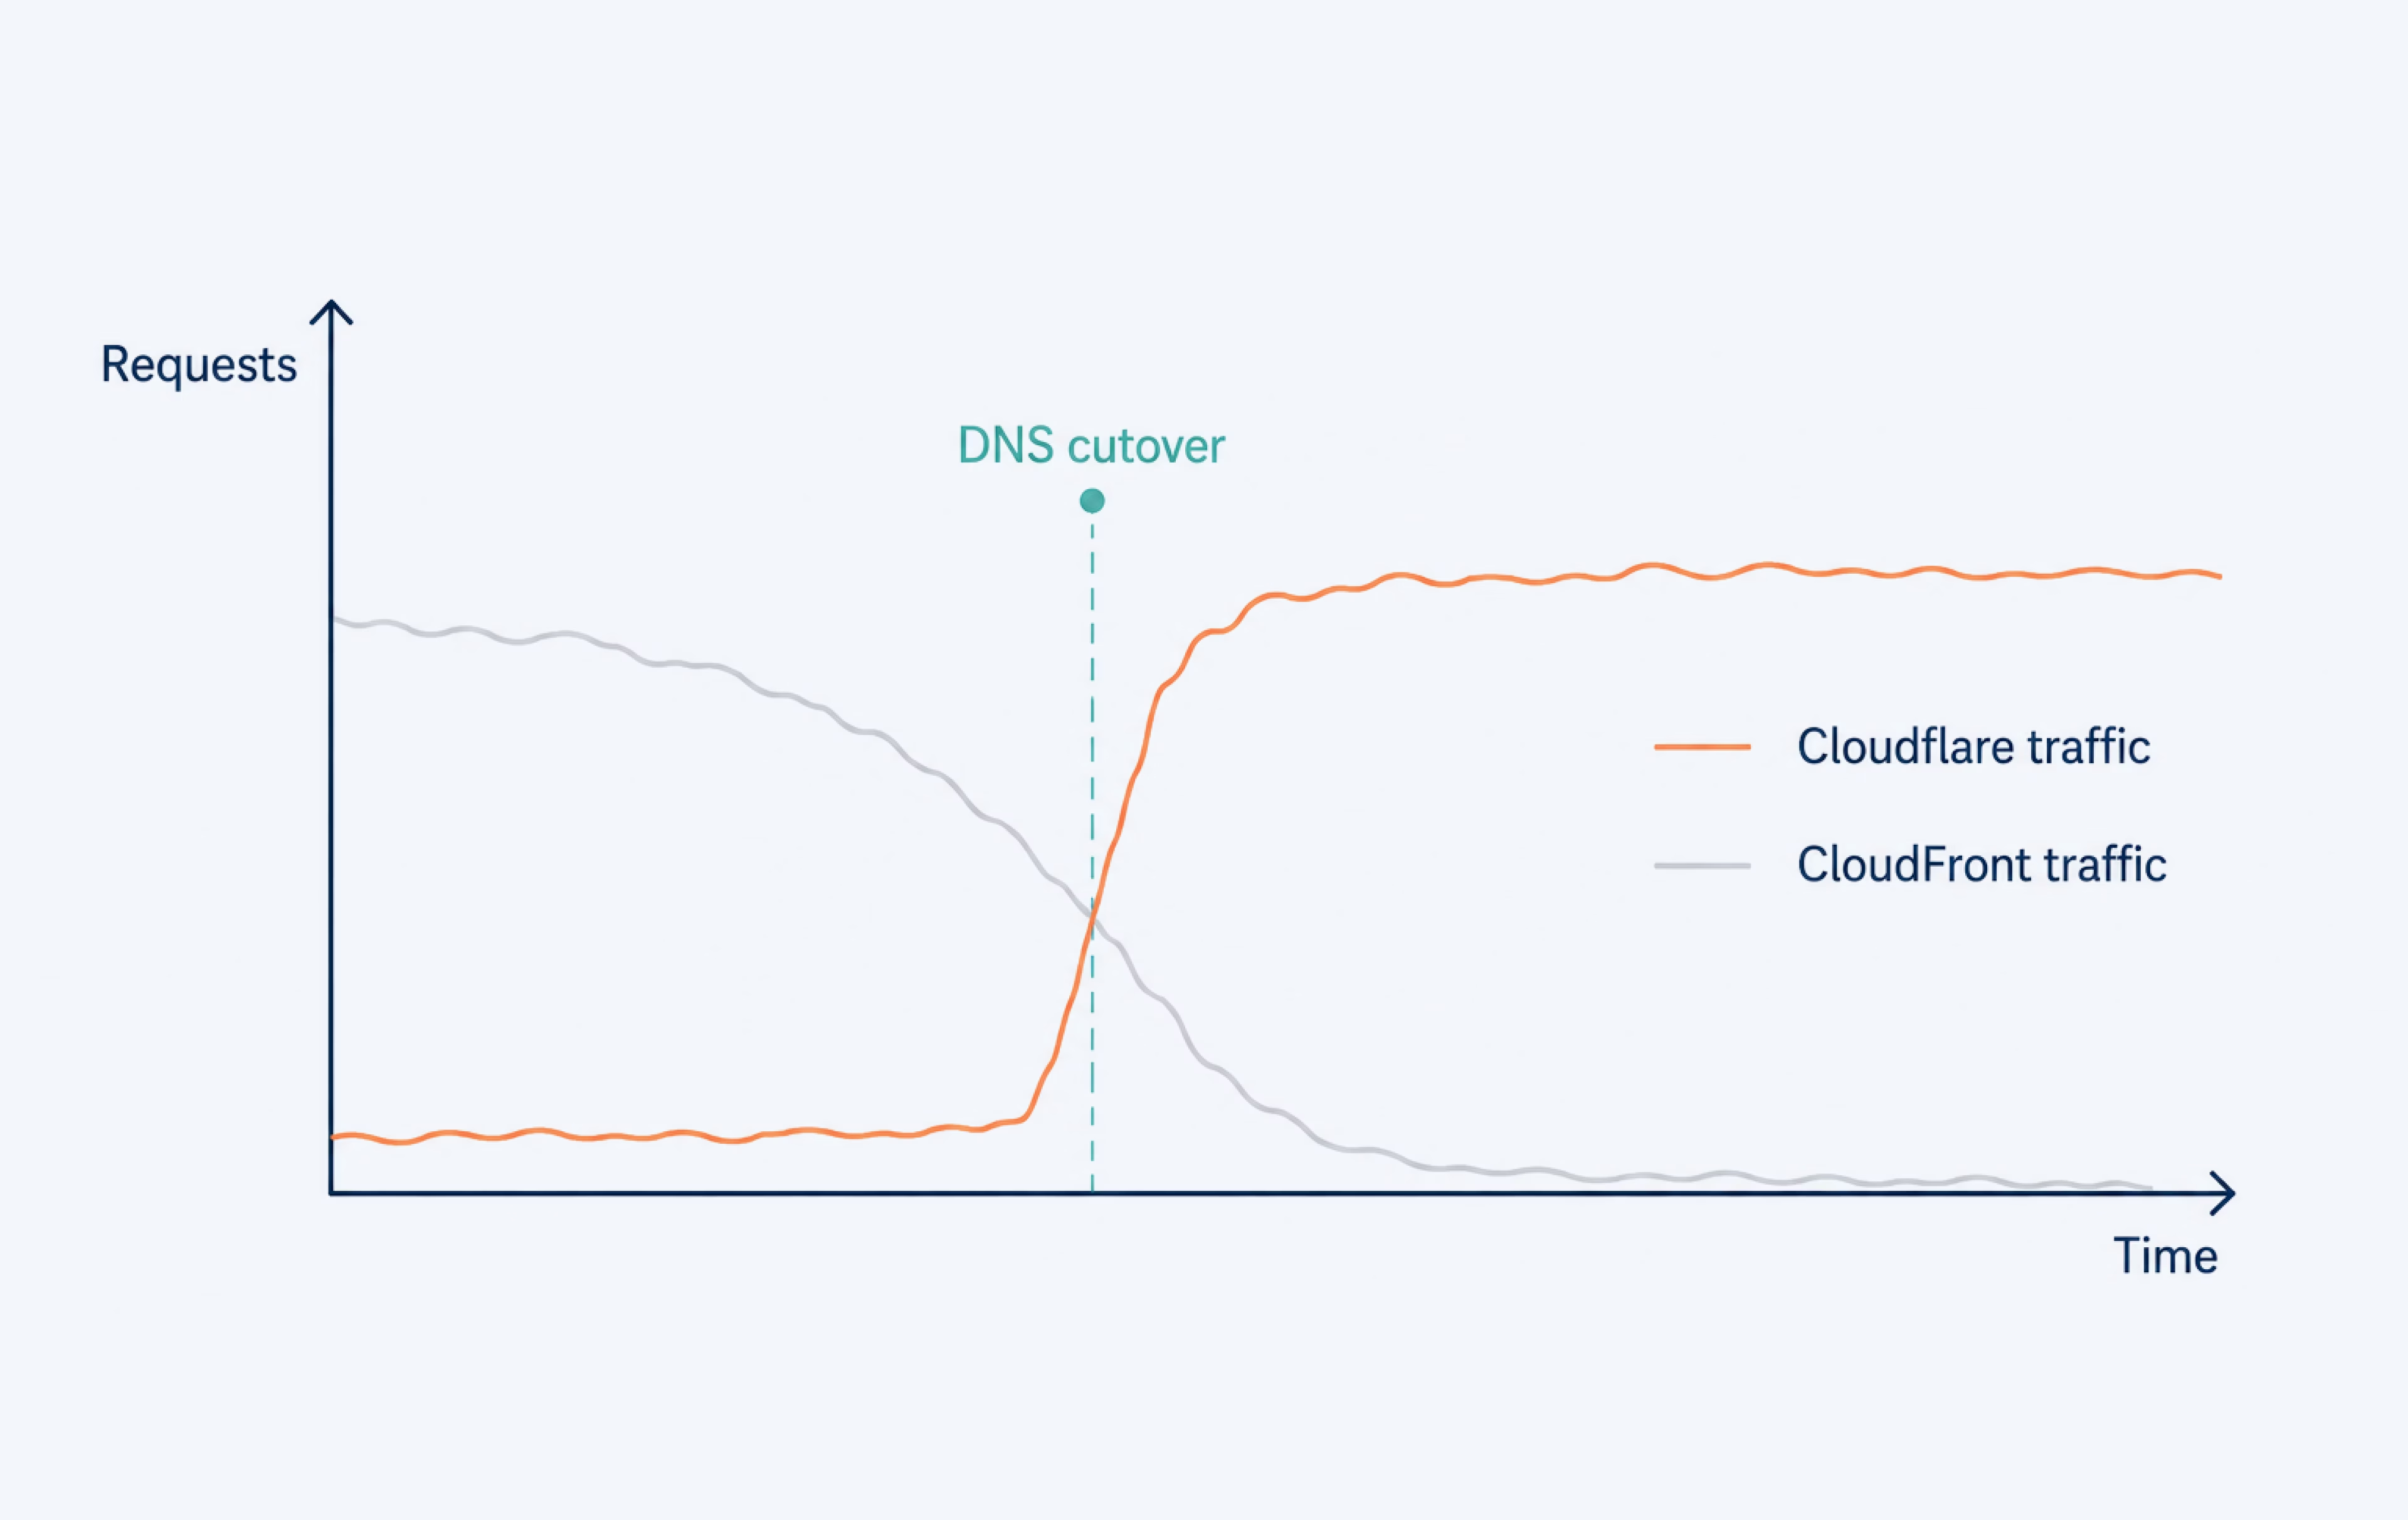
If anything comes out wrong — the wrong content, missing assets, broken routing — the way back is the same lever, pointed the other direction. Flip the DNS record to CloudFront:
# Revert to CloudFront in Terraform (or do it in the Cloudflare dashboard for speed):
resource "cloudflare_record" "site_routing" {
  zone_id = var.cloudflare_zone_id
  name    = var.domain_name
  type    = "CNAME"
  content = "<CLOUDFRONT_DOMAIN_NAME>"
  proxied = false
  ttl     = 60
}
terraform apply
# Traffic returns to CloudFront within 60 seconds (TTL was lowered to 60s before the cutover)
Because the AWS stack never came down — S3 still holds the data, CloudFront is still enabled, and the distribution was only taken out of the traffic path rather than deleted — the flip back costs a single line. That is why the old setup stays live all the way through to Phase 5: it remains a working fallback right up until the moment it’s dismantled.
Cleanup removes the AWS fallback, so start only when all four conditions below are true:
Terraform refuses to delete a bucket that still holds objects unless force_destroy is set, so the flag goes on before the teardown runs:
# terraform/modules/storage/main.tf -- add force_destroy before teardown.
#
# force_destroy = true tells Terraform to empty the bucket automatically
# before deleting it. Without this, `terraform destroy` fails with
# "BucketNotEmpty: The bucket you tried to delete is not empty."
#
# WARNING: This deletes ALL objects in the bucket. Only set this when you are
# certain the data has been migrated and verified in R2.
resource "aws_s3_bucket" "site" {
  bucket        = var.bucket_name
  force_destroy = true  # <-- Added for teardown
}

terraform apply
# Confirms: aws_s3_bucket.site will be updated in-place (force_destroy: false → true)
Do not run a bare terraform destroy: the state now contains both stacks. Remove the old AWS modules from main.tf and use terraform apply so only resources no longer declared are removed.
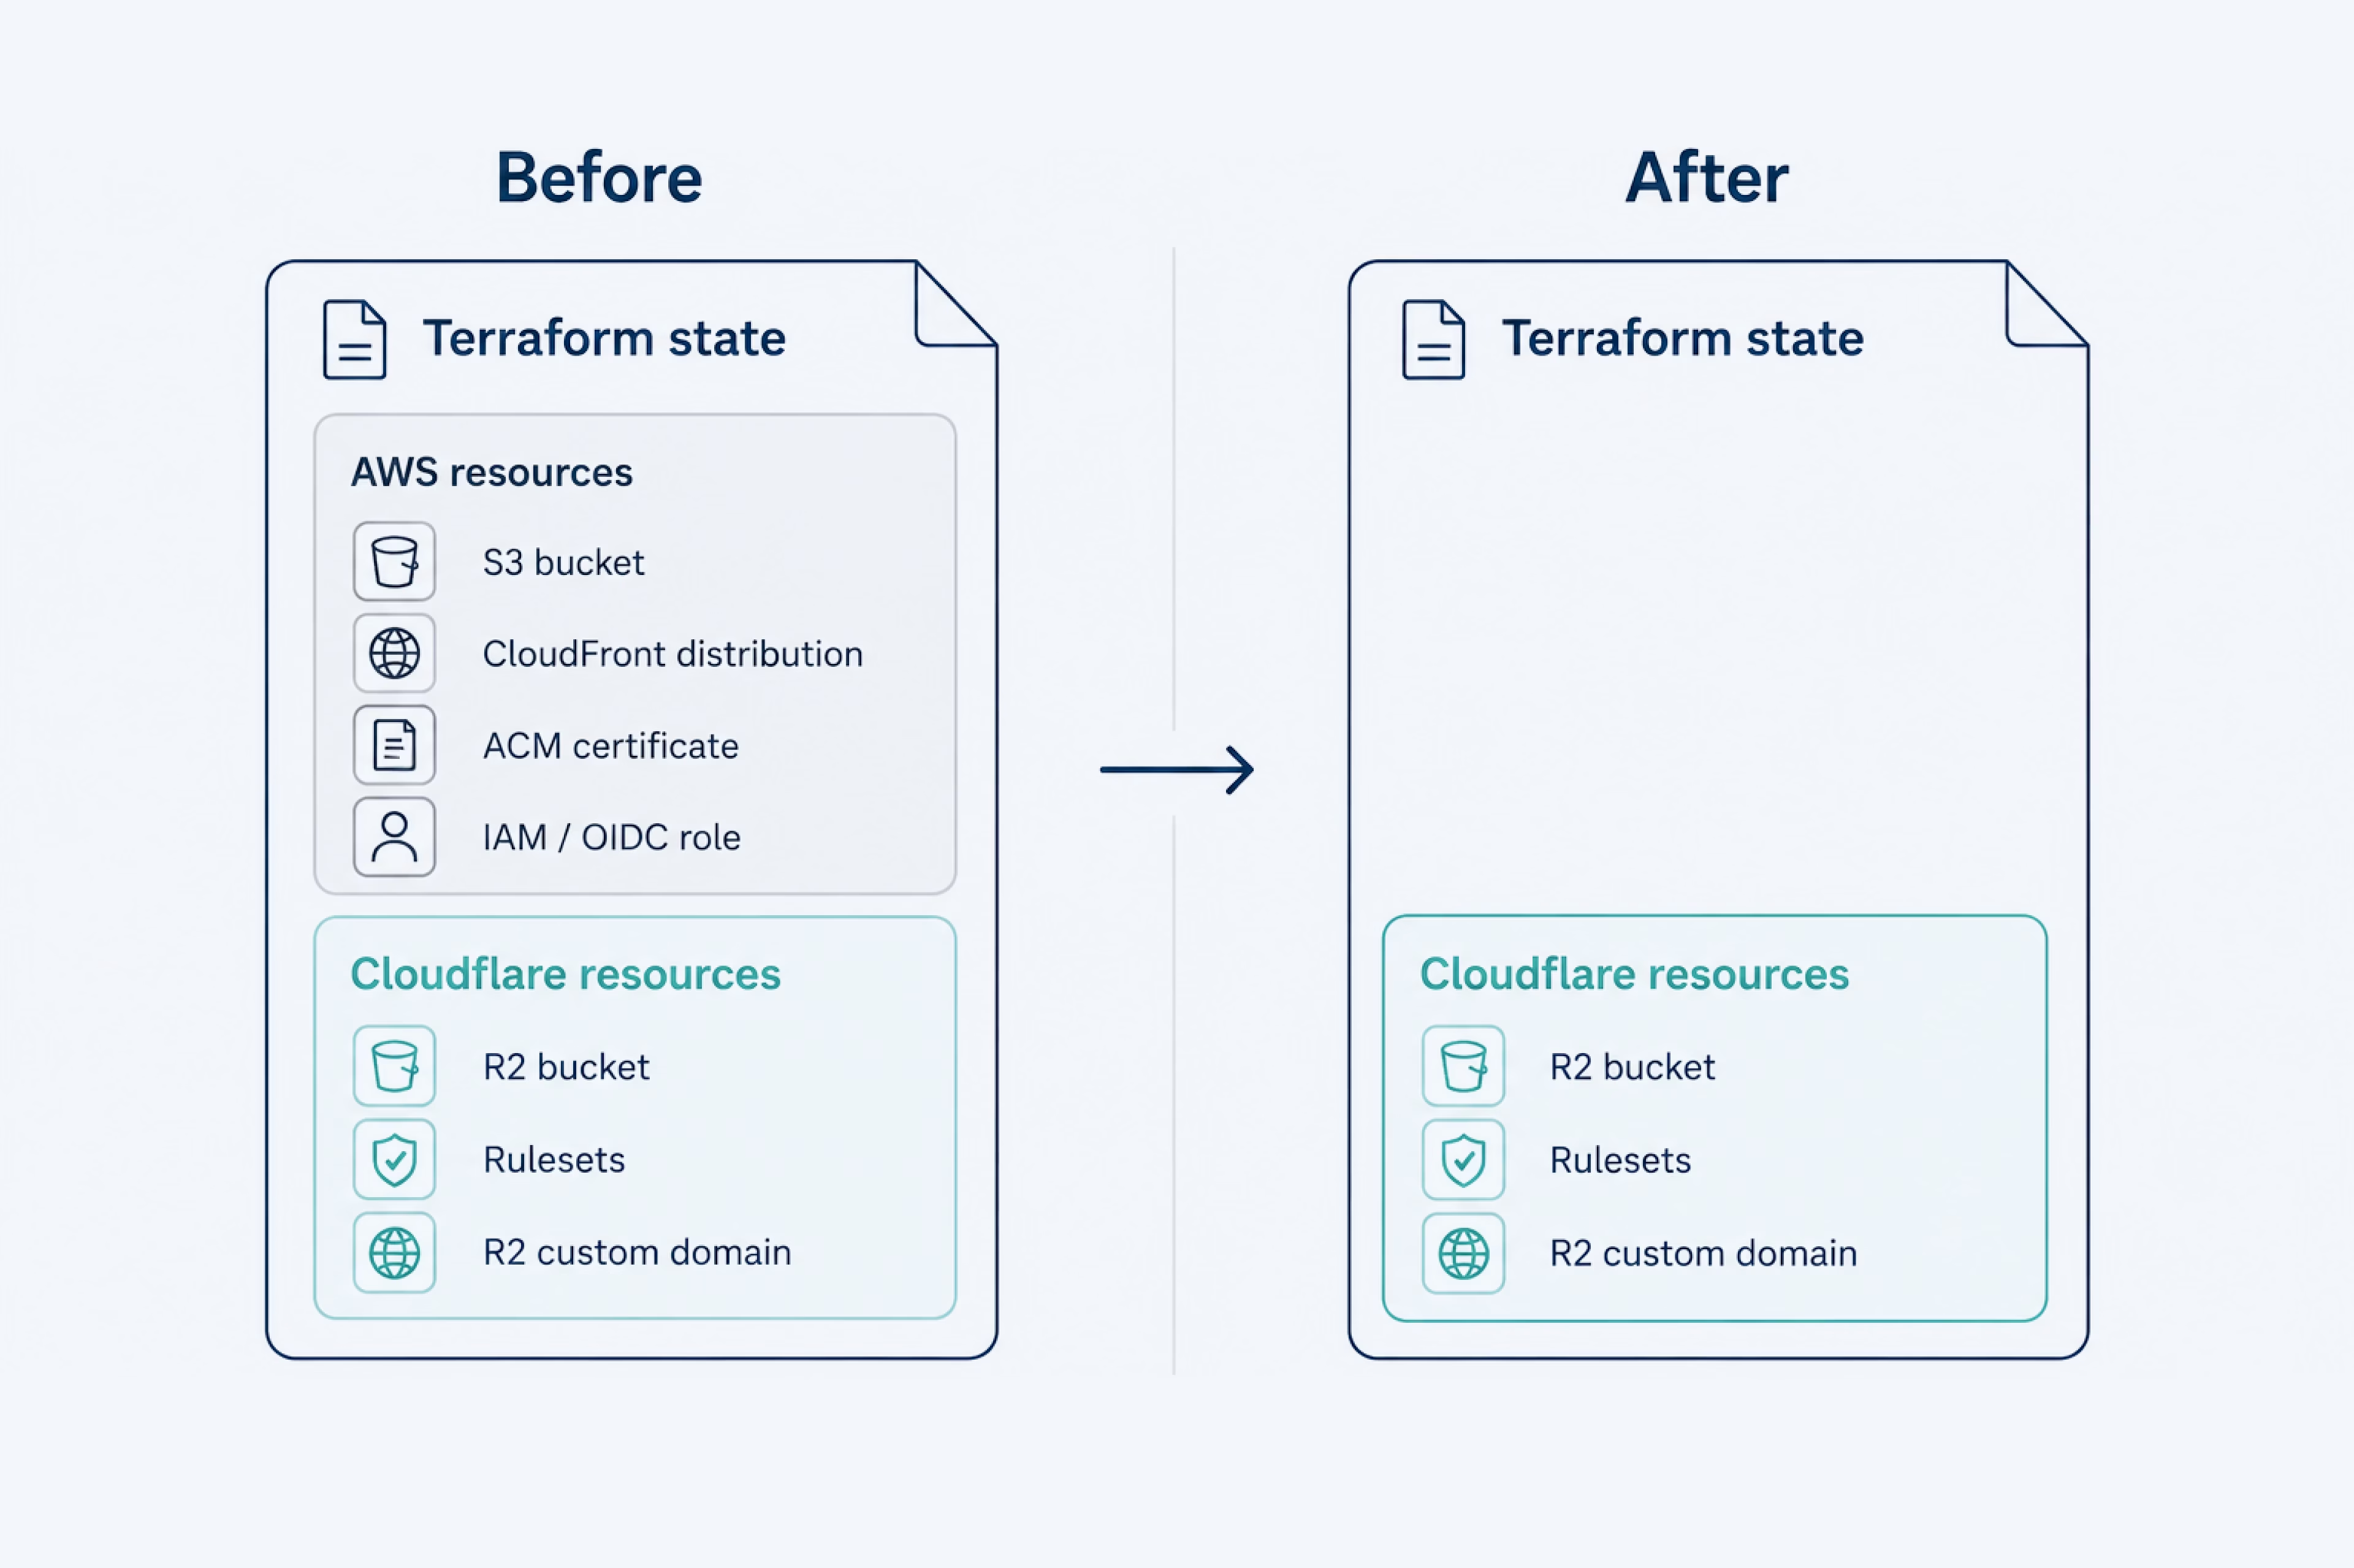
Start by editing main.tf and removing the AWS module calls, leaving the Cloudflare blocks in place:
# terraform/environments/prod/main.tf
#
# BEFORE: main.tf has both old AWS modules and new Cloudflare modules.
# AFTER: Only the Cloudflare modules remain.
#
# Remove these module blocks (or comment them out):
# module "storage"     → aws_s3_bucket, public_access_block, versioning, lifecycle
# module "certificate" → aws_acm_certificate, validation records
# module "cdn"         → aws_cloudfront_distribution, OAC, cache policy, headers policy
# module "dns"         → cloudflare_record (the old CNAME to CloudFront -- already replaced by R2 domain)
# module "ci"          → aws_iam_role, OIDC provider, IAM policies
#
# Keep these module blocks:
# module "storage_r2"  → cloudflare_r2_bucket
# module "cdn_r2"      → cloudflare_ruleset (cache + security headers + error pages worker)
# cloudflare_r2_bucket_domain.site → the custom domain binding (added in Phase 4)
Then plan and read the output closely — this is the checkpoint that catches a mistake before it becomes destructive:
terraform plan
# Expected output:
# Plan: 0 to add, 0 to change, N to destroy.
#
# N should be the count of old AWS resources. Terraform sees that the modules
# no longer exist in the config, so it plans to destroy their resources.
#
# Review EVERY resource in the destroy list:
# - module.storage.aws_s3_bucket.site → YES, destroy
# - module.cdn.aws_cloudfront_distribution.site → YES, destroy
# - module.certificate.aws_acm_certificate.site → YES, destroy
# - module.ci.aws_iam_role.github_actions → YES, destroy
# - etc.
#
# If you see ANY cloudflare_* resources in the destroy list, STOP.
# That means you accidentally removed a Cloudflare module block.
Once the destroy list contains only AWS resources, apply it:
terraform apply
# Type "yes" to confirm.
# This will take 15-20 minutes primarily because CloudFront distribution
# deletion requires AWS to disable the distribution at all edge locations first.
Terraform handles the dependency order; CloudFront deletion is the slowest step and can take 15–20 minutes.
Check the GitHub OIDC provider before removal. If other repositories use it, leave it in AWS and remove it from this Terraform state:
# Remove OIDC provider from Terraform state so it is not destroyed.
# The resource continues to exist in AWS, just no longer managed by this Terraform config.
terraform state rm module.ci.aws_iam_openid_connect_provider.github
Also preserve any S3/DynamoDB remote state backend. If it appears in this state, remove it from management before teardown:
terraform state list | grep terraform-state
# If the state bucket or locks table appear here, terraform state rm them first.
With the destroy complete, one pass confirms nothing survived that shouldn’t have — the bucket, the distribution, the role, and the certificate should each come back empty or missing:
# S3 bucket should not exist.
aws s3 ls s3://<YOUR_BUCKET_NAME>
# Expected: An error occurred (NoSuchBucket)

# CloudFront distribution should not exist.
aws cloudfront list-distributions --query 'DistributionList.Items[?Id==`<CLOUDFRONT_DISTRIBUTION_ID>`]'
# Expected: empty array []

# IAM role should not exist (unless you preserved the OIDC provider).
aws iam get-role --role-name <IAM_ROLE_NAME>
# Expected: An error occurred (NoSuchEntity)

# ACM certificate should not exist.
aws acm list-certificates --query 'CertificateSummaryList[?DomainName==`<YOUR_DOMAIN>`]'
# Expected: empty array []
The last AWS traces live in the repository itself. Start with the secrets, under Settings → Secrets and Variables → Actions, deleting the four the old pipeline relied on:
Then clear out the workflow files that referenced them, leaving only the Cloudflare deploy in place:
The final AWS invoice should contain only storage through the deletion date, migration egress, and CloudFront usage through the cutover. In the following billing cycle, S3 and CloudFront should fall to $0.
The case for this migration was never really about a $4.50 monthly bill. It’s about what that bill does under load — climbing without limit exactly when a site is having its best day. Moving to R2 breaks that link: storage is the only thing metered, egress is free at any volume, and the delivery, TLS, and DNS that AWS bills separately fold into the platform at no charge.
What makes it safe to attempt is that nothing is one-way until the final step. R2 speaks the S3 API, so the same tooling keeps working against it — and keeps working in reverse if a site ever needs to move again. That’s the rare infrastructure change that lowers cost without trading away flexibility.
{{banner}}