[fs-toc-omit]Part 1. Introduction and creating all required for migration resources.
[fs-toc-omit]Introduction
Hi to everyone! This article will be helpful if you have little or no knowledge of cloud technologies.
There are three main cloud providers: Google Cloud, AWS and Azure. Let’s imagine that your task is to move the application to Azure.
Before continuing, note that the best way to familiarize with basic Azure cloud features, to gain a foundational knowledge of cloud services, and the way those services are provided with Microsoft Azure is to learn and pass Exam AZ-900: Microsoft Azure Fundamentals. The exam is for candidates who are just beginning to work with cloud-based solutions and services or are new to Azure. Azure Fundamentals can be used to prepare for other Azure role-based or specialty certifications, but it is not a prerequisite for any of them. All Microsoft Azure learning has two options: online, which is always free, and instructor-led, which is paid. Passing the exam and getting the certification is always paid. The price depends on the country. One more tip: learn it before migration because learning during the process is a bad idea. There is much to say about passing Microsoft exams, but I suggest we move on to the next step and explore the project structure.
Project structure and reasons for migration to Azure
So, let’s do a deep dive into the project structure before moving on.
Front-end: NEXT.js app, hosted on Vercel. Back end: Strapi CMS + custom node scripts, hosted on Heroku DB: Mongo db hosted on Mongo Atlas
The common problems with current providers include:
- No simple ways to spread application to multiply regions and elastically scale the capacity based on demand.
- No static inbound and outbound IP addresses (only via proxy), which I needed to secure back-end and DB connections.
- No obvious ways to give separate accesses to resources, based on roles.
First steps to start to work with Azure, regardless wich computing services you choose to host applications
Firstly go to Microsoft Azure Portal and create the account. After you complete the registration, you will have a single tenant ID associated with your account, which will not change unless you ask Microsoft to delete your account. Tenant is associated with a single identity (person, company, or organization) and can own one or several subscriptions. At this step you will only have one subscription. An Azure subscription is a logical container used to provision resources in Azure. It holds the details of all your resources like virtual machines (VMs), databases, and more. When you create an Azure resource like a VM, you identify the subscription it belongs to. A subscription is linked to a payment setup and each subscription will result in a separate bill and can use different payment methods. Resources from one subscription are isolated from resources in other subscriptions.
During the registration in Azure you may choose to get 200$ dollars on balance of the default subscription that you can spend on Azure services. It is a very useful option for beginners in cloud technologies to test different options.
Now you are signed in, have a tenant and one subscription inside it. The next step is to decide which Azure services to use for your apps hosting.
Choose the appropriate Azure services
Azure offers three main cloud computing platform services: SaaS (Software as a Service), IaaS (Infrastructure as a Service), PaaS (Platform as a Service). The main differences and maintaining levels are displayed on the diagram below:
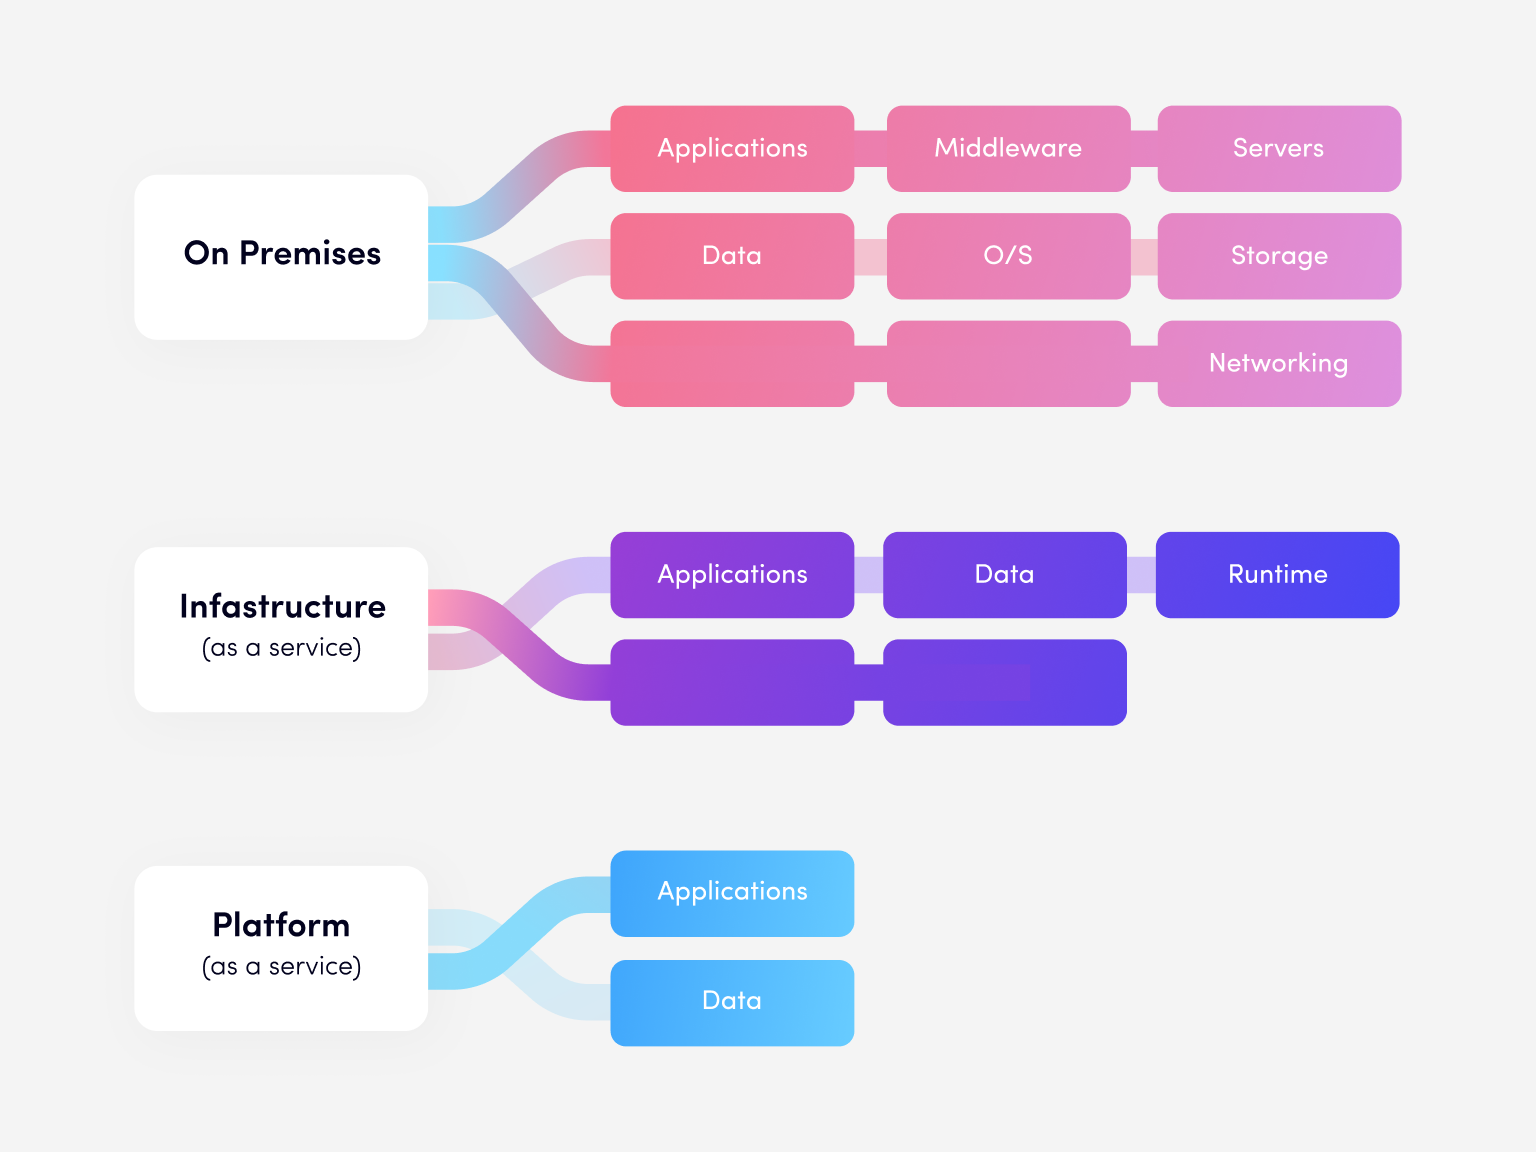
If you don’t want to be responsible for the operating system, data, runtime and middleware, but still need to manage and configure the application, the PaaS cloud computing service is a good choice.
So, PaaS — it is where Azure provider hosts the hardware and software on its own infrastructure and delivers this platform to the user as an integrated solution, solution stack, or service through an internet connection, while the developer is allowed to develop, run, and manage his own apps without having to build and maintain the infrastructure or platform usually associated with the process.
When we have decided which cloud computing service to use, let's proceed to the next step.
Creating required resources
The next step is to create the App Service Plan and the Resource Group.
An App Service Plan, in two words, at a very high level is just the container in which your web applications run. It is used to determine the resources available to your application (or applications) and their boundary. Comparing this to an on premises environment, the app service environment is one server or servers on which your application is deployed. The app service plan defines what configuration of hardware your app runs on and how many servers you have. You can deploy multiple web applications inside the same App Service Plan. You do not need a separate web app plan for each web app.
When you create an App Service plan in a certain region (for example, Western Europe), a set of compute resources is created for that plan in that region. Whatever apps you put into this App Service plan run on these compute resources as defined by your App Service plan.
A resource group is a logical container into which Azure resources like web apps, databases, and storage accounts are deployed and managed. The Resource Group can include all the resources for the solution, or only those resources that you want to manage as a group. You decide how to allocate resources to resource groups based on what makes the most sense for your organization. Generally, add resources that share the same lifecycle to the same resource group so you can easily deploy, update, and delete them as a group.
Steps to create App Service Plan with Resource Group simultaneously:
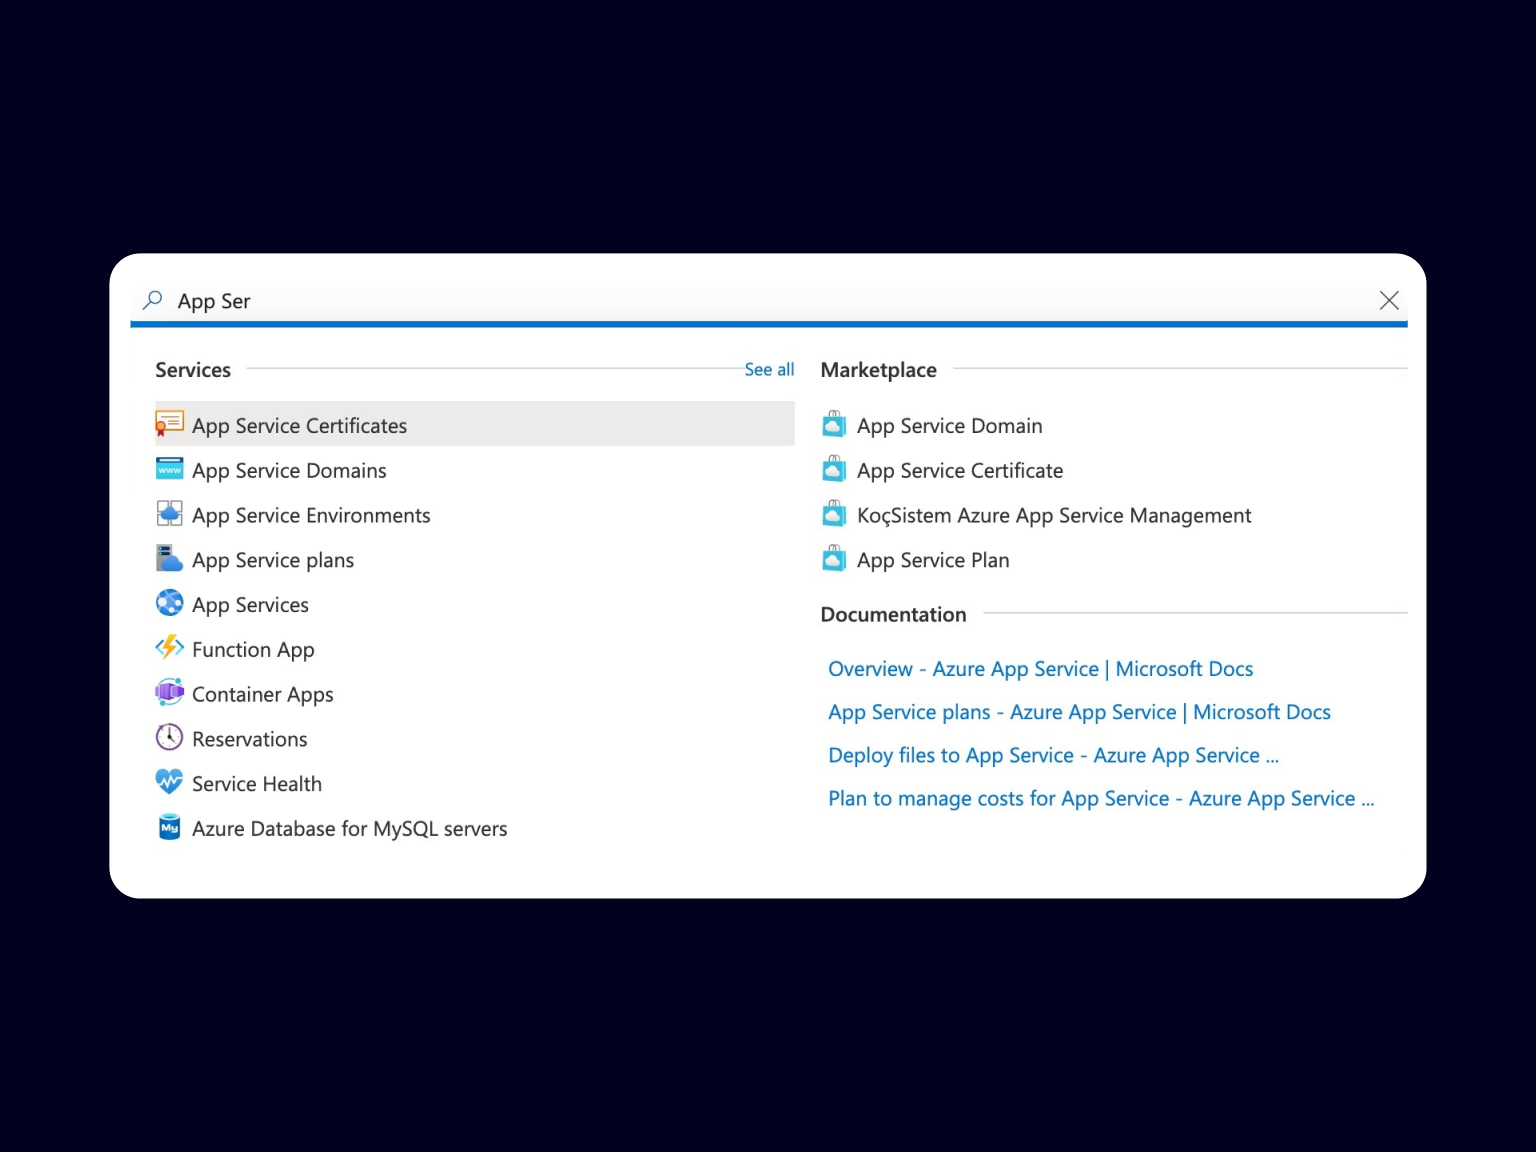
- Type App Service Plan in the search bar, select it from the dropdown and click +Create new.
- Now you need to configure it. As you don’t have the Resource Group yet, press create new, enter its name, and it will be created with the App Service Plan and placed inside it. Some other tips:
- Enter the App Service Plan name that will clearly describe group of resources inside it (for example, name of the project or of the group of projects) select the region (the better option is to choose the closest region to your customers' location because it will affect the latency)
- Select operating system to run your apps, in this case Linux was selected
- Select the pricing tier. You can choose from dev/test or production plans. But in case you want to configure automatic deployment from GitHub, choose the P1V2 or higher pricing tier. The application plans less than P1V2 have a list of limitations. The next features are not available:
- Auto-scale feature. Autoscale is a built-in feature of Cloud Services, Mobile Services, Virtual Machine Scale Sets, and Websites that helps applications perform their best when demand changes.
- Daily backups. Here, probably, nothing to explain.
- Traffic manager improves performance and availability by routing traffic between multiple instances of your app.
- Staging slots. Useful for testing and deployments before swapping them into production.
- If you want to create a high volume of resources in the future, use tags. Azure tags are name-value pairs that are used to organize resources in Azure Portal. You can apply tags for individual resources or tag the resource group that they are part of.

- Press Review and create. It can take up to 10 minutes.
App Service Plan and the Resource Group are ready to place resources inside. That’s why we can proceed to the next steps.
Creating instances for applications
As PaaS was selected, we should search among its services. The appropriate service is App Service. It enables you to build and host web apps, mobile back ends, and RESTful APIs in the programming language of your choice without managing infrastructure. It offers auto-scaling and high availability, supports both Windows and Linux, and enables automated deployments from GitHub, Azure DevOps, or any Git repo.
- To create the App Service find this category in the search bar and press +Create.
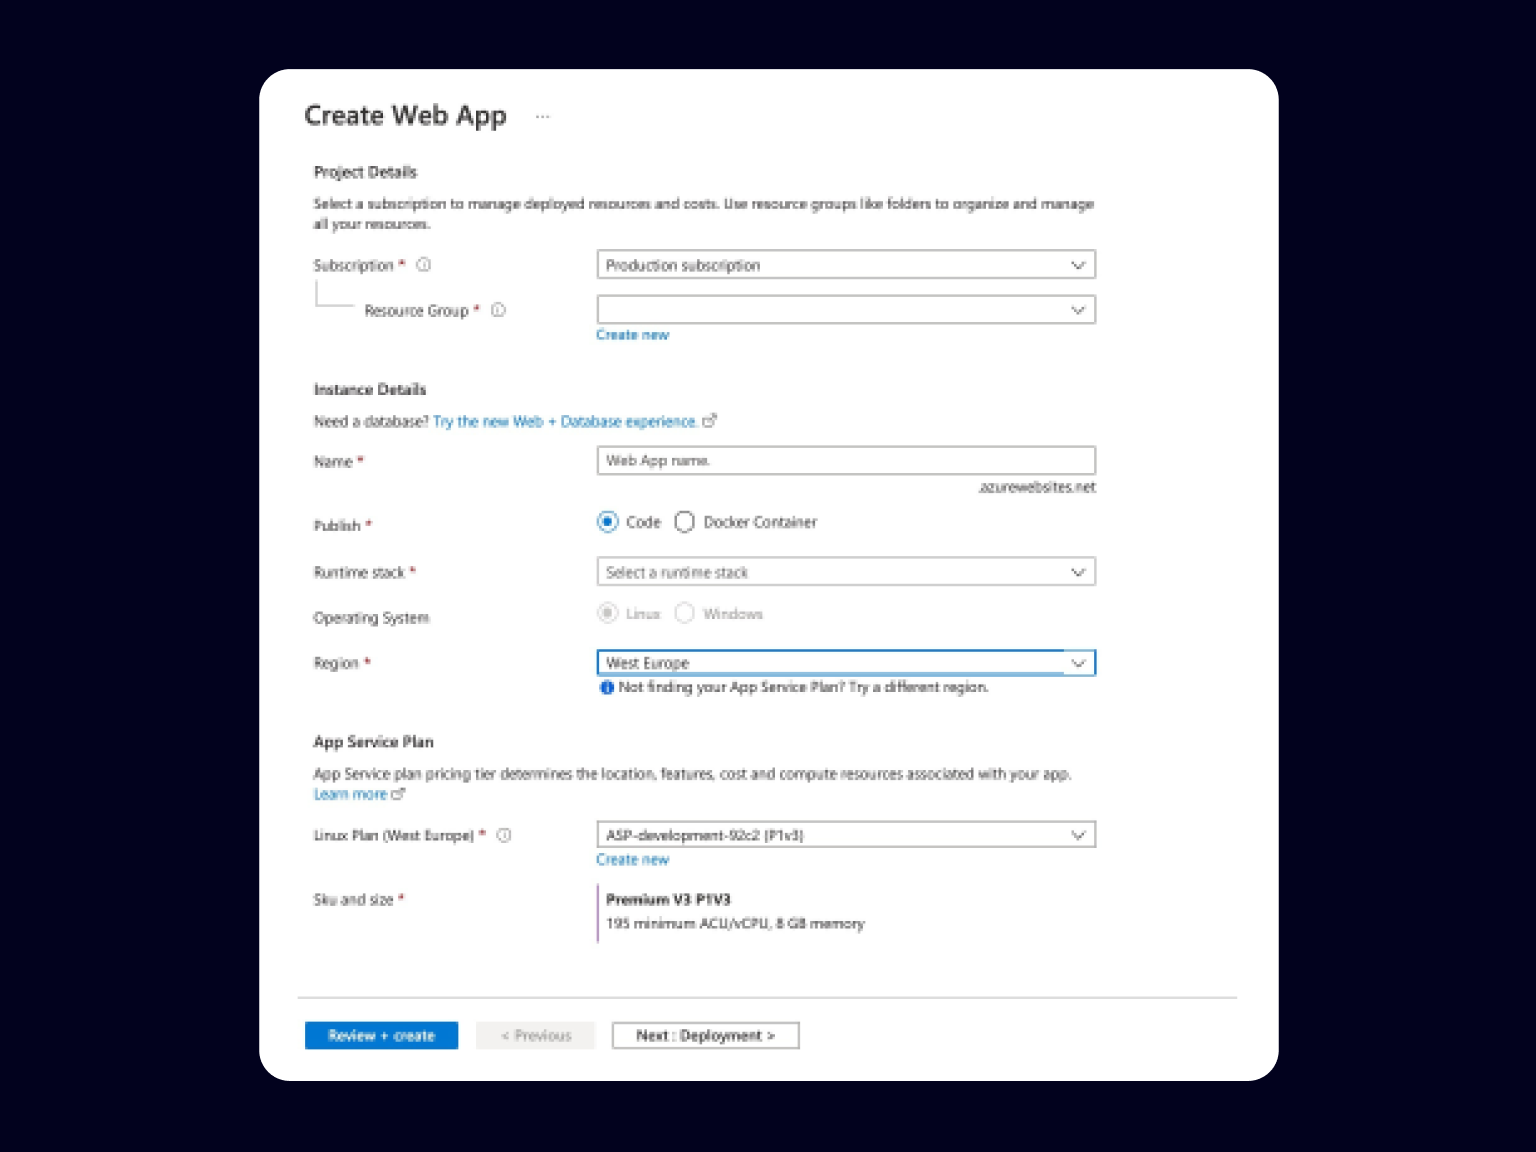
- You will be redirected to this service configuration page. You need to select from the dropdown the subscription on the resource group, where it needs to be located. Put the name of the application (for example my-project-back-end-development).
- In the Publish tab select Code option if you are going to just put the code of your project instead of the ready Docker container. It will make Azure create the Docker container for you itself and run your application inside it.
- Select Node from the dropdown of runtime stack.
- The application region and operating system will be chosen automatically, according to your App Service Plan settings.
- Press next and in the Monitoring section I fully recommend you to switch on Application Insights. It allows you to automatically monitor your application. It will automatically detect performance anomalies and includes powerful analytics tools to diagnose issues and to understand how users actually use your app. It's designed to help you continuously improve performance and usability. It works for apps on various platforms, including .NET, Node.js, Java, and Python hosted on-premises, hybrid, or any public cloud. It integrates with your DevOps process and has connection points to various development tools. All other settings, at this moment, let's keep by default. Click create and review, check if all settings are correct, and confirm. It can take up to 5-10 minutes.
The instance for hosting the back-end is ready, and you can reproduce previous steps to create a separate App Service instance for the front-end application. Once it is ready we go to the next part.
Creating instances for database
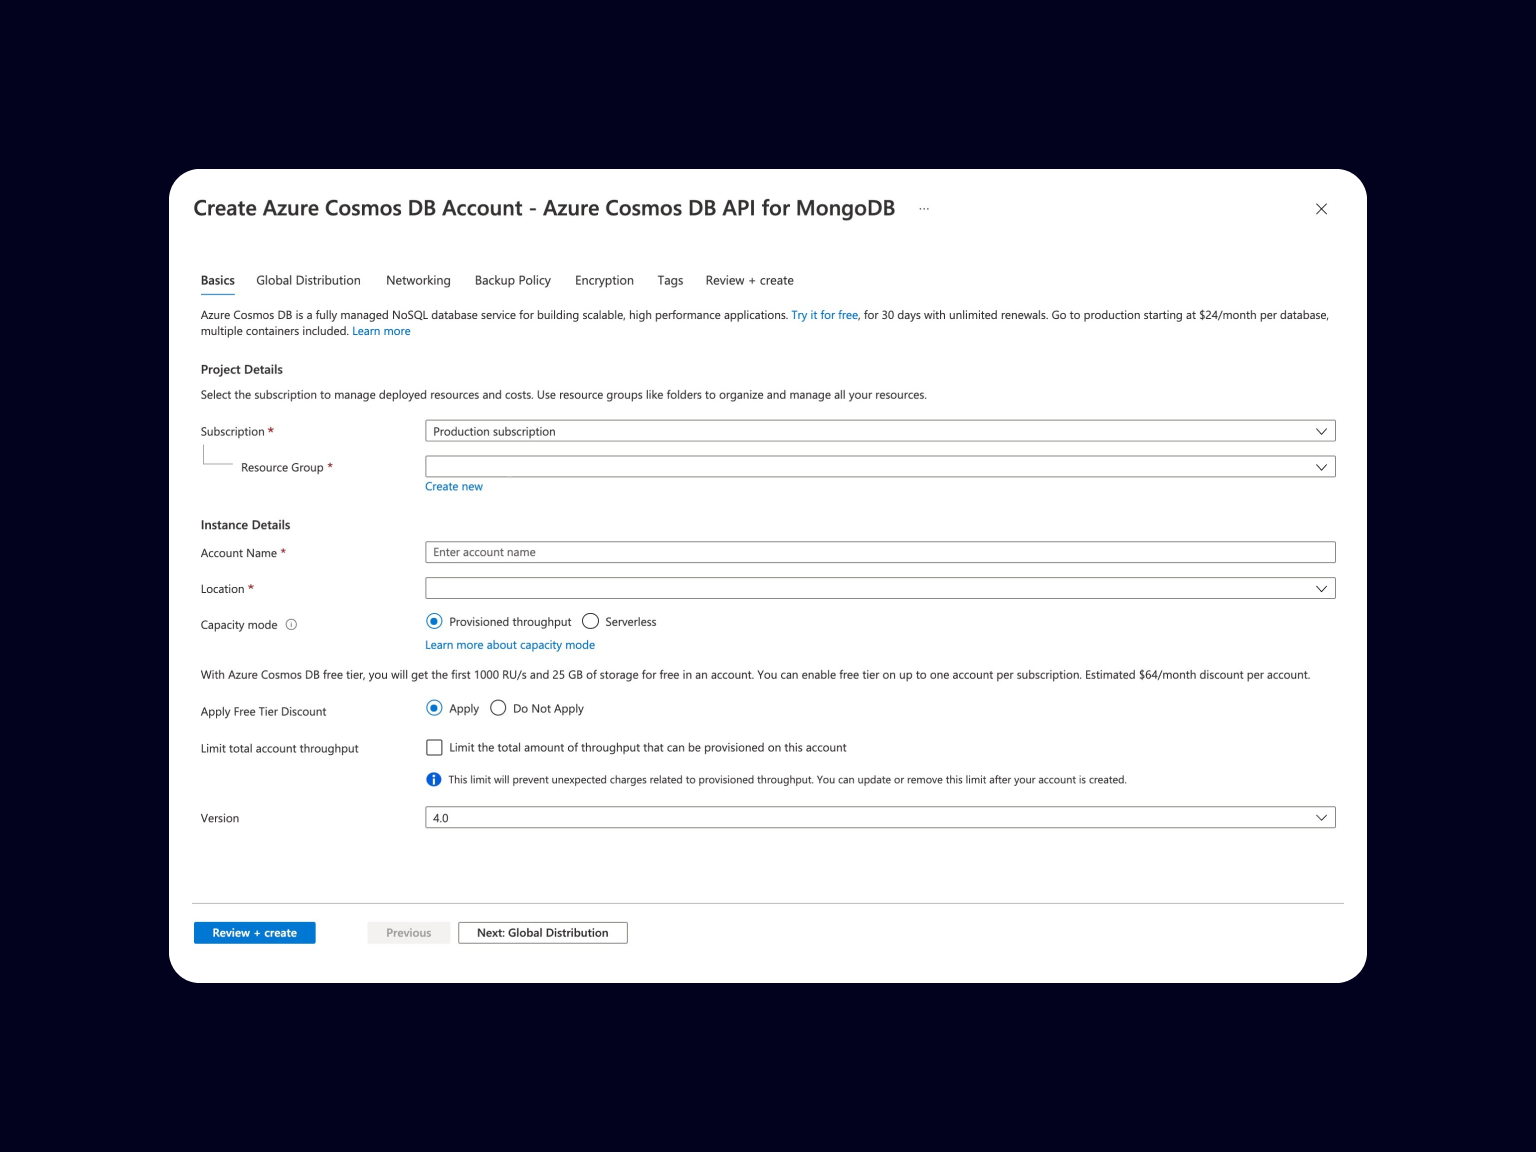
As mentioned, MongoDB is used in the project. Azure has an opportunity to place MongoDB using the Azure Cosmos DB's API for MongoDB. It has some limitations. With the full list of supported operators and limitations or exceptions you can familiarize by the link; To create DB go to Azure Cosmos DB Resource and click on Create Azure Cosmos DB account. On the next screen select Azure Cosmos DB API for MongoDB.
The instance for hosting the database is ready, and you As on previous steps, select subscription and resource group, enter the database name. Select the location closest to the rest of your resources and customers to decrease the requests time. Select the Mongo version.
Choosing the capacity mode of the instance is an important step to save your money. You need to know the differences between these two options. Provisioned has throughput at a constant rate, regardless of whether operations are being performed on our Cosmos DB account. Serverless Mode — we only use throughput when operations are performed on our Cosmos DB resources. Each of these options has pros and cons and if you want to know more, follow the link. But in two words, serverless — pay only when using, provisioned — reserve capacity for the instance and pay for it all the time. I need to highlight that it is cheaper to use the serverless mode for non-highly loaded projects. Press the create button and wait until it is ready.
Summary
Let’s check what we have at the moment. You can find all the created instances in your resource group on Azure Portal. Each of the application instances are already available with the Microsoft example page by the url, which you can find in the app essentials section. Cosmos db account is ready for moving your database into it.
Now all resources are ready to deploy your applications and database. The next part of the article is going to be about the migration processes and how to connect all instances. Make sure you read both parts of the article and then proceed to work because we will talk about database migration in the next steps.